E-mail address
¿Qué es una cuenta de correo electrónico?
El correo electrónico es un servicio que permite a los usuarios enviar y recibir mensajes a través de redes de comunicación electrónica, como Internet. Su funcionamiento se basa en un modelo de almacenamiento y reenvío, lo que significa que no es necesario que el remitente y el destinatario estén conectados al mismo tiempo. En este proceso, el servidor de correo juega un papel clave, ya que almacena temporalmente los mensajes antes de entregarlos a sus destinatarios.
¿Cómo funciona el correo electrónico?
Actualmente, el envío y recepción de correos electrónicos se realiza siguiendo una serie de pasos:
-
El usuario redacta el mensaje utilizando un gestor de correo electrónico. Al enviarlo, el programa se comunica con el servidor SMTP (Simple Mail Transfer Protocol) del remitente, que almacena el mensaje mientras está pendiente de ser enviado.
-
El servidor SMTP emisor determina a qué servidor debe enviar el mensaje. Para ello, consulta el servidor de destino, verificando el registro MX del dominio del correo del destinatario.
-
Una vez identificado el servidor de destino, el servidor SMTP emite el mensaje mediante el protocolo SMTP. El servidor receptor almacena el correo hasta que el destinatario lo lea o lo elimine.
Alias de correo
Un alias de correo es una dirección de correo electrónico que redirige todos los mensajes que recibe hacia otra(s) cuenta(s). Puede tener uno o varios destinatarios. A diferencia de una cuenta normal, un alias no ocupa espacio de almacenamiento, ya que no guarda los mensajes, sino que los reenvía directamente a la cuenta de destino.
Listas de correo electrónico
Una lista de correo electrónico es una herramienta que permite enviar un mensaje a múltiples usuarios de forma simultánea.
Cuando se envía un correo a la dirección de la lista, este se distribuye automáticamente a todas las cuentas de correo electrónico inscritas en ella. Estas listas también se conocen como listas de distribución.
Es importante no confundirlas con las listas blancas o listas negras, que se utilizan para permitir o bloquear, respectivamente, la recepción de ciertos correos electrónicos.
Correo electrónico en SW Hosting
En SW Hosting ofrecemos servicios de correo electrónico diseñados para garantizar la máxima seguridad y fiabilidad en todas tus comunicaciones. Nuestro servicio está siempre disponible y accesible desde cualquier lugar, ya sea a través de Webmail o mediante tu gestor de correo preferido.
Crear Cuenta de correo con SWPanel
Paso 1: Accede al Dashboard del servicio para el cual deseas crear una cuenta de correo. Para ello, pulsa Árbol de servicios activos (menú izquierdo) y haz clic sobre el servicio correspondiente (por ejemplo, el hosting swmanuales.euw).
También puedes localizar el servicio en el buscador general del SWPanel, si prefieres una búsqueda más rápida.

info_capture ℹ️ Nota: La captura es orientativa, tomada sobre la versión 2026.000.0001 con fecha 15/02/2026. Puede diferir de la versión actual de SWPanel.
Paso 2: Una vez seleccionado el servicio, sitúate en el menú azul de la izquierda y selecciona: Gestiones sobre el servicio → Gestión de correo.

info_capture ℹ️ Nota: La captura es orientativa, tomada sobre la versión 2026.000.0001 con fecha 15/02/2026. Puede diferir de la versión actual de SWPanel.
Paso 3: En el menú de Gestión de correo de tu servicio, haz clic en el botón azul "Crear Cuenta", ubicado en la parte superior derecha de la pestaña.

info_capture ℹ️ Nota: La captura es orientativa, tomada sobre la versión 2026.000.0001 con fecha 15/02/2026. Puede diferir de la versión actual de SWPanel.
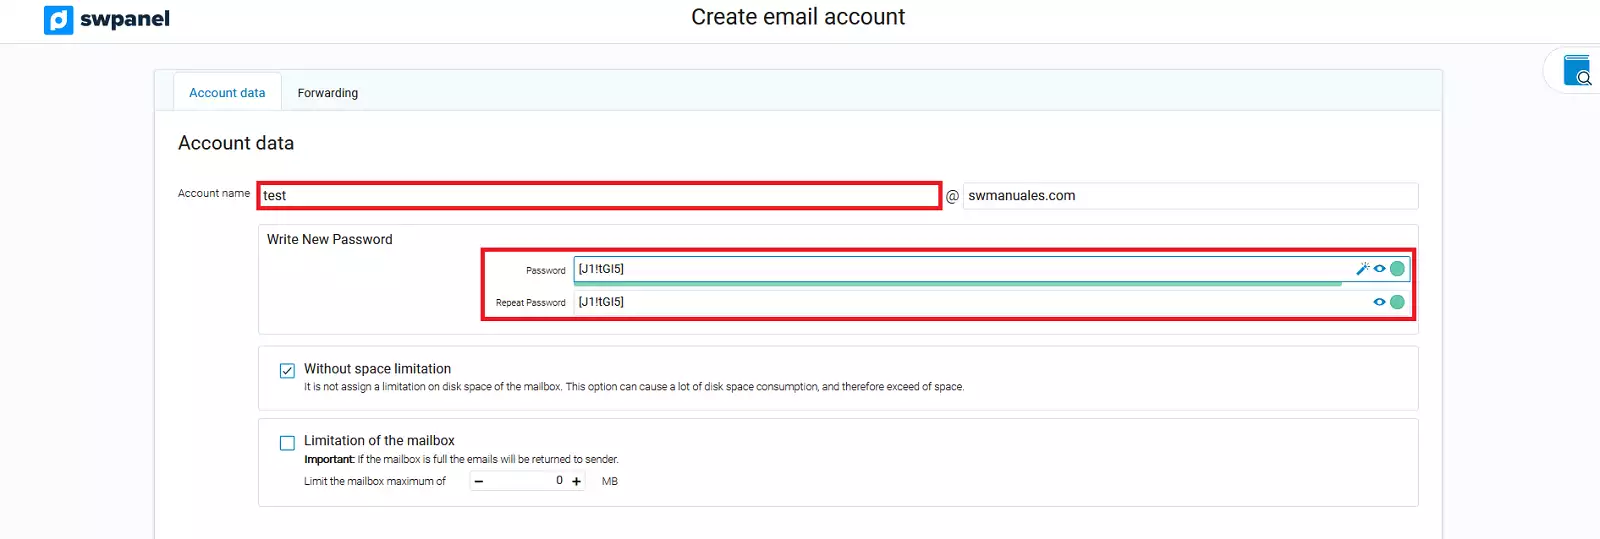
Paso 4: Completa los datos de la nueva cuenta de correo:
- Nombre de la cuenta y contraseña que usarás para acceder a ella.
- Opciones adicionales:
- Limitar el tamaño máximo del buzón de correo.
- Redirigir todos los mensajes a otra cuenta de correo.
- Configurar una respuesta automática para los correos recibidos.
info_capture ℹ️ Nota: La captura es orientativa, tomada sobre la versión 2026.000.0001 con fecha 15/02/2026. Puede diferir de la versión actual de SWPanel.
Presta atención a la seguridad de la contraseña. En SW Hosting nos tomamos muy en serio la protección de tus datos, por lo que es obligatorio establecer una contraseña considerada segura. En el campo de contraseña encontrarás indicaciones con los requisitos mínimos necesarios para garantizar la seguridad de tu cuenta.
Para finalizar la creación de la cuenta de correo, haz clic en el botón "Crear Cuenta". Esto confirmará todos los datos ingresados y activará la nueva cuenta en el sistema.
Gestión de la cuenta de correo con SWPanel
En esta sección podrás gestionar y administrar tus cuentas de correo electrónico, así como realizar otras configuraciones importantes:
- Añadir alias de correo.
- Crear listas de distribución.
- Configurar listas blancas o negras para filtrar buzones o dominios.
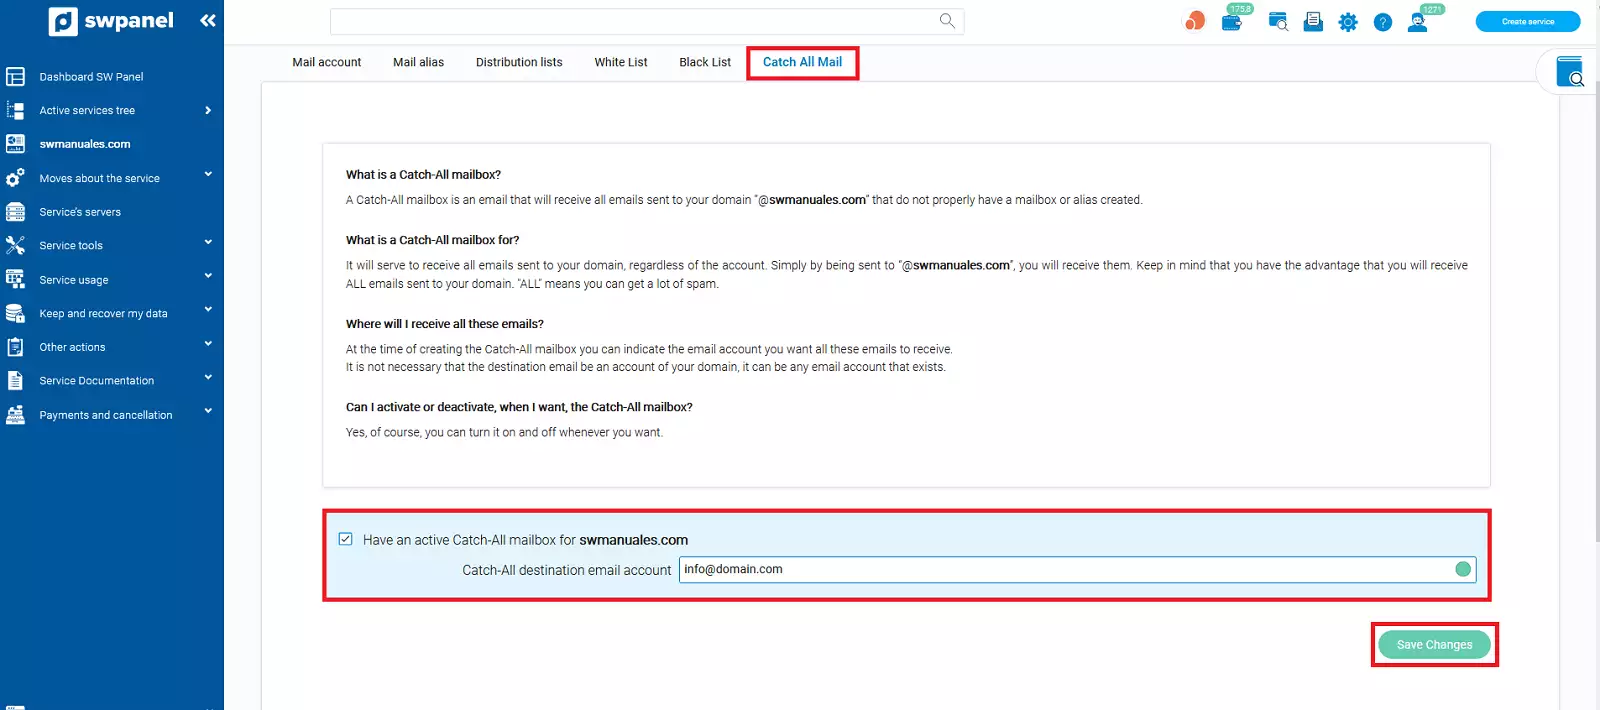
- Activar un buzón Catch-All, en caso de que sea necesario.
Crear Alias de correo con SWPanel
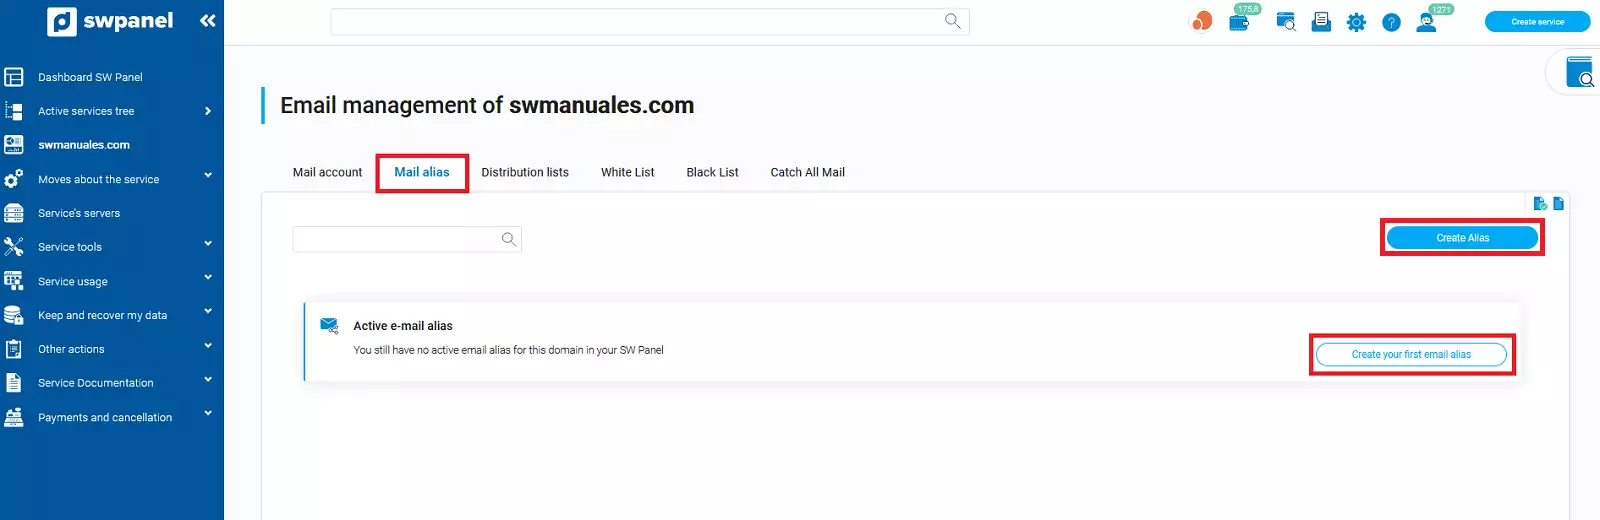
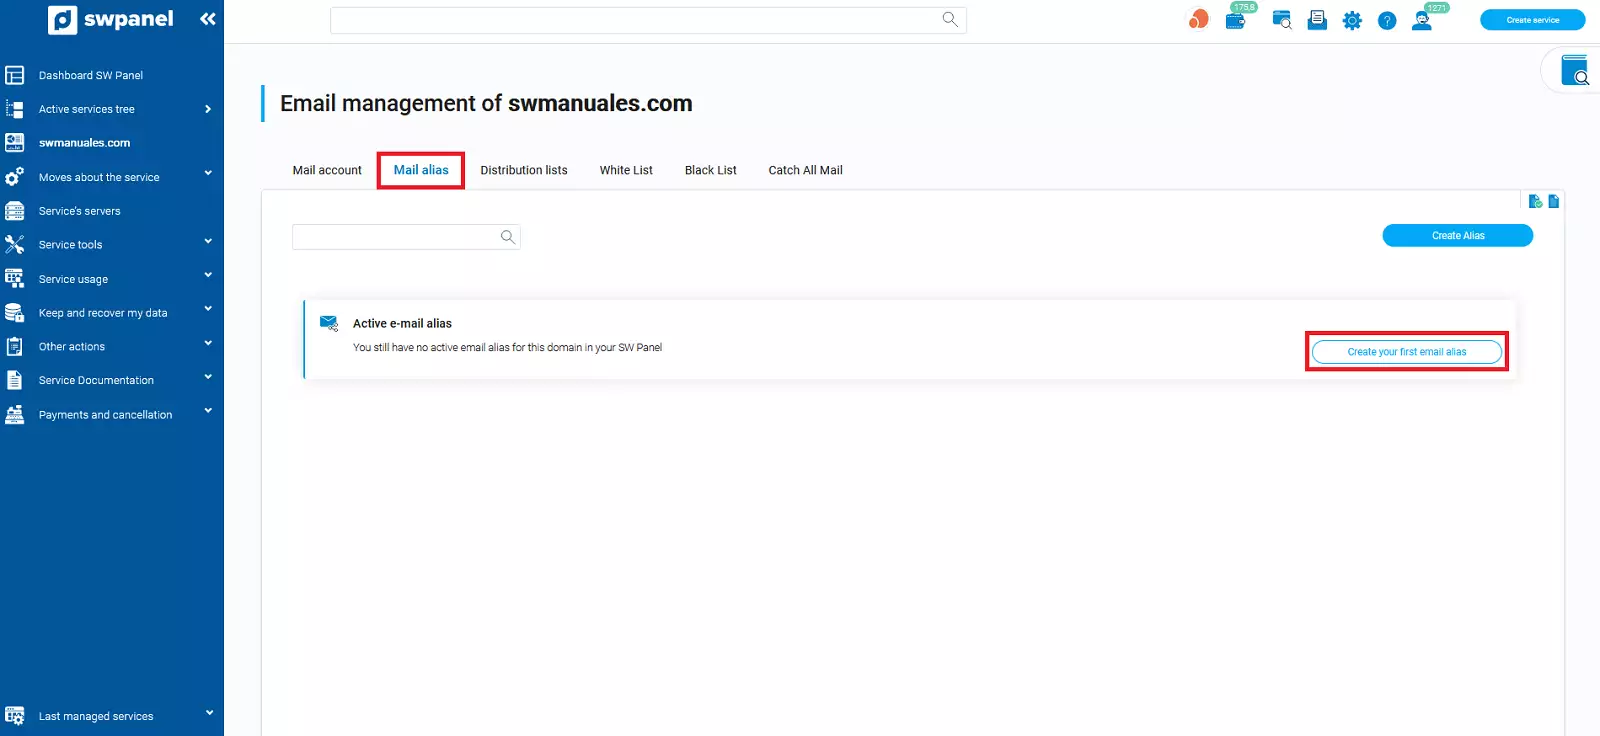
Paso 1: En el menú de Gestión de correo de tu servicio, selecciona el apartado "Alias de correo" y haz clic en el botón azul "Crear Alias", ubicado en la parte superior derecha.
info_capture ℹ️ Nota: La captura es orientativa, tomada sobre la versión 2026.000.0001 con fecha 15/02/2026. Puede diferir de la versión actual de SWPanel.
Paso 2: Introduce el nombre de la cuenta alias y especifica a qué cuenta(s) se redirigirá el correo recibido.
info_capture ℹ️ Nota: La captura es orientativa, tomada sobre la versión 2026.000.0001 con fecha 15/02/2026. Puede diferir de la versión actual de SWPanel.
Para finalizar la creación del alias de correo, haz clic en el botón "Crear". Esto confirmará los datos ingresados y activará el alias en el sistema.
Listas de distribución
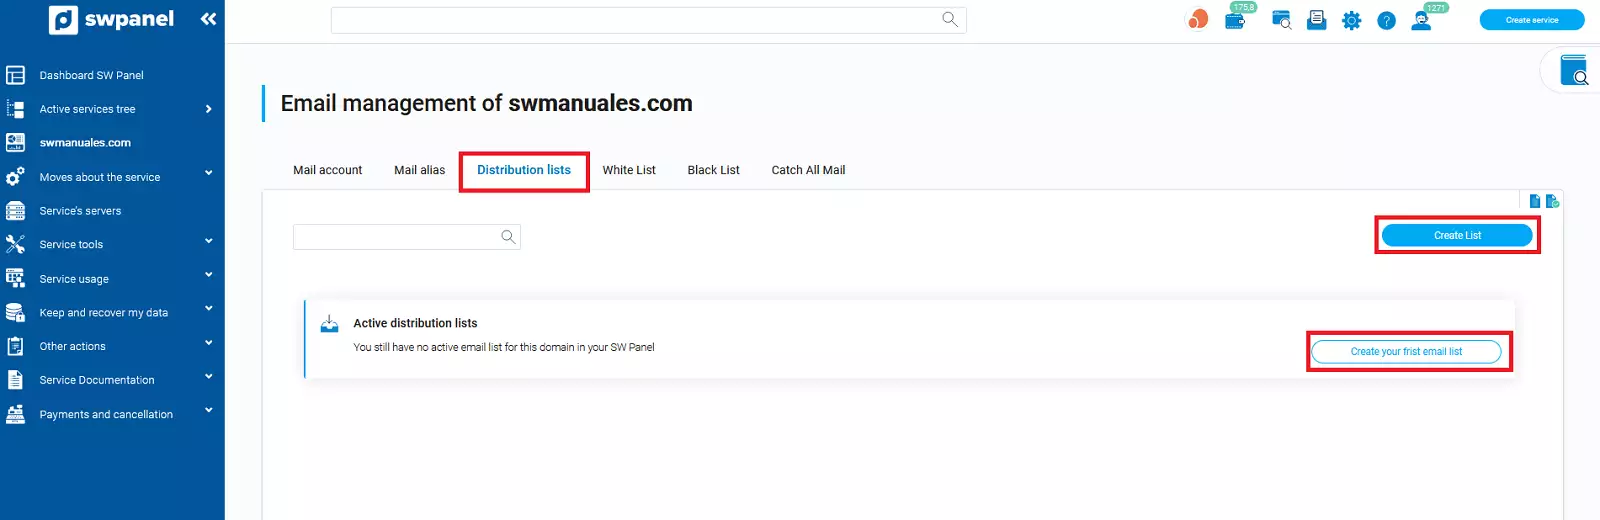
Paso 1: En el menú de Gestión de correo de tu servicio, selecciona el apartado "Listas de distribución" y haz clic en el botón azul "Crear Lista", ubicado en la parte superior derecha.
info_capture ℹ️ Nota: La captura es orientativa, tomada sobre la versión 2026.000.0001 con fecha 15/02/2026. Puede diferir de la versión actual de SWPanel.
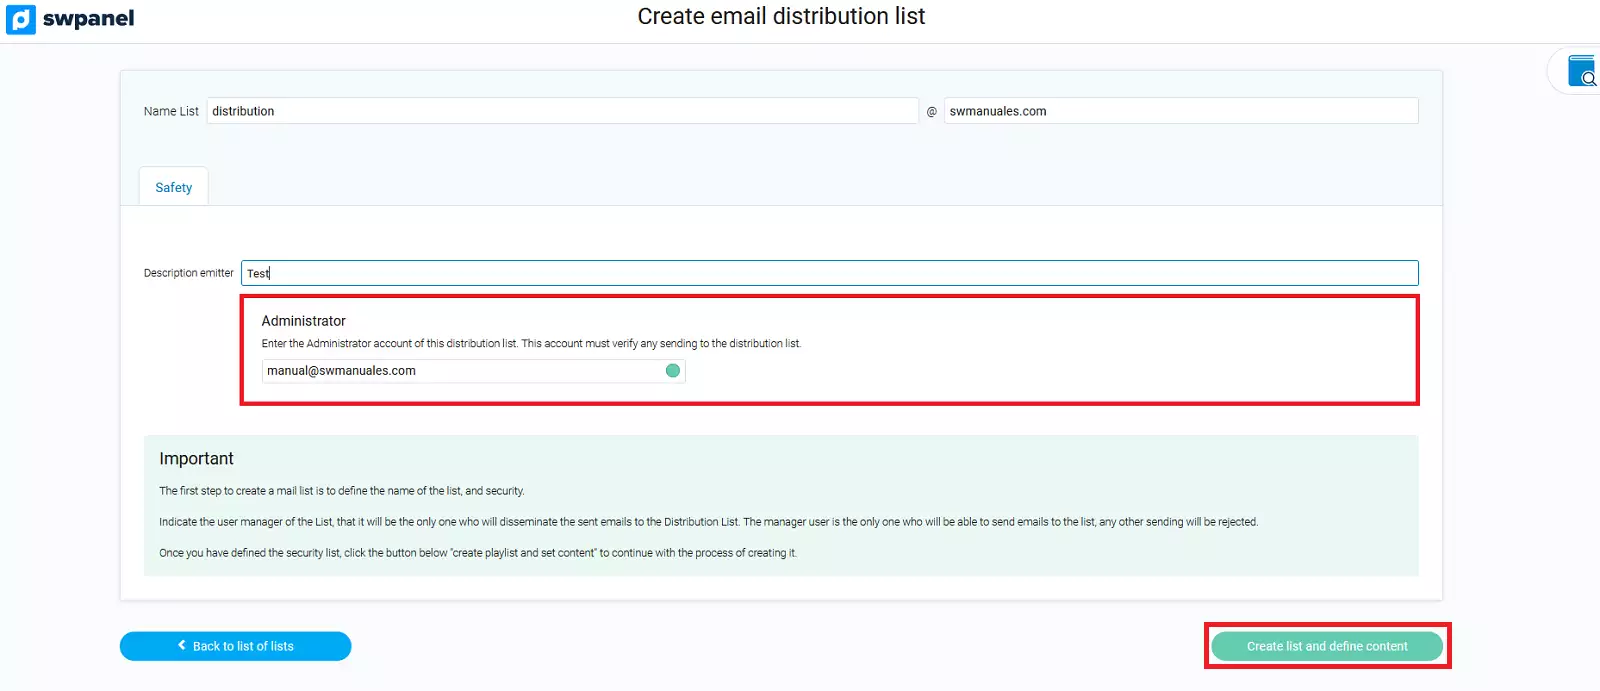
Paso 2: Selecciona los correos electrónicos o destinatarios que deseas añadir a la lista, así como el usuario encargado de gestionar dicha lista.
info_capture ℹ️ Nota: La captura es orientativa, tomada sobre la versión 2026.000.0001 con fecha 15/02/2026. Puede diferir de la versión actual de SWPanel.
Para finalizar, pulsa "Crear" y confirma los datos para activar la lista de distribución.
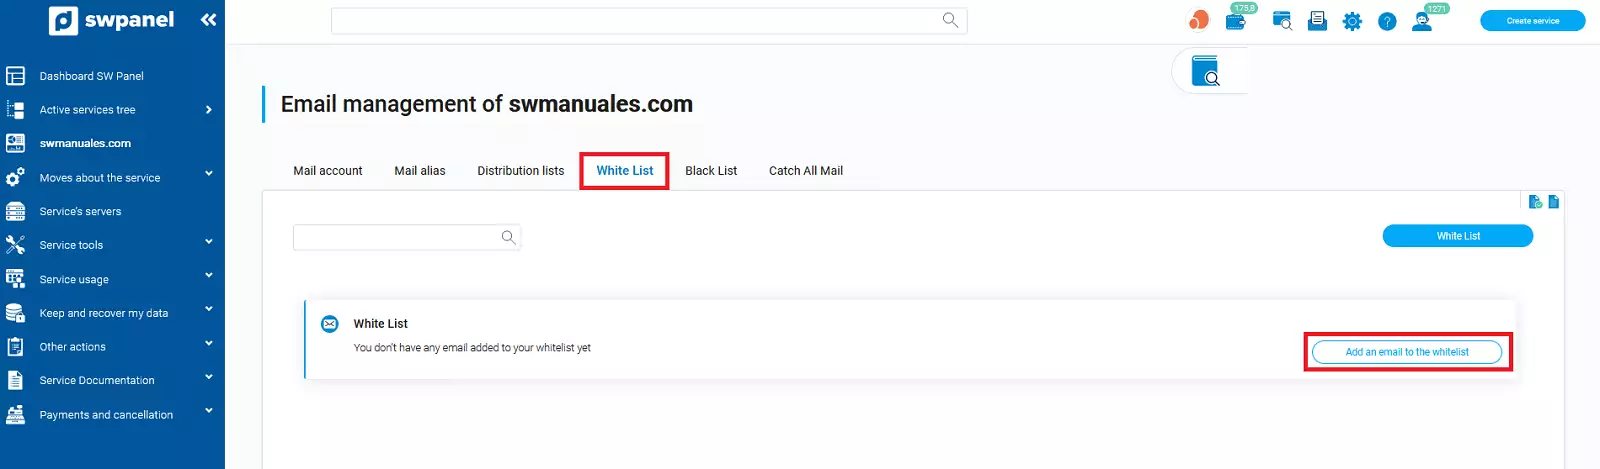
Lista Blanca
Paso 1: En el menú de Gestión de correo de tu servicio, selecciona el apartado "Lista Blanca" y haz clic en el botón azul "Añadir a Lista Blanca", ubicado en la parte superior derecha.
info_capture ℹ️ Nota: La captura es orientativa, tomada sobre la versión 2026.000.0001 con fecha 15/02/2026. Puede diferir de la versión actual de SWPanel.
Paso 2: Indica qué deseas añadir a la lista blanca:
- Todo un dominio
- Una cuenta de correo
Paso 3: Selecciona dónde deseas añadirlo:
- A la lista blanca de todo mi dominio (ej. swmanuales.euw)
- A la lista blanca de una cuenta específica de tus buzones
info_capture ℹ️ Nota: La captura es orientativa, tomada sobre la versión 2026.000.0001 con fecha 15/02/2026. Puede diferir de la versión actual de SWPanel.
Paso 4: Para finalizar, pulsa "Añadir Cuenta" y confirma los datos para que el buzón o dominio seleccionado se agregue correctamente a la lista blanca.
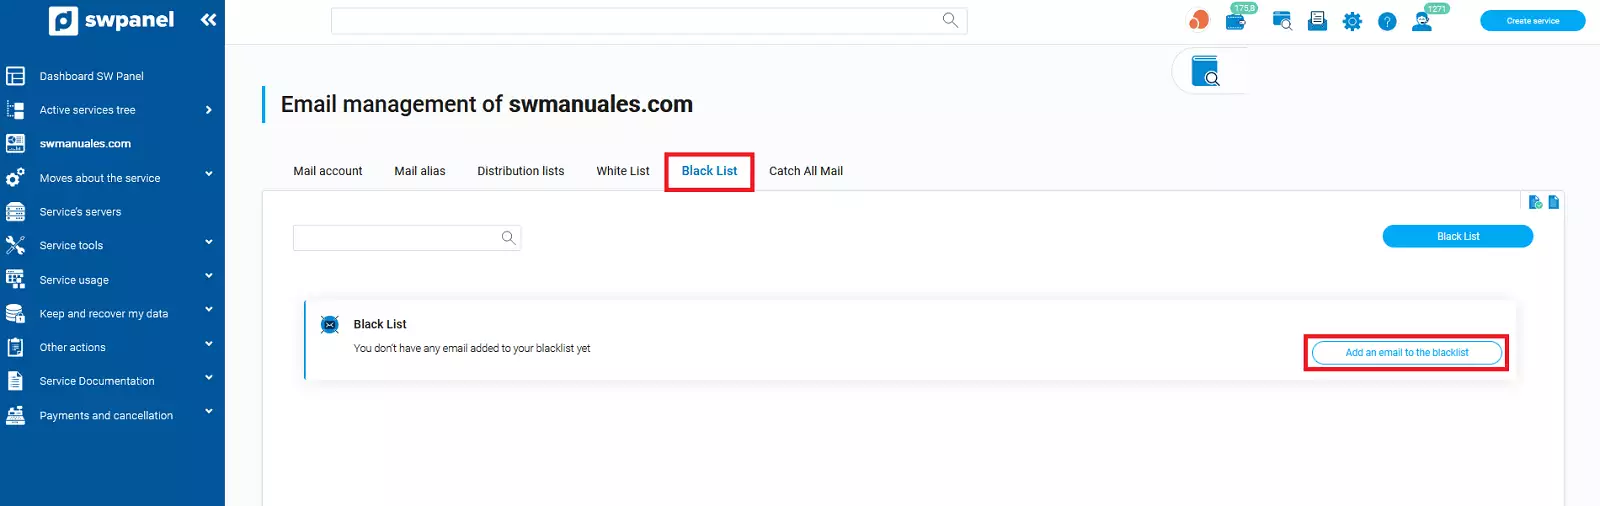
Lista Negra
Paso 1: En el menú de Gestión de correo de tu servicio, selecciona el apartado "Lista Negra" y haz clic en el botón azul "Añadir a Lista Negra", ubicado en la parte superior derecha.
info_capture ℹ️ Nota: La captura es orientativa, tomada sobre la versión 2026.000.0001 con fecha 15/02/2026. Puede diferir de la versión actual de SWPanel.
Paso 2: Indica qué deseas añadir a la lista negra:
- Todo un dominio
- Una cuenta de correo
Paso 3: Selecciona dónde deseas añadirlo:
- A la lista negra de todo mi dominio (ej. swmanuales.euw)
- A la lista negra de una cuenta específica de tus buzones
info_capture ℹ️ Nota: La captura es orientativa, tomada sobre la versión 2026.000.0001 con fecha 15/02/2026. Puede diferir de la versión actual de SWPanel.
Paso 4: Para finalizar, pulsa "Añadir Cuenta" y confirma los datos para que el buzón o dominio seleccionado se agregue correctamente a la lista negra.
Autorespuestas
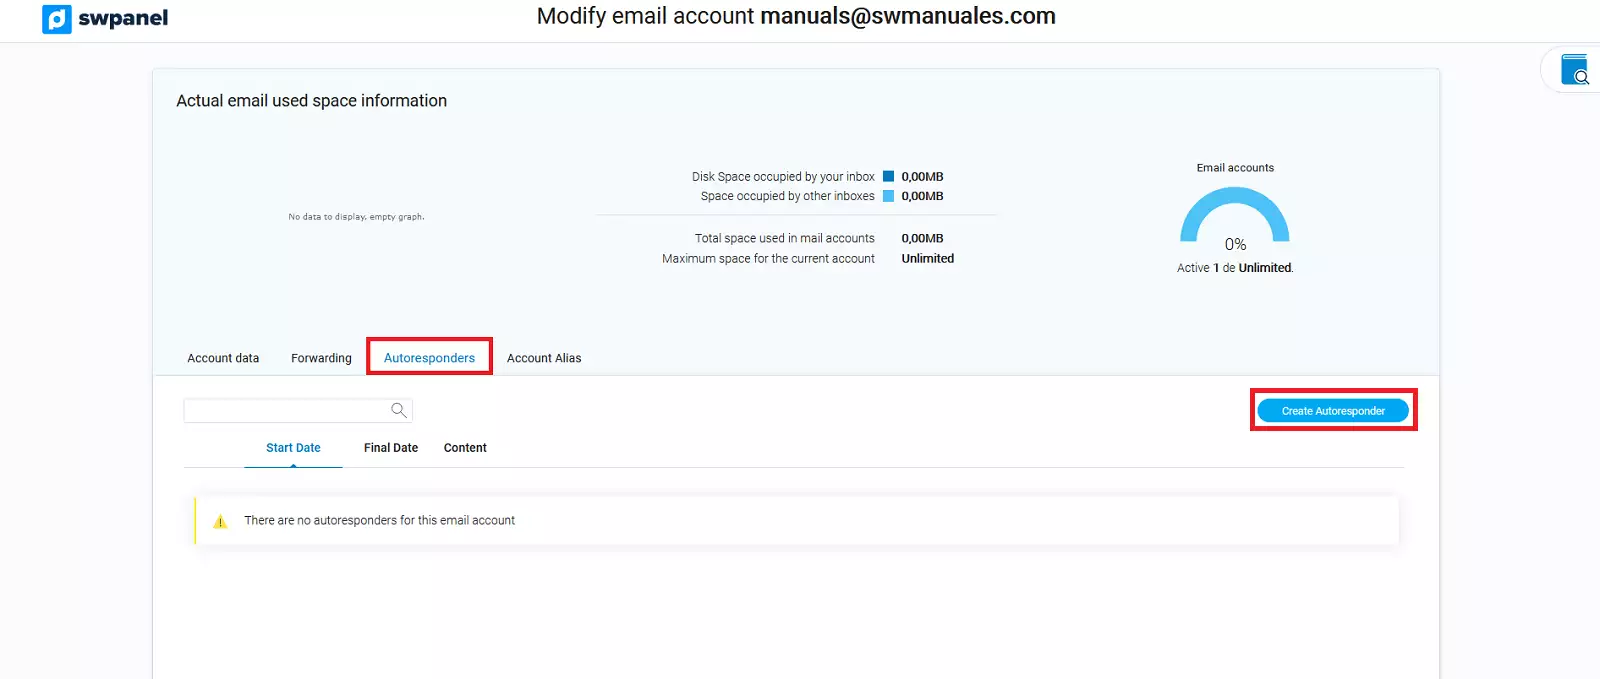
Paso 1: En el menú de Gestión de correo de tu servicio, selecciona el apartado "Autorespuestas" y haz clic en el botón azul "Crear autorespuesta", ubicado en la parte superior derecha.
info_capture ℹ️ Nota: La captura es orientativa, tomada sobre la versión 2026.000.0001 con fecha 15/02/2026. Puede diferir de la versión actual de SWPanel.
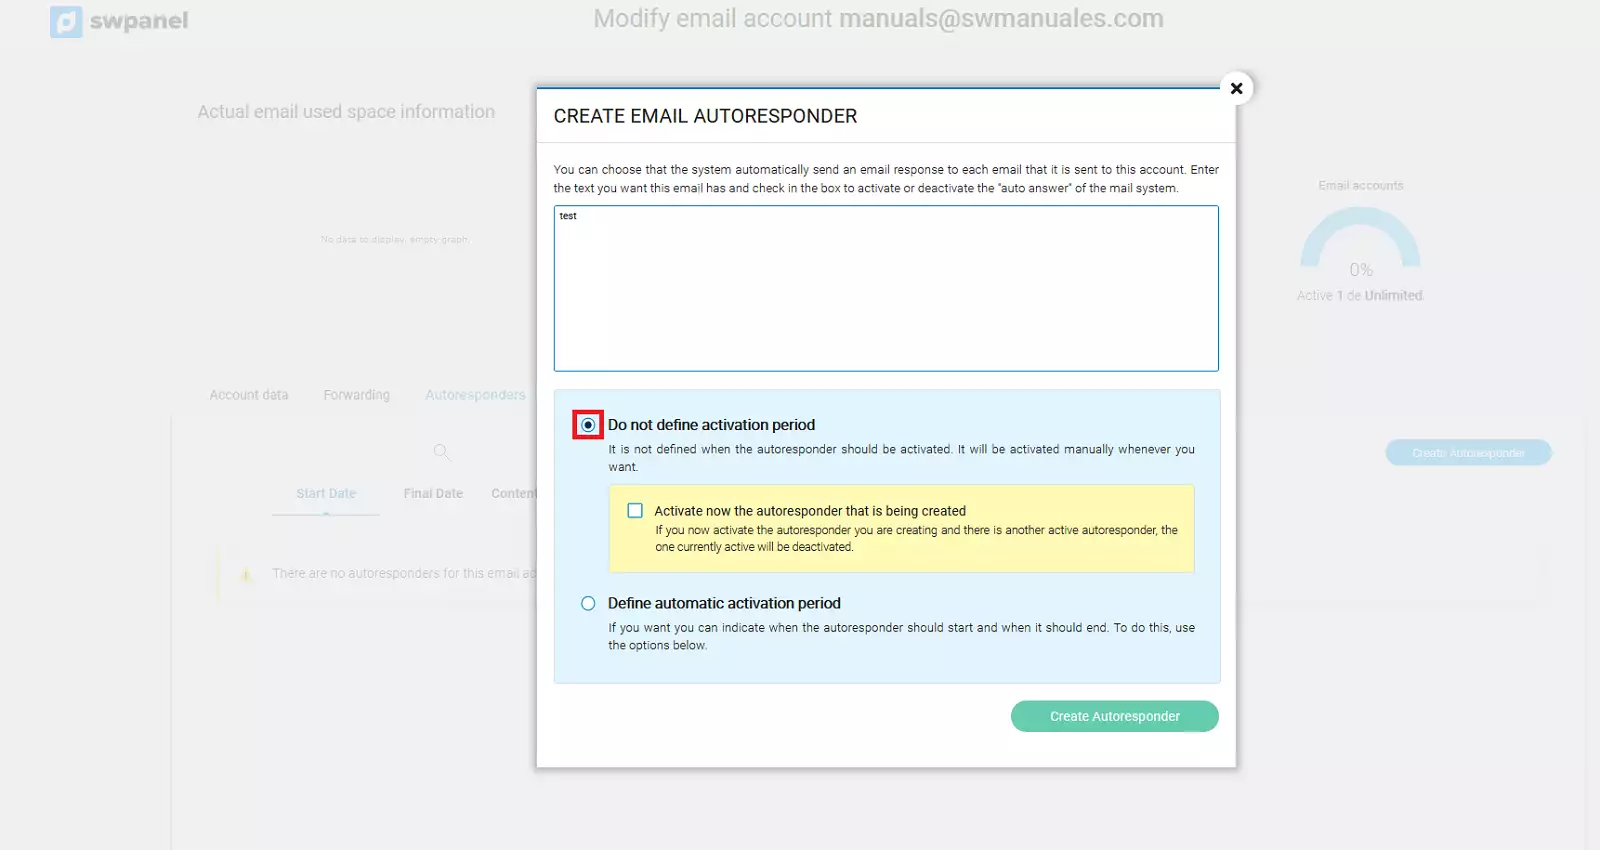
Paso 2: Configura el mensaje de respuesta automática que se enviará al recibir un correo electrónico.
Paso 3: Selecciona cómo se activará la autorespuesta:
- No definir periodo de activación: La autorespuesta no tendrá un periodo definido. Se activará manualmente cuando lo desees.
- Activar ahora la autorespuesta que se está creando: La autorespuesta se activará inmediatamente. Si existe otra autorespuesta activa, la anterior se desactivará automáticamente.
- Definir periodo automático de activación: Puedes indicar fecha y hora de inicio y fecha y hora de finalización utilizando las opciones del calendario y reloj disponibles.
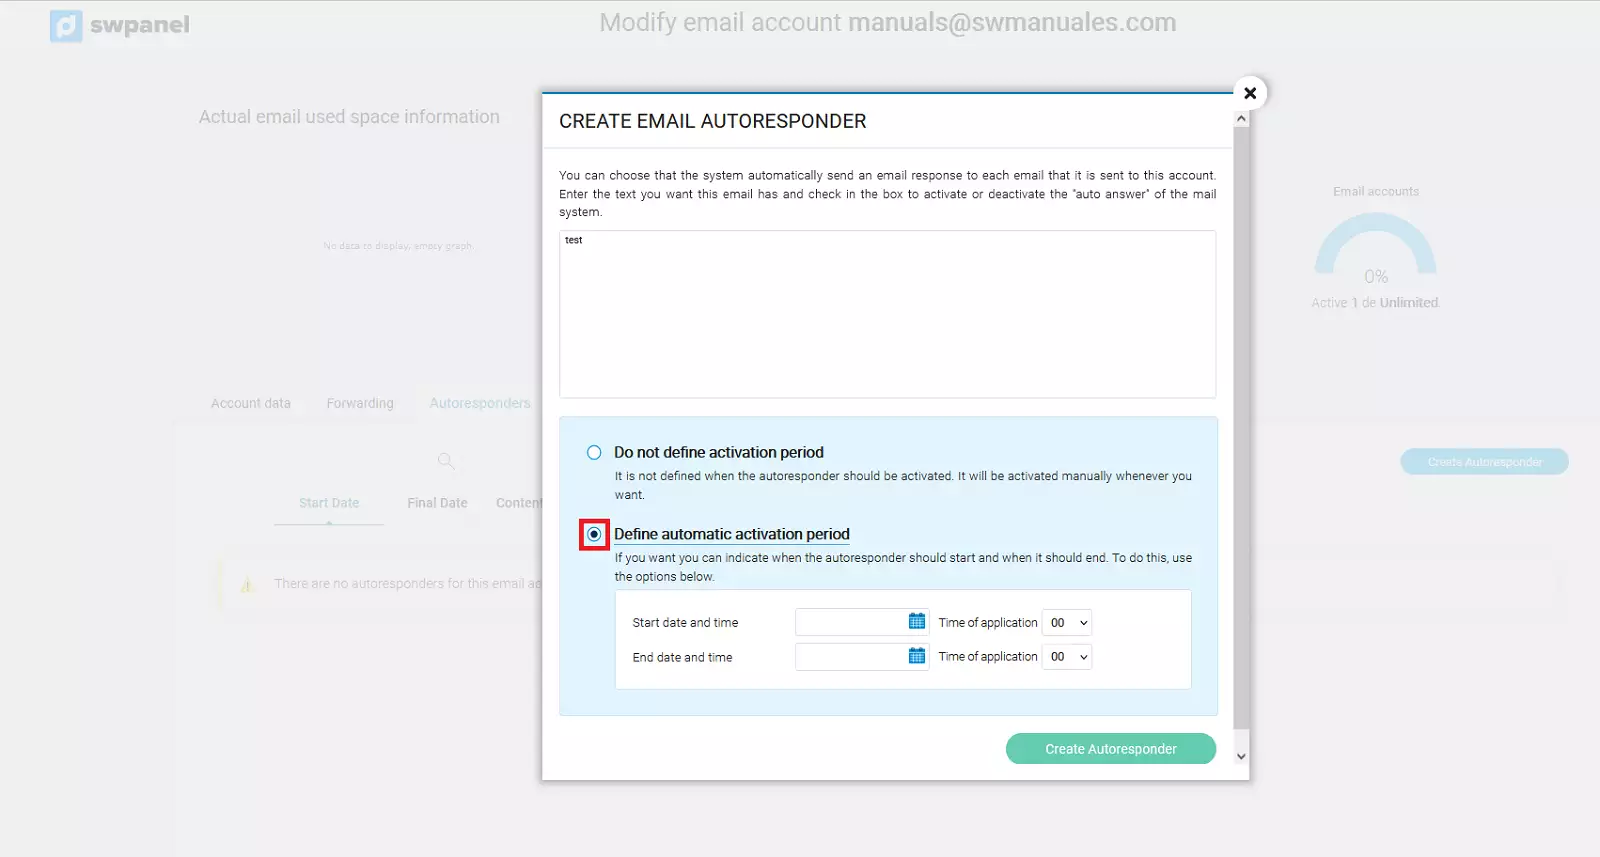
info_capture ℹ️ Nota: La captura es orientativa, tomada sobre la versión 2026.000.0001 con fecha 15/02/2026. Puede diferir de la versión actual de SWPanel.
Para finalizar la creación de la autorespuesta, haz clic en el botón "Crear Autorespuesta". Esto confirmará los datos ingresados y dejará configurada la autorespuesta según las opciones de activación seleccionadas.
Cola de correo
Paso 1: En el menú de Gestión de correo de tu servicio, selecciona el apartado "Cola de correo".
Paso 2: Desde este apartado podrás consultar el estado de la cola de correo del dominio, visualizar los mensajes pendientes de envío y realizar acciones de gestión si fuera necesario.
Paso 3: Si deseas filtrar los resultados, puedes utilizar las opciones de búsqueda indicando un rango de fechas y horas mediante el selector de calendario y hora disponible.
Paso 4: También dispones de las siguientes opciones de gestión:
- Iniciar búsqueda ahora: Ejecuta una búsqueda inmediata en la cola de correo.
- Parar cola de correo: Detiene temporalmente el procesamiento de la cola.
- Borrado masivo de correos: Permite eliminar múltiples correos pendientes de forma simultánea.
Si no existen mensajes pendientes, el sistema mostrará el aviso indicando que la cola de correo está vacía.
info_capture ℹ️ Nota: La captura es orientativa, tomada sobre la versión 2026.000.0001 con fecha 15/02/2026. Puede diferir de la versión actual de SWPanel.
Una vez creada la cuenta de correo, puedes acceder a su configuración para modificar distintos parámetros y adaptarlos a tus necesidades.
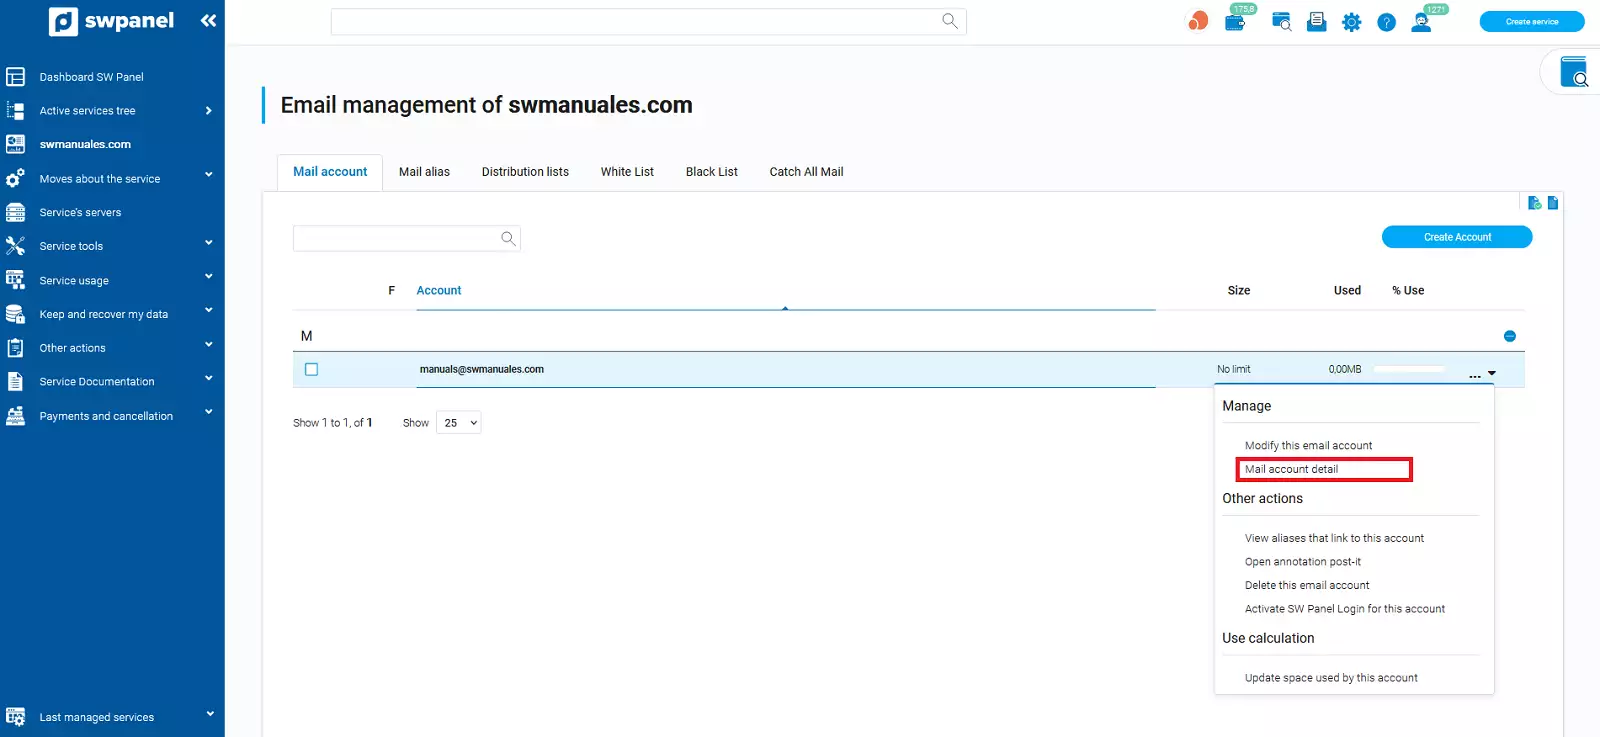
info_capture ℹ️ Nota: La captura es orientativa, tomada sobre la versión 2026.000.0001 con fecha 15/02/2026. Puede diferir de la versión actual de SWPanel.
A continuación se detallan todas las acciones disponibles:
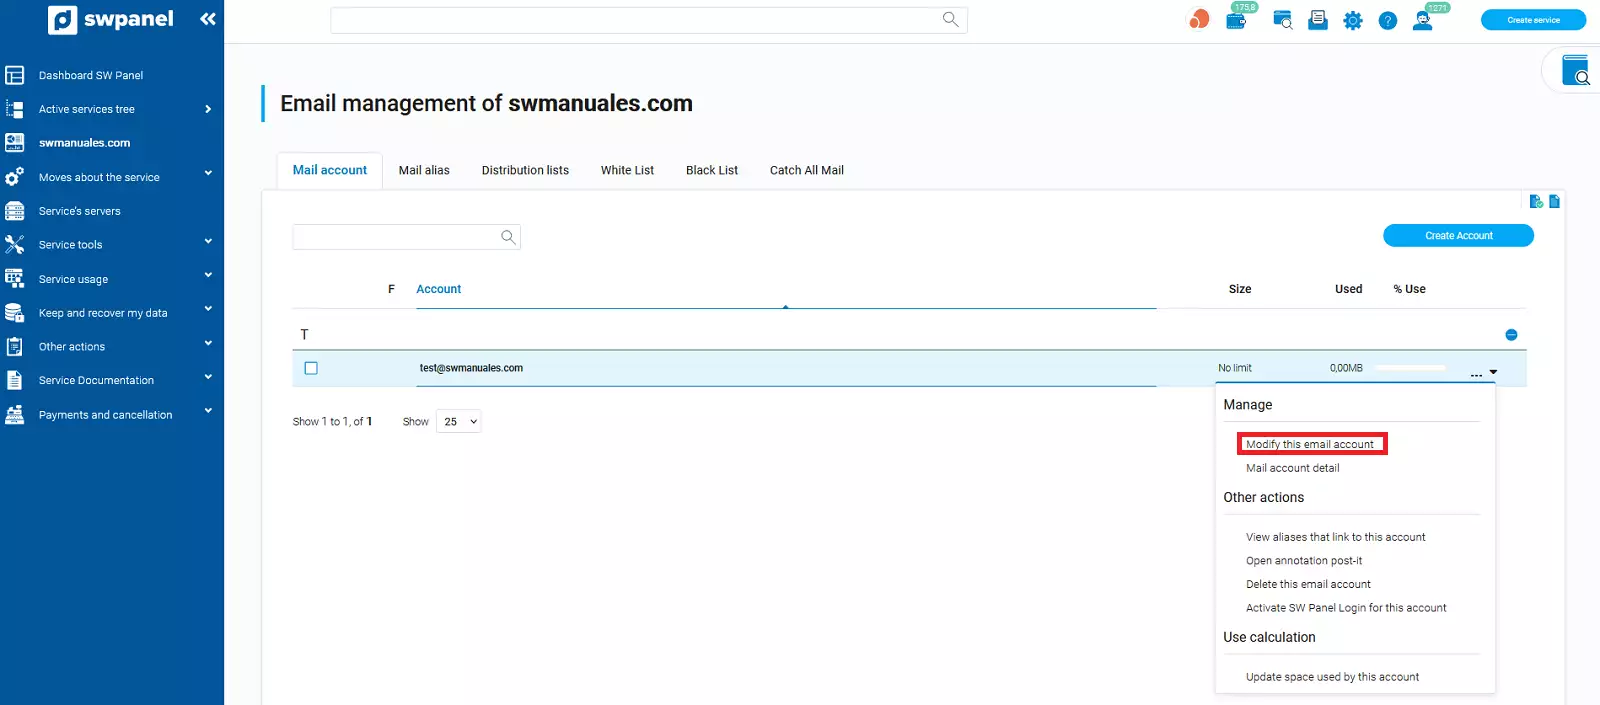
Modificar esta cuenta de correo
En el menú de Gestión de correo de tu servicio, localiza la cuenta que deseas modificar (por ejemplo, [email protected]) y accede a su configuración.
En este apartado podrás consultar la información de uso del buzón, como:
- Espacio ocupado actualmente.
- Espacio disponible.
- Espacio máximo asignado al buzón.
- Número de cuentas activas sobre el total permitido.
Además, podrás gestionar las siguientes opciones:
- Datos de la cuenta: Modificar el nombre o la contraseña.
- Reenvío: Configurar el desvío de correos a otra dirección.
- Autorespuestas: Activar o modificar respuestas automáticas.
- Alias de cuenta: Gestionar alias asociados a la cuenta.
- Preferencias: Ajustar configuraciones adicionales del buzón.
Una vez realizados los cambios, pulsa "Guardar cambios" para aplicar la configuración.
info_capture ℹ️ Nota: La captura es orientativa, tomada sobre la versión 2026.000.0001 con fecha 15/02/2026. Puede diferir de la versión actual de SWPanel.
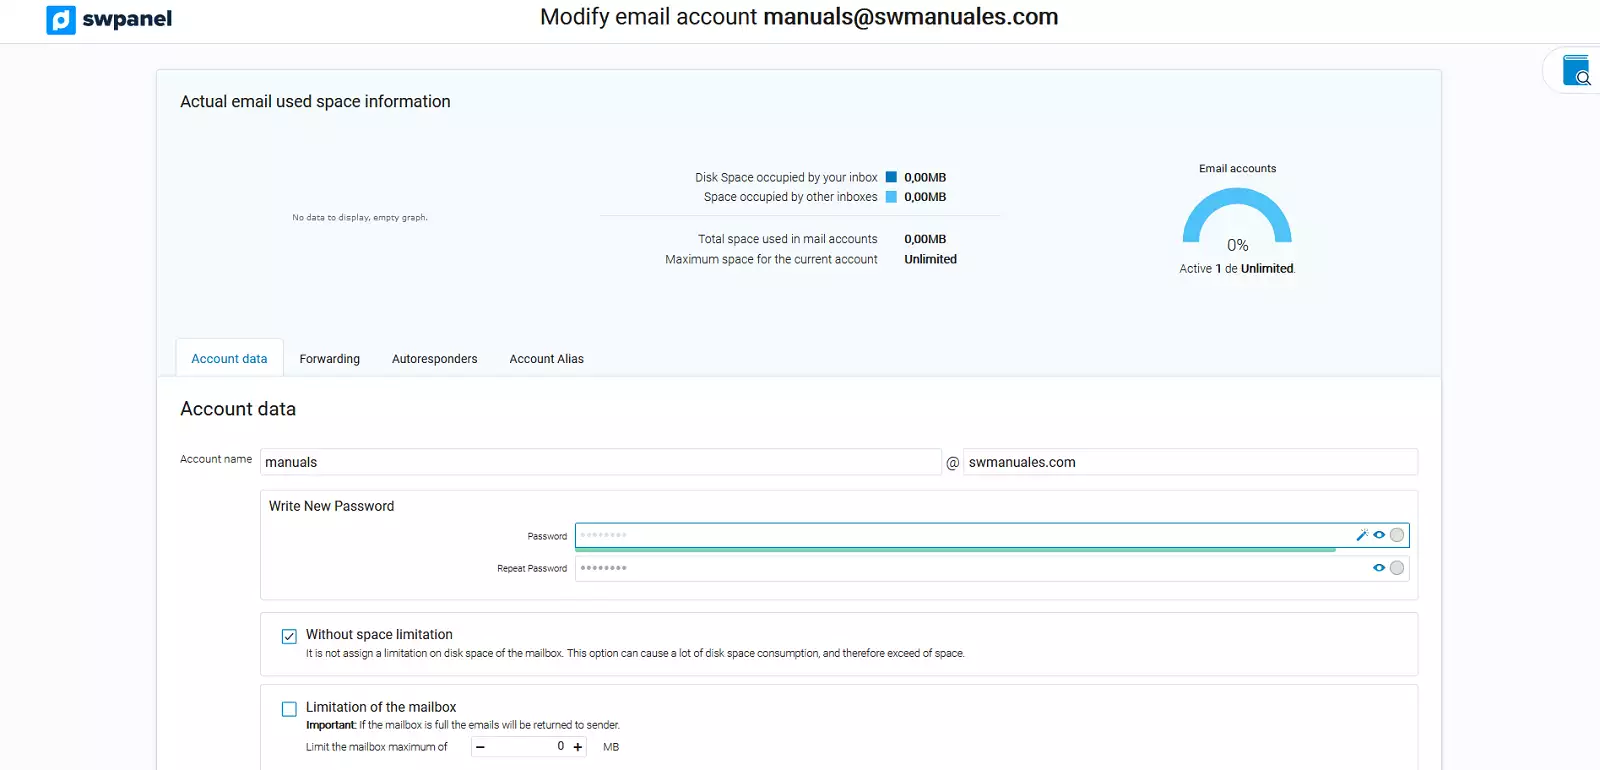
Datos de la cuenta
En este apartado podrás modificar la contraseña de acceso a la cuenta y configurar los límites del buzón de correo.
- Nombre de la cuenta:
- Contraseña:
- Escribe la nueva contraseña en los campos correspondientes.
- Confirma la contraseña escribiéndola nuevamente.
- Limitación del buzón:
- Selecciona el espacio máximo que deseas asignar al buzón de correo.
- Importante: Si el buzón alcanza su límite, los correos entrantes serán devueltos al remitente.
- El tamaño máximo permitido para el buzón es 4096 MB.
info_capture ℹ️ Nota: La captura es orientativa, tomada sobre la versión 2026.000.0001 con fecha 15/02/2026. Puede diferir de la versión actual de SWPanel.
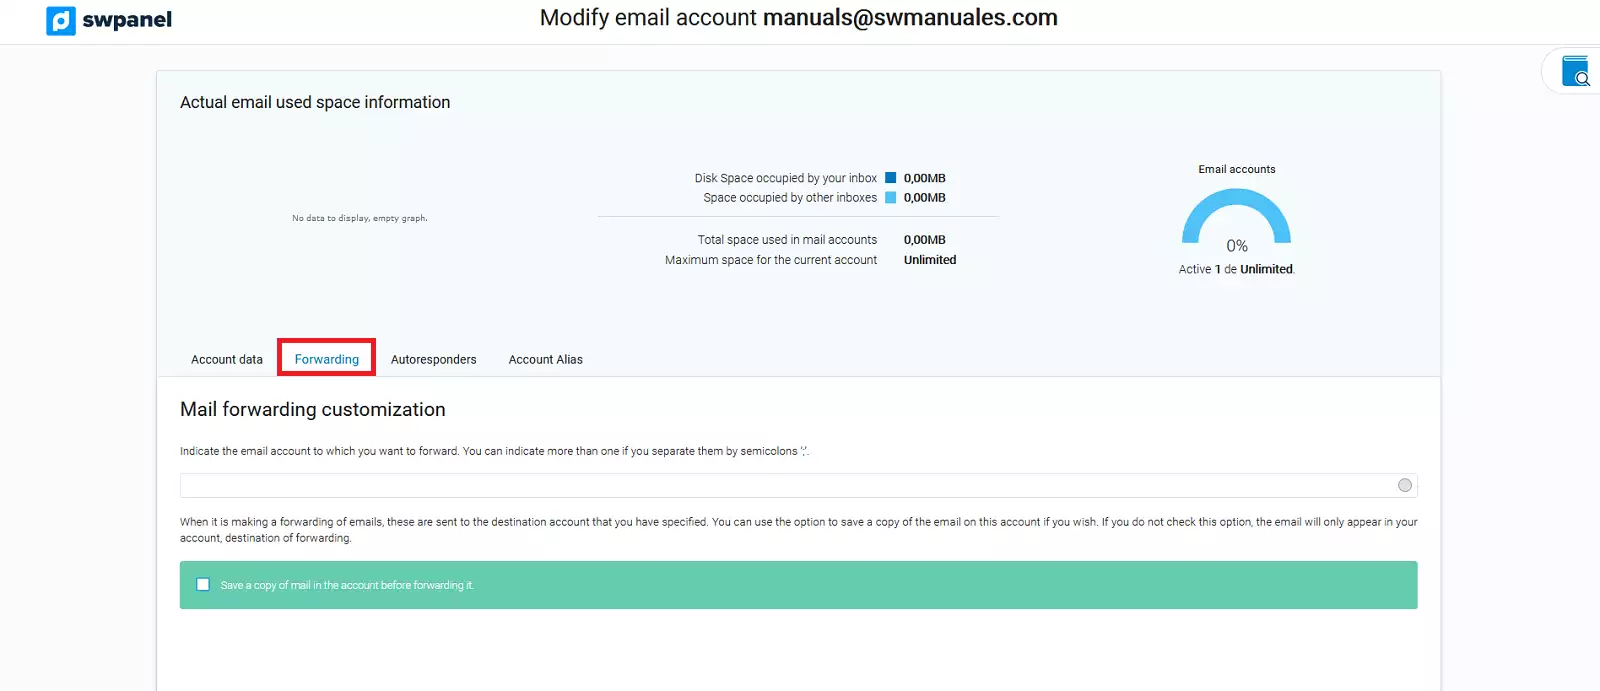
Reenvío
En este apartado puedes configurar el reenvío automático de los correos recibidos en la cuenta a otra dirección de correo.
- Activar reenvío de los correos:
- Marca esta opción para que los correos recibidos se reenvíen automáticamente a la cuenta destino que indiques.
- Si activas la opción adicional, los correos reenviados también se guardarán en tu buzón original.
- No reenviar los correos recibidos:
- Selecciona esta opción si deseas que los correos permanezcan únicamente en el buzón y no se reenvíen a otra cuenta.
info_capture ℹ️ Nota: La captura es orientativa, tomada sobre la versión 2026.000.0001 con fecha 15/02/2026. Puede diferir de la versión actual de SWPanel.
Autorespuestas
En este apartado puedes configurar respuestas automáticas que se envíen al recibir un correo electrónico.
info_capture ℹ️ Nota: La captura es orientativa, tomada sobre la versión 2026.000.0001 con fecha 15/02/2026. Puede diferir de la versión actual de SWPanel.
- Puedes crear un mensaje de autorespuesta que se enviará automáticamente a quien te escriba.
- Es posible definir períodos de activación, de manera que la autorespuesta solo se envíe durante un rango de fechas específico.
- También puedes optar por activar la respuesta manualmente sin definir un período, de modo que la respuesta se envíe únicamente cuando tú lo decidas.

info_capture ℹ️ Nota: La captura es orientativa, tomada sobre la versión 2026.000.0001 con fecha 15/02/2026. Puede diferir de la versión actual de SWPanel.
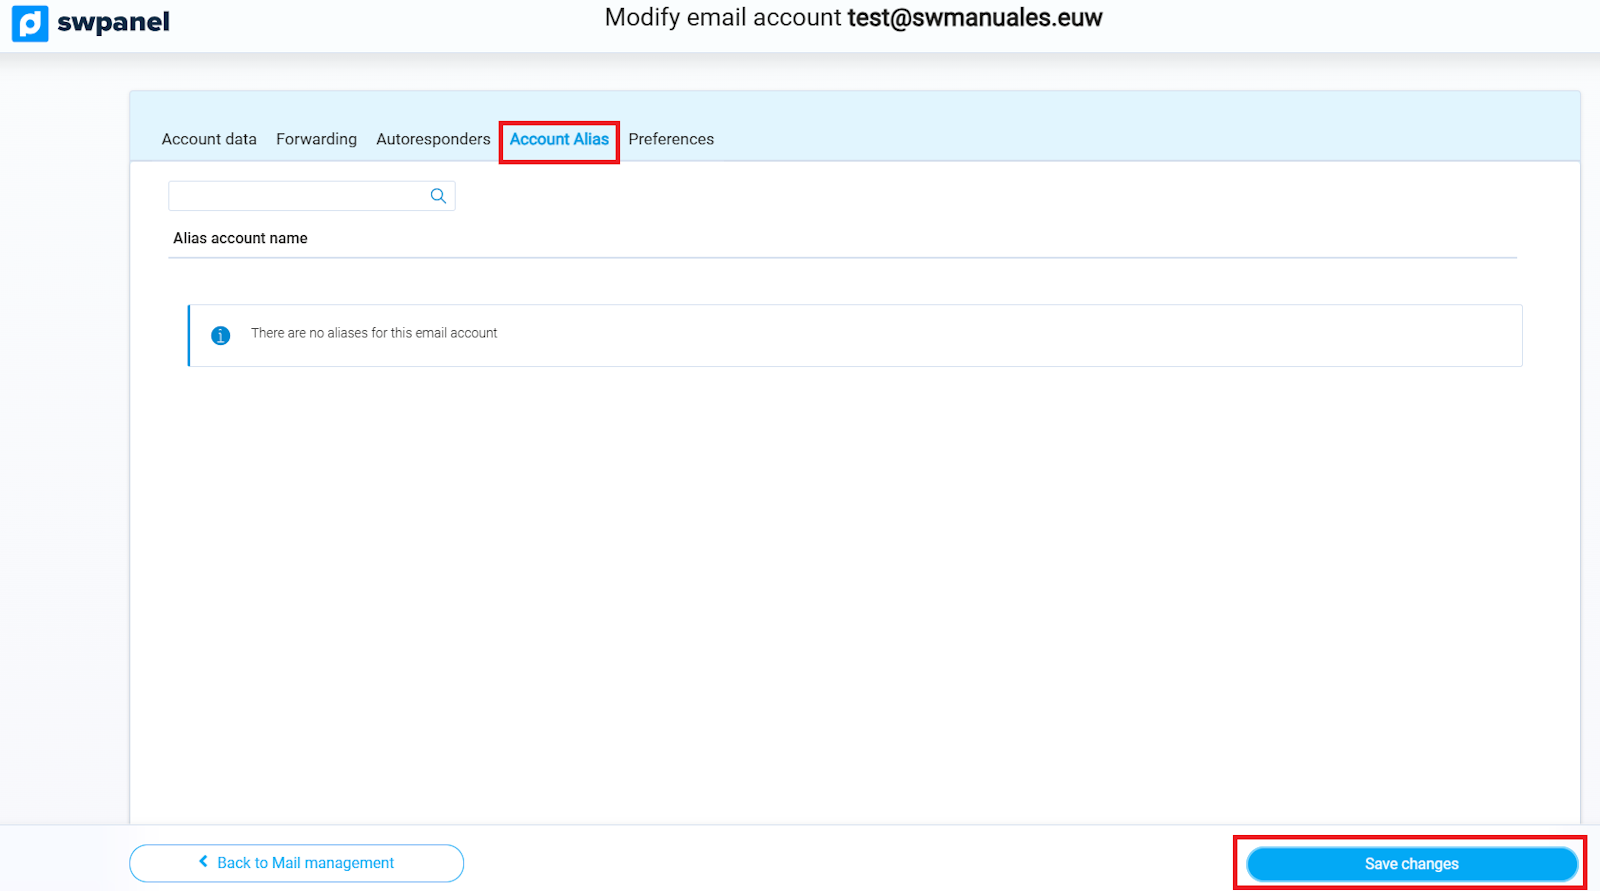
Alias de correo
En este apartado puedes visualizar y gestionar los alias asociados a tu cuenta de correo.
- Podrás ver todos los alias existentes de la cuenta.
- También tendrás la opción de eliminar cualquier alias que ya no necesites.
info_capture ℹ️ Nota: La captura es orientativa, tomada sobre la versión 2026.000.0001 con fecha 15/02/2026. Puede diferir de la versión actual de SWPanel.
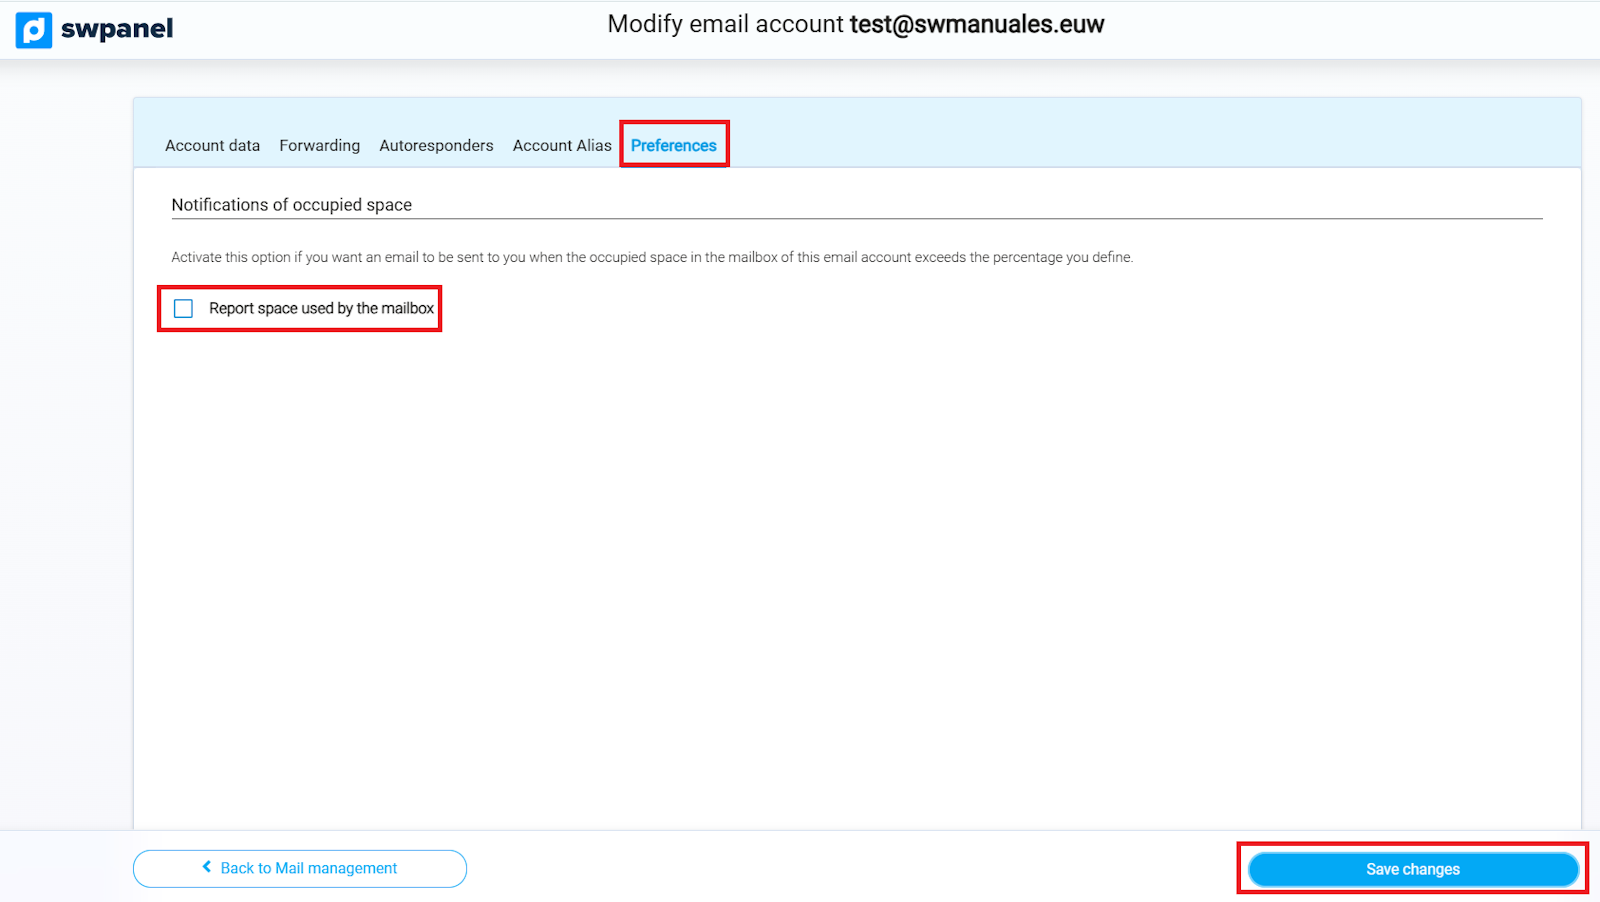
Preferencias
En este apartado puedes configurar opciones adicionales de tu cuenta de correo.
- Podrás establecer notificaciones automáticas que te avisen cuando el espacio utilizado en el buzón supere un porcentaje determinado del total asignado.
info_capture ℹ️ Nota: La captura es orientativa, tomada sobre la versión 2026.000.0001 con fecha 15/02/2026. Puede diferir de la versión actual de SWPanel.
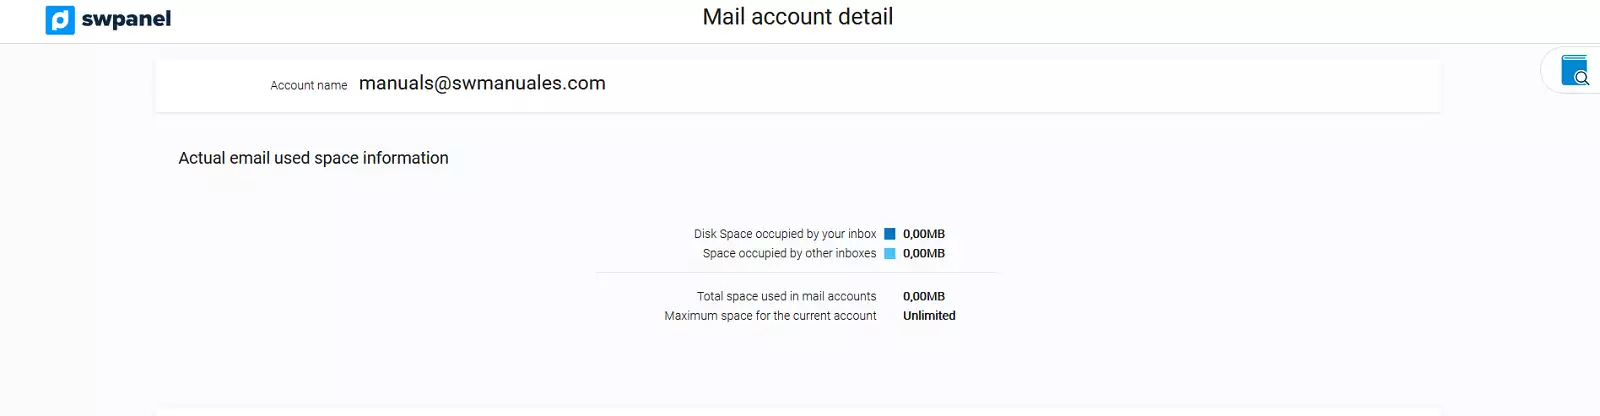
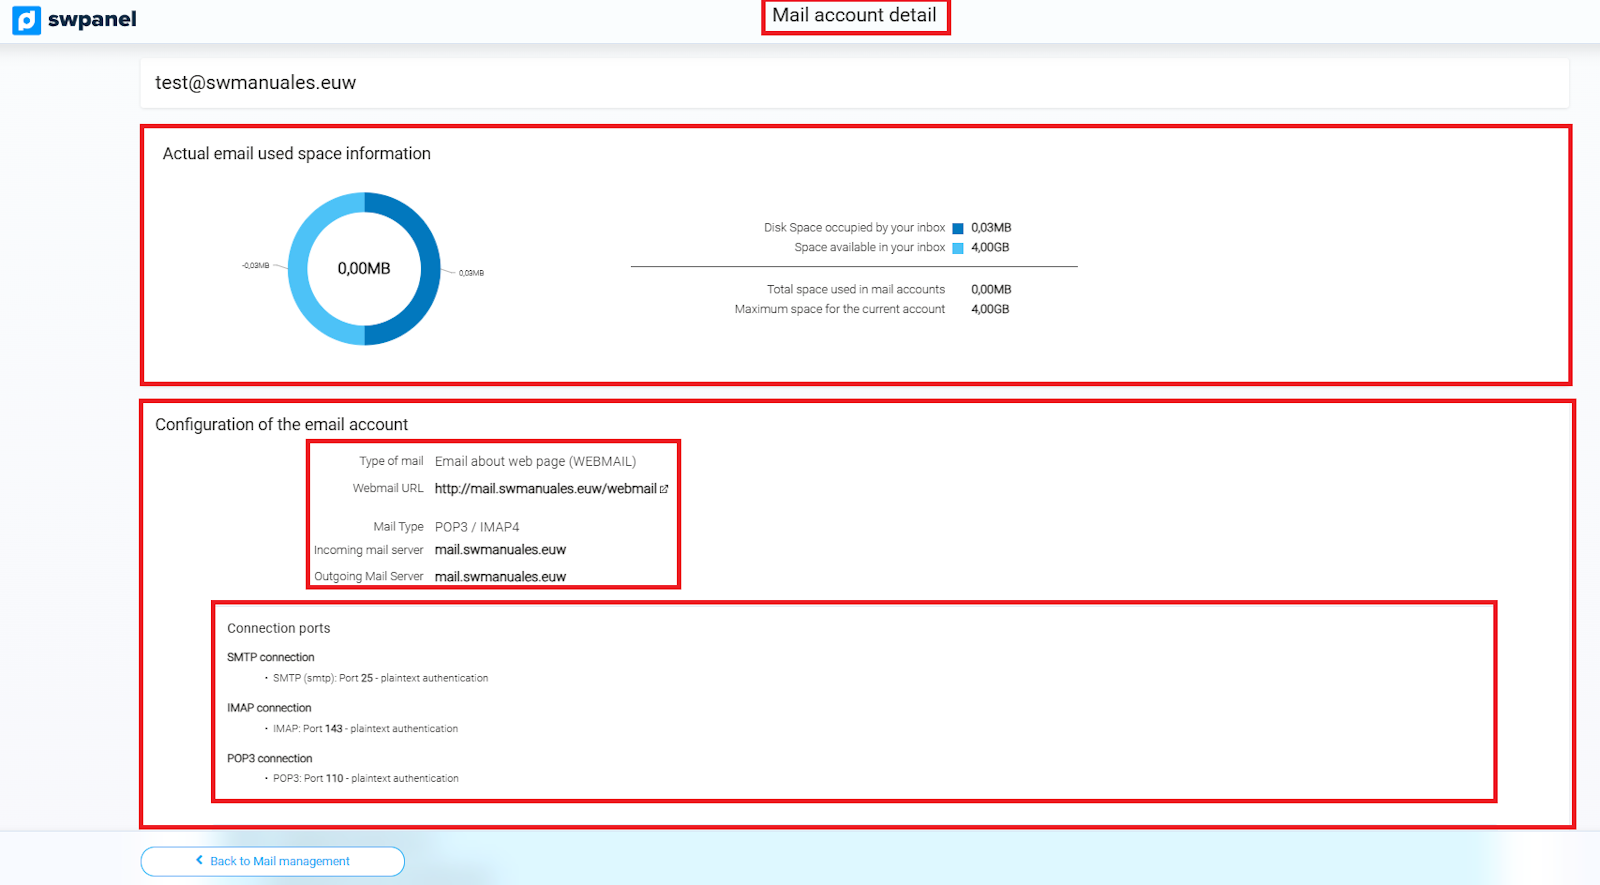
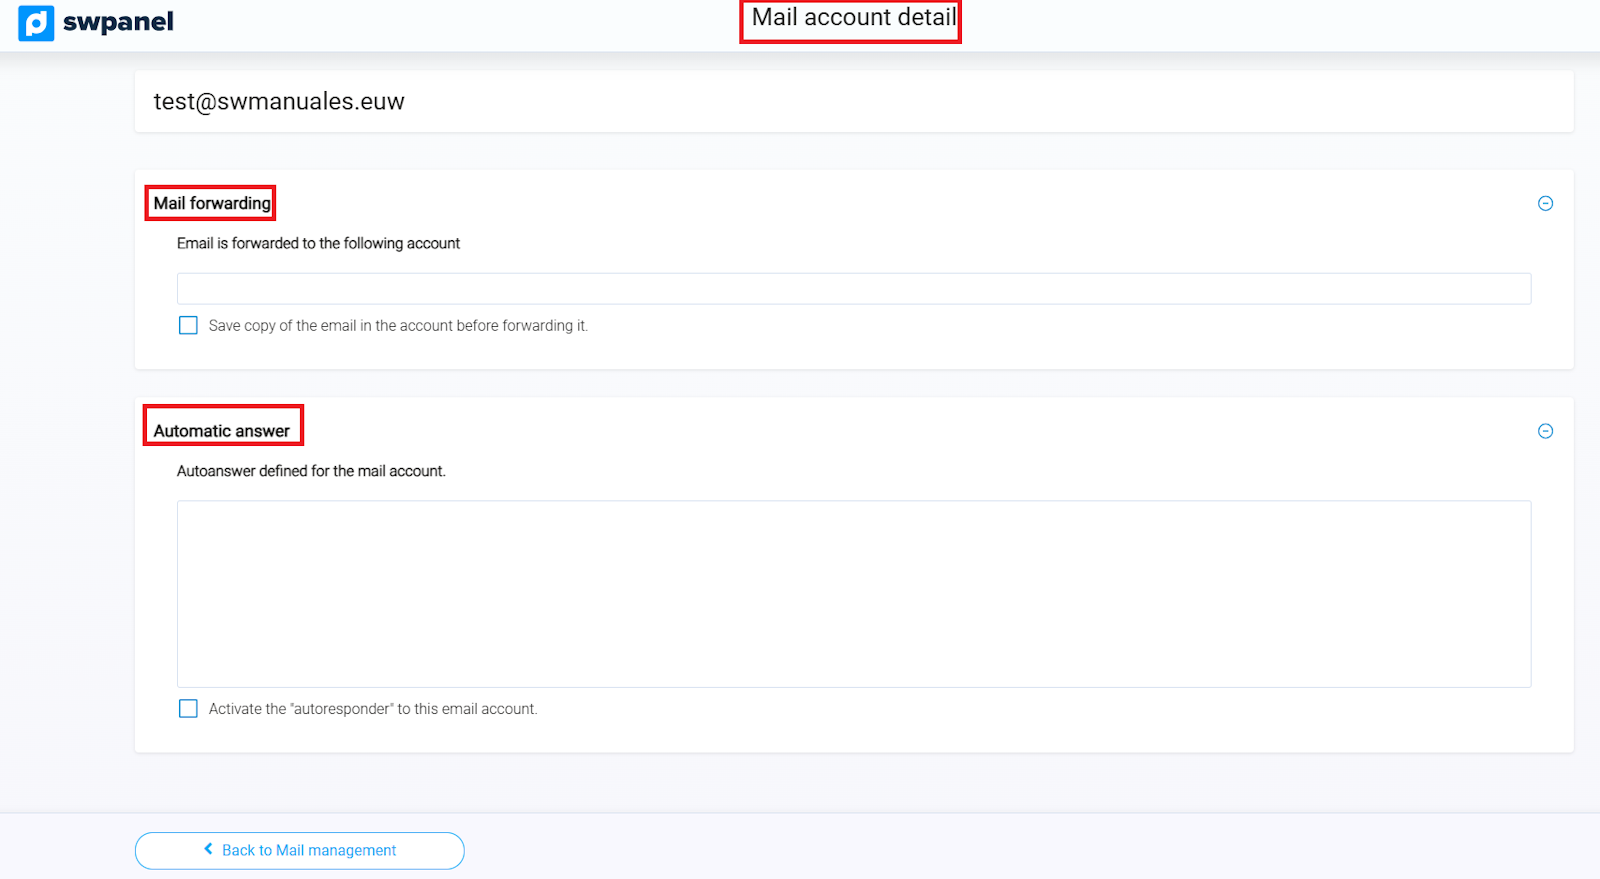
Detalle de la cuenta de correo
En este apartado podrás visualizar toda la información relevante de tu cuenta de correo, incluyendo el uso de espacio, los parámetros de configuración y el enlace a Webmail, entre otros.
Información de uso de espacio
- Espacio ocupado actualmente en tu buzón: 0,03 MB
- Espacio disponible en tu buzón: 4,00 GB
- Espacio total usado en todas las cuentas de correo: 0,00 MB
- Espacio máximo asignado al buzón actual: 4,00 GB
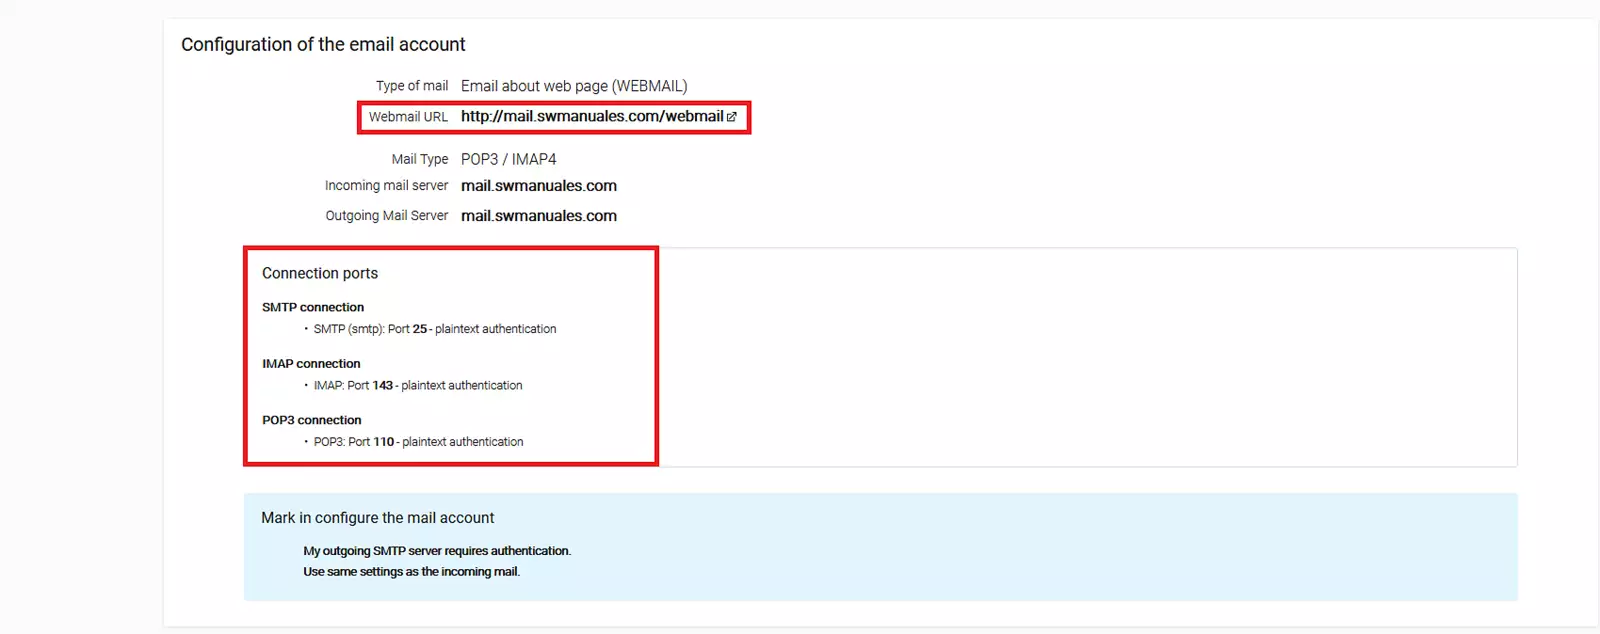
Configuración de la cuenta de correo
- Tipo de correo: Correo sobre página Web (Webmail)
- URL de Webmail: http://mail.swmanuales.euw/webmail
- Tipo de correo: POP3 / IMAP4
- Servidor de correo entrante: mail.swmanuales.euw
- Servidor de correo saliente: mail.swmanuales.euw
Puertos de conexión
- Conexión SMTP: Puerto 25 – autenticación plaintext
- Conexión IMAP: Puerto 143 – autenticación plaintext
- Conexión POP3: Puerto 110 – autenticación plaintext
info_capture ℹ️ Nota: La captura es orientativa, tomada sobre la versión 2026.000.0001 con fecha 15/02/2026. Puede diferir de la versión actual de SWPanel.
Opciones adicionales
- Reenvío de correo: Activar si deseas que los correos se reenvíen a otra cuenta.
- Respuesta automática: Configurar mensajes automáticos.
info_capture ℹ️ Nota: La captura es orientativa, tomada sobre la versión 2026.000.0001 con fecha 15/02/2026. Puede diferir de la versión actual de SWPanel.
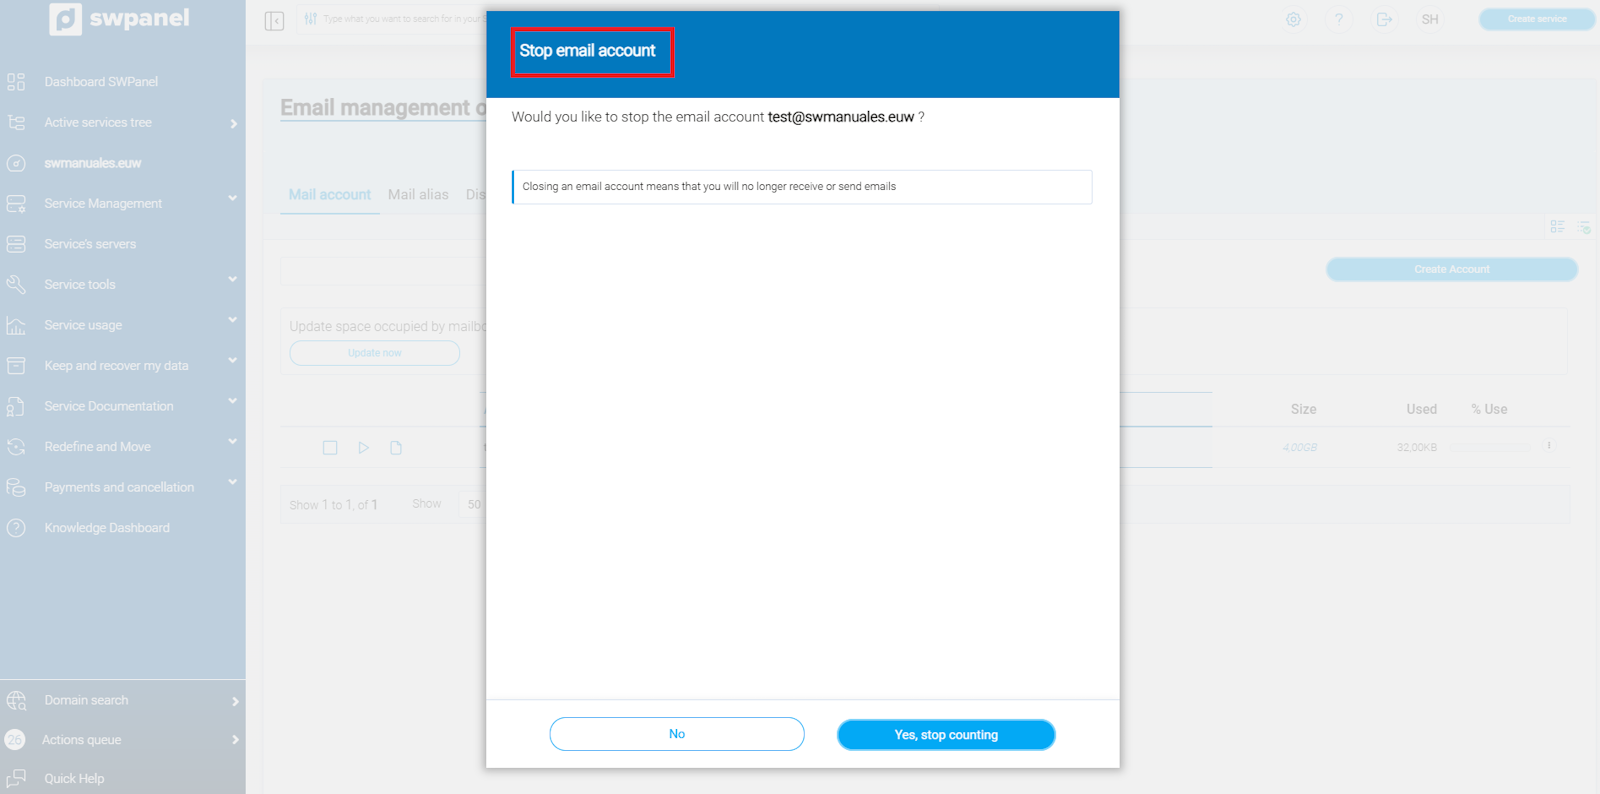
Parar cuenta de correo
En este apartado puedes detener temporalmente una cuenta de correo, lo que significa que dejará de enviar y recibir mensajes hasta que se reactive.
- Confirmación de acción:
- Se mostrará un mensaje de advertencia:
¿Deseas parar la cuenta de correo [email protected]?
- Se mostrará un mensaje de advertencia:
- Opciones disponibles:
- No: Cancelar la acción y mantener la cuenta activa.
- Sí, parar cuenta: Detener la cuenta, impidiendo el envío y recepción de correos.
info_capture ℹ️ Nota: La captura es orientativa, tomada sobre la versión 2026.000.0001 con fecha 15/02/2026. Puede diferir de la versión actual de SWPanel.
Actualizar espacio ocupado de la cuenta
En este apartado puedes actualizar la información del espacio utilizado por la cuenta de correo.
- Al pulsar el botón "Actualizar", el sistema recalculará automáticamente el espacio ocupado y mostrará los valores más recientes de:
- Espacio utilizado actualmente en el buzón.
- Espacio disponible.
- Espacio total usado en todas las cuentas de correo.
Esta acción no modifica los datos de la cuenta, solo actualiza la información mostrada en pantalla.
Gestionar autorespuestas
En este apartado puedes administrar todas las respuestas automáticas previamente creadas para tus cuentas de correo.
- Al acceder, serás redirigido al apartado de Autorespuestas donde podrás:
- Activar o desactivar una autorespuesta existente.
- Modificar el mensaje de la respuesta automática.
- Definir o ajustar los periodos de activación, si corresponde.
- Eliminar autorespuestas que ya no necesites.
Esta sección facilita la gestión centralizada de todas tus respuestas automáticas sin necesidad de crear nuevas desde cero.
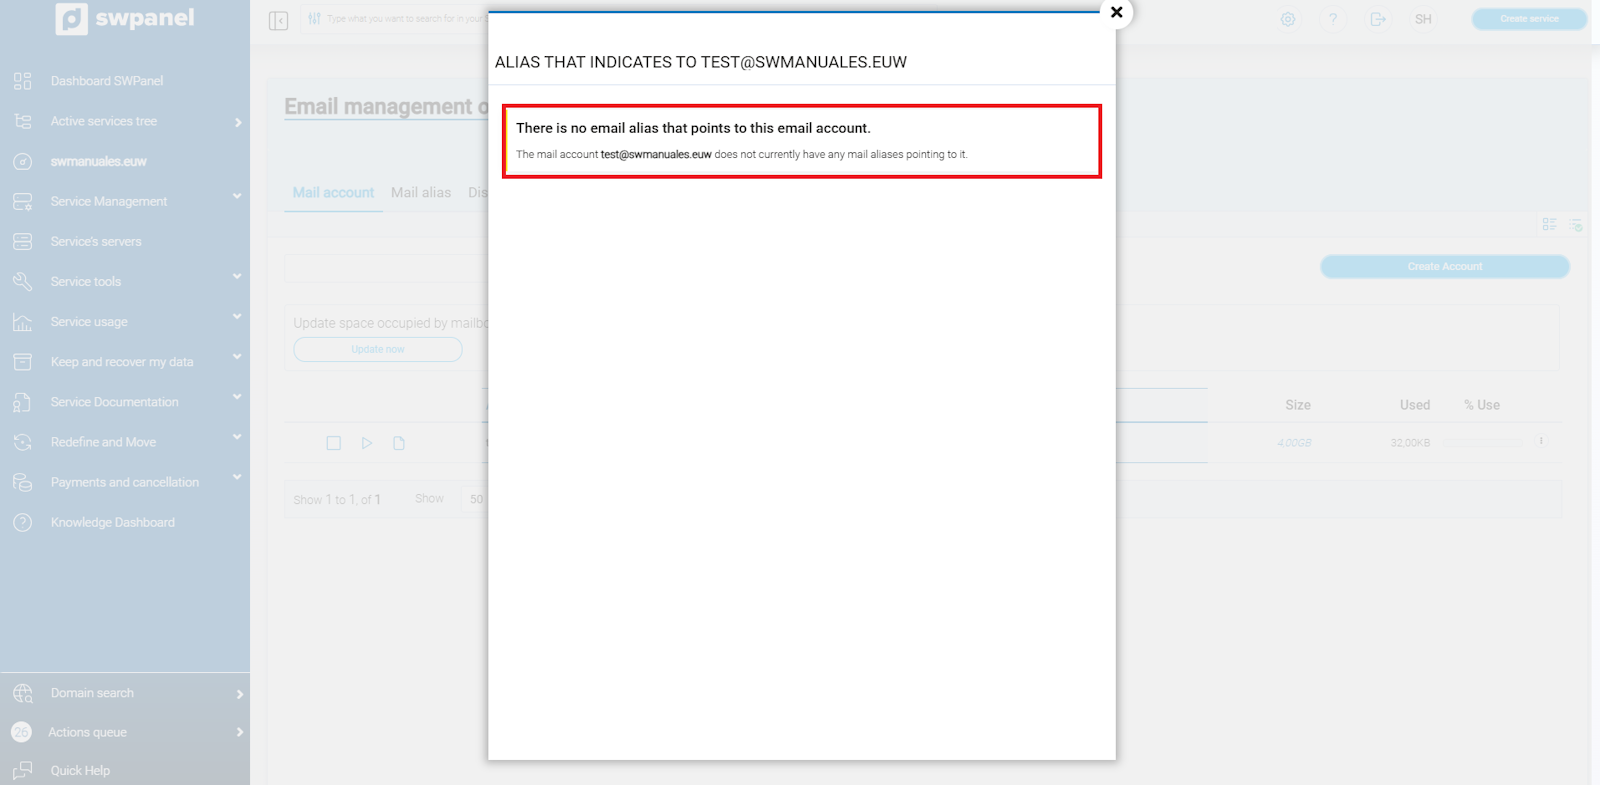
Ver alias que apuntan a esta cuenta
En este apartado podrás visualizar todos los alias que están asociados a la cuenta de correo seleccionada.
- Podrás ver cada alias activo y su correspondencia con la cuenta principal.
- Esta información te permite controlar y gestionar los alias de manera centralizada.
info_capture ℹ️ Nota: La captura es orientativa, tomada sobre la versión 2026.000.0001 con fecha 15/02/2026. Puede diferir de la versión actual de SWPanel.
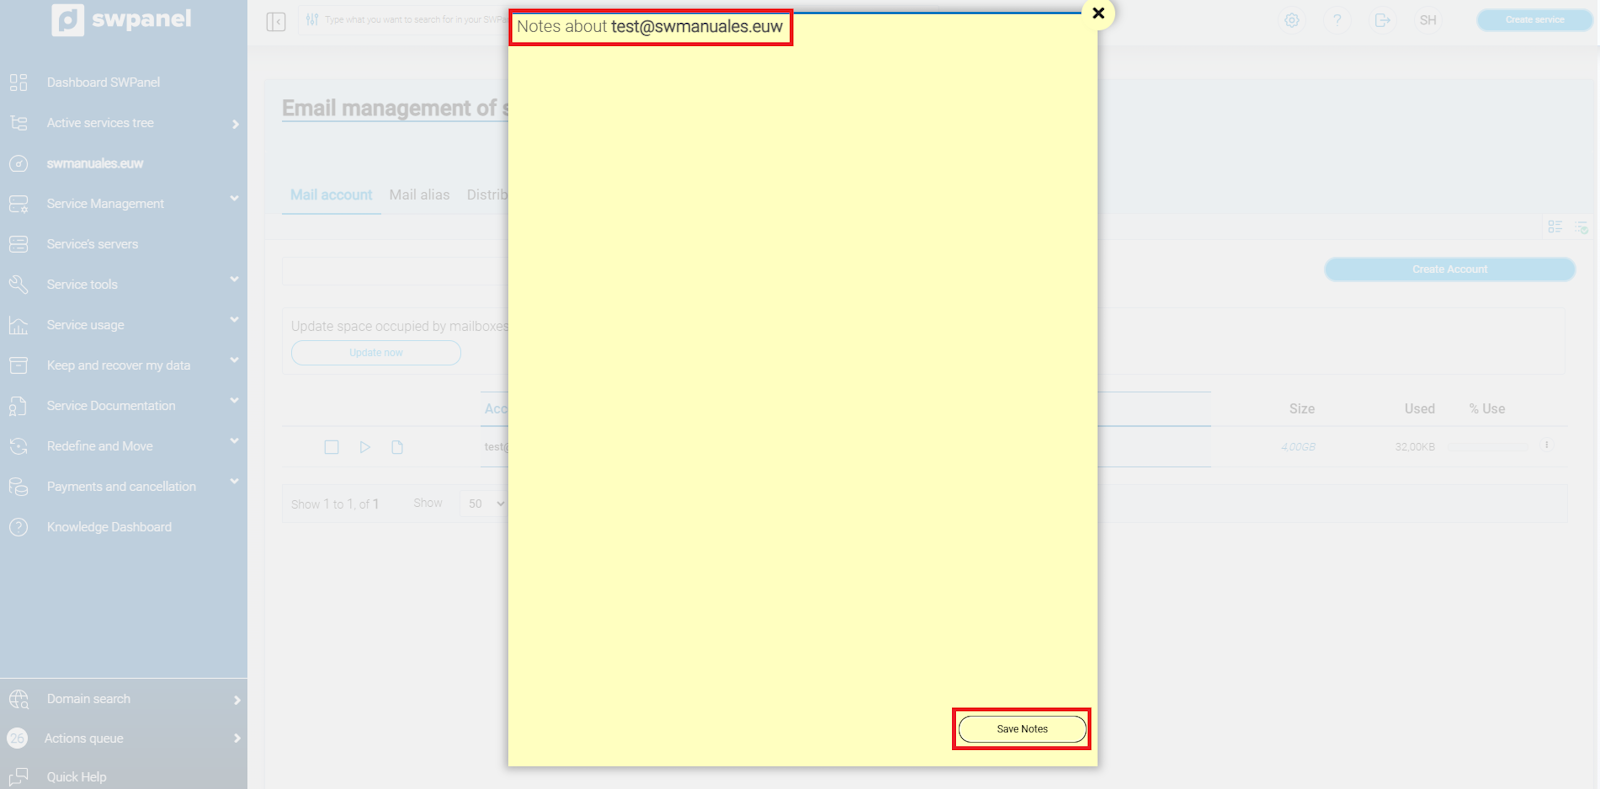
Abrir Post-It de notas
En este apartado puedes utilizar el Post-It de notas para registrar cualquier observación o comentario relacionado con la cuenta de correo.
- Puedes anotar información importante, recordatorios o detalles específicos de la cuenta.
- Esta herramienta permite mantener un registro interno que solo será visible dentro del panel de gestión de correo.
info_capture ℹ️ Nota: La captura es orientativa, tomada sobre la versión 2026.000.0001 con fecha 15/02/2026. Puede diferir de la versión actual de SWPanel.
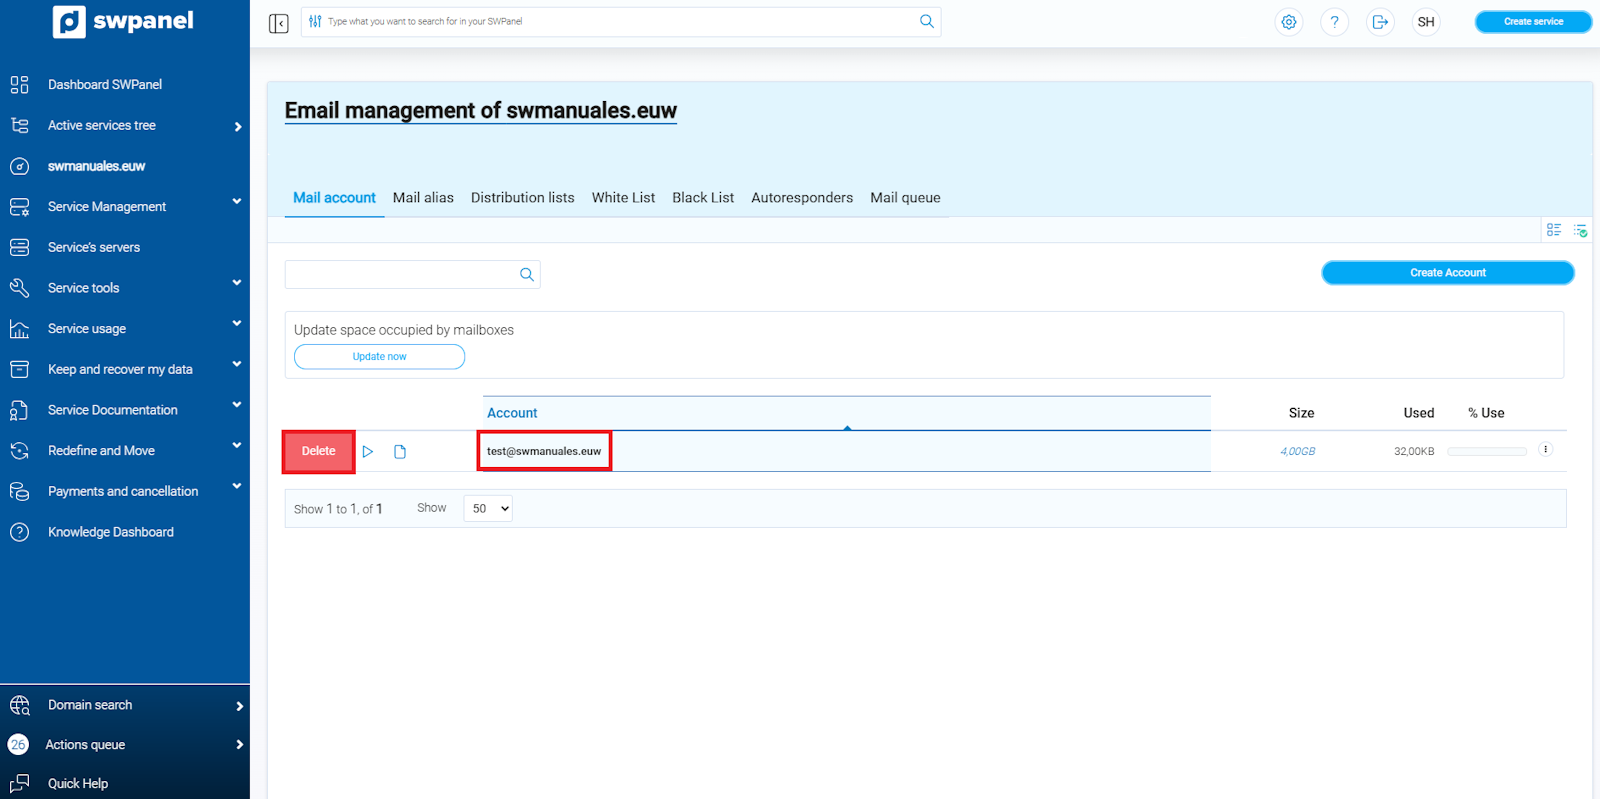
Borrar esta cuenta de correo
Con esta opción puedes eliminar completamente la cuenta de correo seleccionada.
- Al seleccionar esta acción, se mostrará un icono de advertencia (un botón rojo) junto al nombre de la cuenta, indicando que la operación es irreversible.
- Importante: Este proceso eliminará todos los mensajes y datos de la cuenta, sin posibilidad de recuperación.
- Se recomienda descargar previamente los correos en tu gestor de correo si deseas conservar alguno o todos los mensajes antes de proceder con la eliminación.
info_capture ℹ️ Nota: La captura es orientativa, tomada sobre la versión 2026.000.0001 con fecha 15/02/2026. Puede diferir de la versión actual de SWPanel.
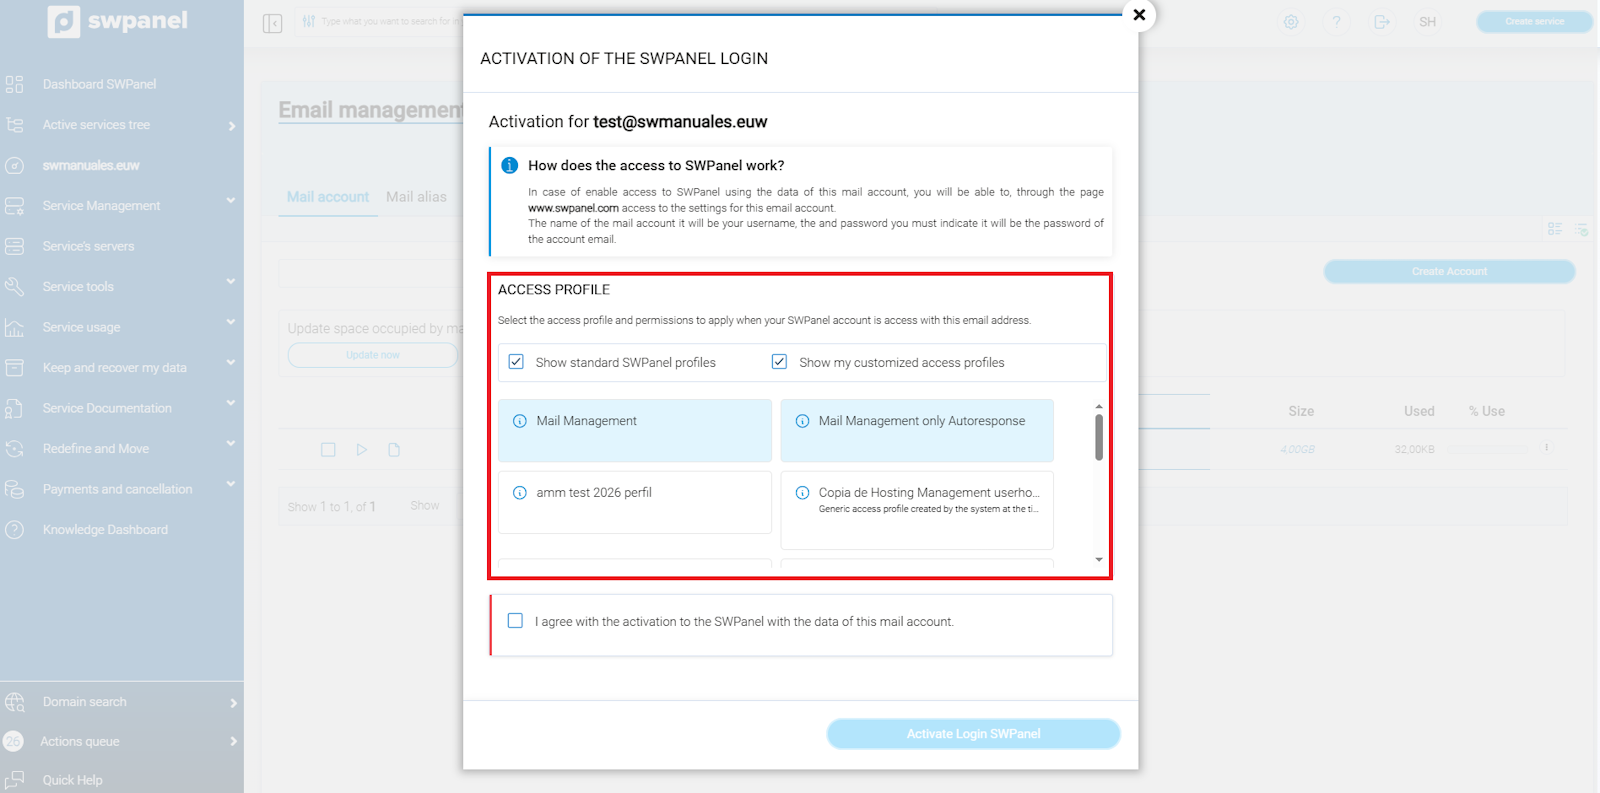
Activar Login de SWPanel para esta cuenta
Con esta opción puedes crear un perfil de acceso SWPanel específico para la cuenta de correo seleccionada.
- El usuario creado podrá gestionar y modificar los detalles de esta cuenta, pero no podrá cambiar la limitación de espacio del buzón de correo.
- Esta funcionalidad permite otorgar acceso restringido y seguro a usuarios que necesiten administrar la cuenta sin comprometer otros recursos del panel.
info_capture ℹ️ Nota: La captura es orientativa, tomada sobre la versión 2026.000.0001 con fecha 15/02/2026. Puede diferir de la versión actual de SWPanel.
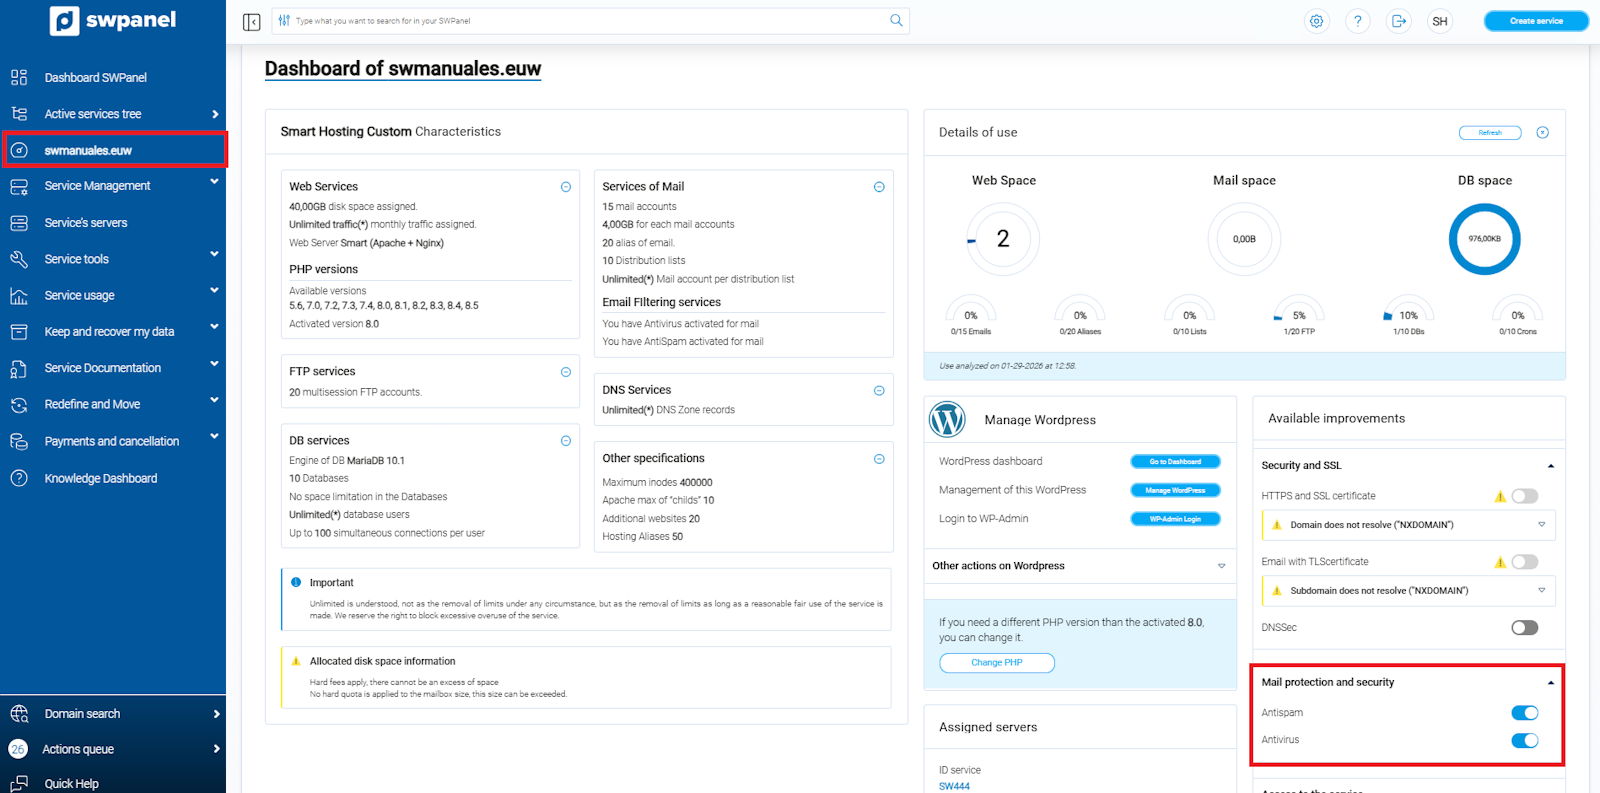
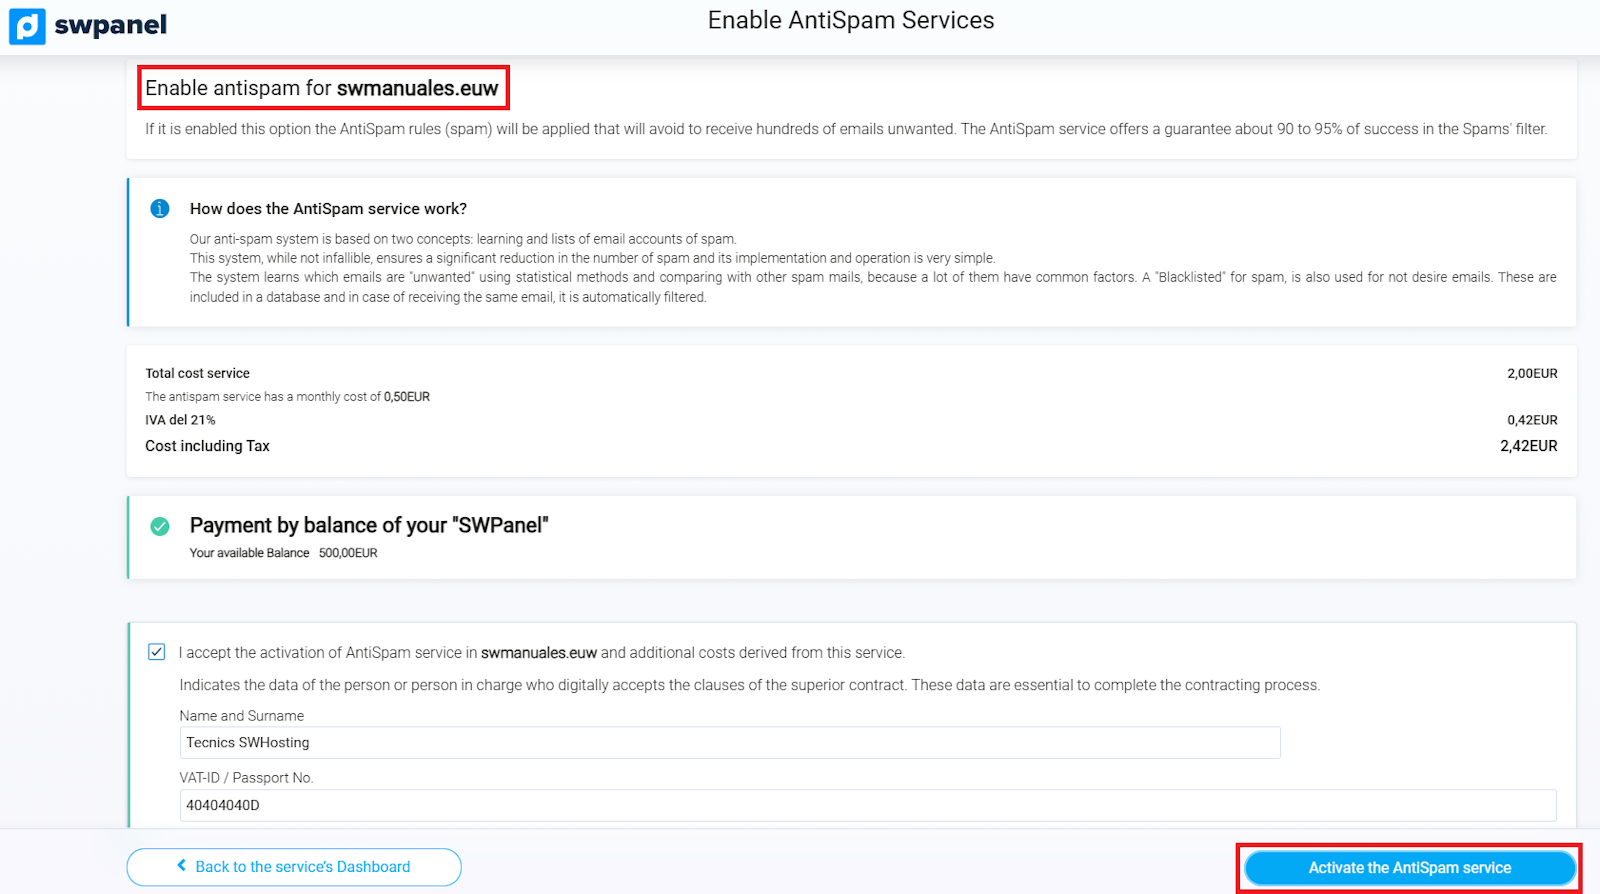
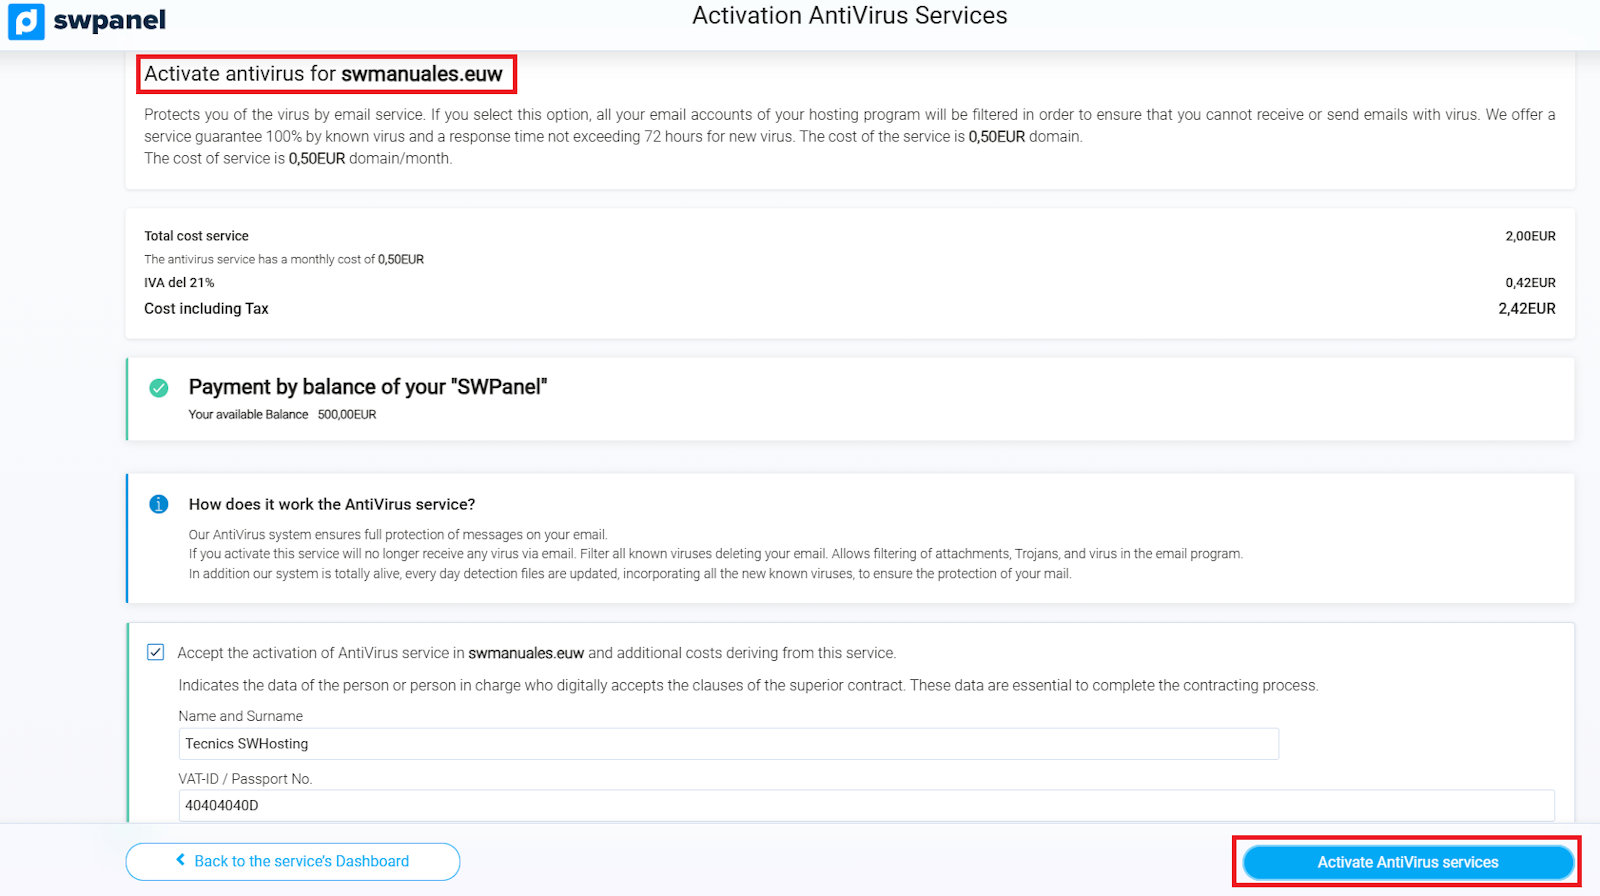
Seguridad (Antispam / Antivirus)
Con los servicios de Antispam y Antivirus activados, puedes aumentar el nivel de seguridad de tu cuenta de correo electrónico y proteger tus comunicaciones frente a amenazas externas.
info_capture ℹ️ Nota: La captura es orientativa, tomada sobre la versión 2026.000.0001 con fecha 15/02/2026. Puede diferir de la versión actual de SWPanel.
Nuestro sistema Antispam detecta automáticamente remitentes con indicios de envío masivo de correos o contenido sospechoso (spam), bloqueando estos mensajes antes de que lleguen a tu bandeja de entrada.
info_capture ℹ️ Nota: La captura es orientativa, tomada sobre la versión 2026.000.0001 con fecha 15/02/2026. Puede diferir de la versión actual de SWPanel.
Por su parte, el sistema Antivirus analiza los correos entrantes en busca de posibles amenazas, como archivos maliciosos o adjuntos infectados, bloqueándolos de forma preventiva para evitar riesgos o infecciones en tus dispositivos.
info_capture ℹ️ Nota: La captura es orientativa, tomada sobre la versión 2026.000.0001 con fecha 15/02/2026. Puede diferir de la versión actual de SWPanel.