Choose how you want to use SWPanel
Self-Hosted
Install SWPanel on your own server and take full control of your infrastructure.
Cloud
Access SWPanel in the cloud without complex configurations. Fast, secure, and ready to use.
Our Deployment Partners
To deploy Cloud quickly and easily on our SWPanel control panel, we work with partners specialized in cloud deployment. These partners collaborate closely with us to provide automatic installation, optimized configuration, and ongoing support, making it easy for you to activate and manage your cloud infrastructure hassle-free.
Our main partner offering personalized support and our SWPanel to deploy and manage Cloud automatically and easily.

Enables rapid Cloud server deployment with optimized configuration and great ease of use.

Offers flexible options and competitive pricing for Cloud deployments integrated with SWPanel.

World leader providing a wide variety of advanced Cloud services, integrated to facilitate management in our panel.

Brings innovation and power in analytics and artificial intelligence, directly connected to our system for efficient management.

Specialized in hybrid enterprise environments, integrated with SWPanel to offer automatic Cloud deployment and control.
How to install SWPanel on your Server - SWPanel Self-Hosted
SWPanel is a control panel for administering web hosting servers. It is under a proprietary licence and specifically designed to be compatible with Linux Debian servers. It offers an intuitive and dynamic web interface that allows for the centralised management of websites, content management systems (CMS), email accounts, MariaDB databases, FTP access and DNS records. This interface is accessible via the web https://go.swpanel.com and works in SaaS mode.
Management in SWPanel is organised into several different levels of access and privileges
- Administrator
- User
- Up to 10 levels of depth and nesting
- RHA client
- Access by services
- Hosting plans, servers or services
- Email user
- VPN user
each with their own specific permissions through the use of personalised access profiles designed to adapt them to their functions.
Its main features include:
-
Centralised management: Manages all resources from a single simplified panel.
-
Automation: Simplifies recurring tasks, such as the installation of content managers (WordPress, Joomla), SSL certificate management and email account creation.
-
Monitoring and alerts: Allows real-time monitoring of the security, availability and performance of services, with automatic notifications in case of incidents.
-
Advanced security: Integrates its own firewall, protection against DDoS attacks, efficient backup management and advanced access controls.
-
Multi-user and reseller support: Ideal for agencies, developers and hosting providers that need multiple levels of access.
-
Detailed reporting and statistics: Generates comprehensive reports on performance, resource use, traffic and consumption, facilitating better decision-making.
Having explained what SWPanel is and all the potential uses, we will focus on how to install an operational version of SWPanel on any server. In this manual we will show you step by step how to do it.
You can install the Self-Hosted version of SWPanel on your server using two different methods:
1. Manual installation from the server console:
This method is most recommended for advanced users or experienced system administrators, as it involves executing commands directly from the server terminal.
2. Assisted or automatic installation from the web https://go.swpanel.com:
This is the easiest and most convenient option for installing SWPanel. All you need to know is the IP address of your server and the password for the "root" user. By entering this data on the installation page, the process will run automatically.
Below we explain step by step how to install SWPanel on your server.
Installing SWPanel manually
Step 1: Preparing the system
The system update process and the installation of SWPanel must be carried out by the root user.
To avoid confusion, in this manual, commands that begin with the
$symbol indicate that they should be executed with an unprivileged user, while commands that begin with the#symbol indicate that they should be executed as the root user .
To do this, you must access your server's command line interface and execute the commands:
danger ❕ Execute the following command if you have not logged in as the root user. It will grant you access as the root user and its full environment.
$ sudo su -
In addition, you should bear in mind the following three points in order to link the SWPanel licence to your server:
-
The server must be active and have an Internet connection.
-
You must ensure that the server's port 3203 is open.
-
If the server is located in a network with NAT, you must redirect port 3203 to that server.
-
That no security system has blocked requests from SWPanel, whose requesting IPs are 81.25.112.X.
Step 2: Install SWPanel
To install SWPanel, you must access the command line of your Linux server and use the following command to download and execute the installation script:
# wget -qO - https://deployment.swpanel.com/install.sh | bash
Once the execution script has been launched, you will see the following warning. You must type ‘yes’ to continue. Otherwise, the process will end here without making any changes to the server.
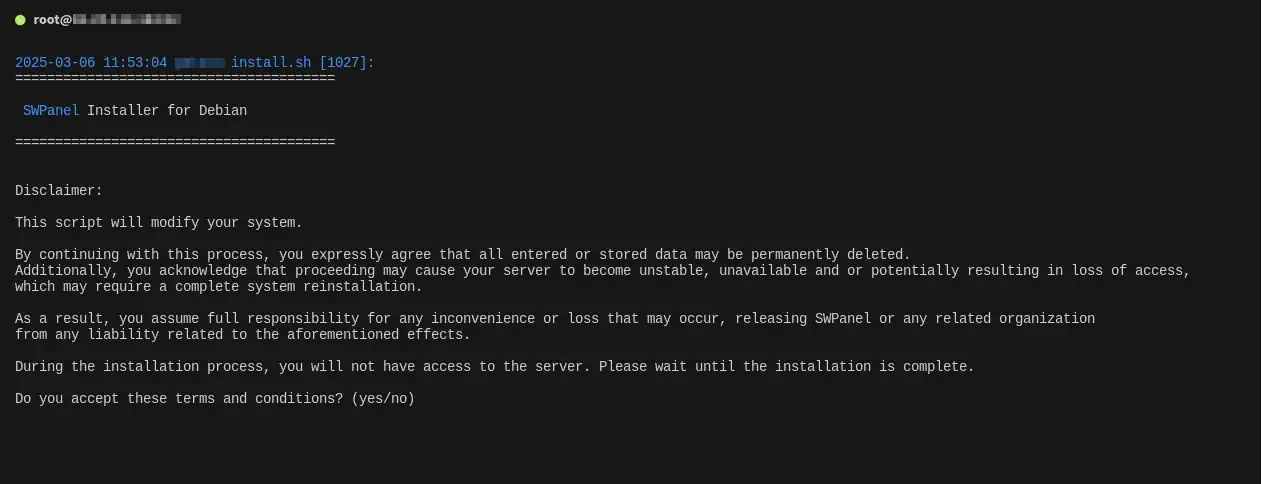
By indicating yes and pressing the Enter key on your keyboard, the system will end your session. Access to your server will be blocked in order to install SWPanel. As soon as the process is finished, the system will be unlocked.
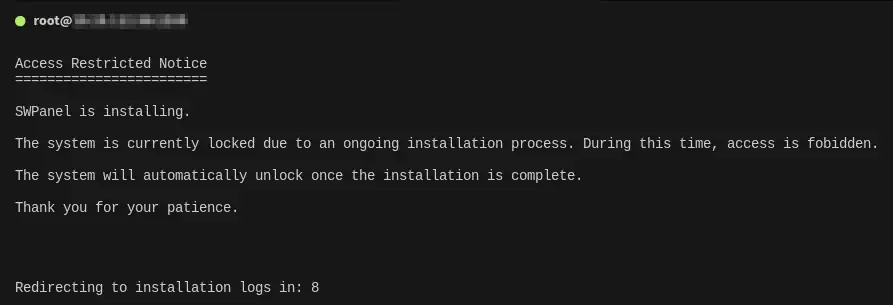
If you access your server while the process is being installed, you will see a message informing you that the installation is in progress and access is blocked. After a ten-second countdown, you will see the installation logs.

Once SWPanel has been installed, the server will restart automatically. When you reconnect to your server console, the following message will appear on screen:
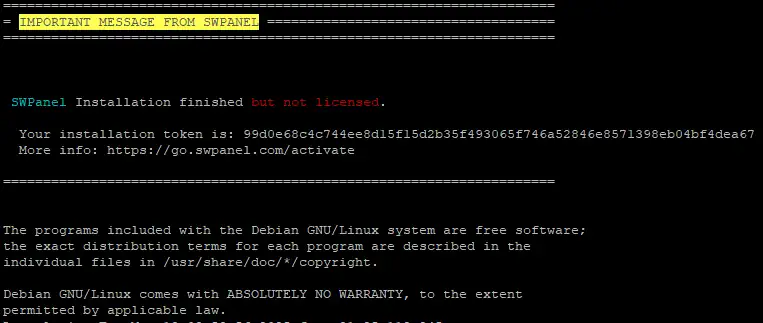
At this point the SWPanel installation process on your server will have finished and you will have your installation token. You must save it as you will need it for the next step. Next you must start the licence activation process so that your server starts working with SWPanel
Step 1: Create SWPanel user account
If you already have a user account, skip to step 2.
In order to use SWPanel it is essential that you have an active user account. If you don't have one, you will have to create one. Consult the following manual to find out how to create an SWPanel user account 📃 Manual: How to register in SWPanel.
Step 2: Activate your installation token
You now have a user account, access the system from this link:
https://go.swpanel.com/activate/
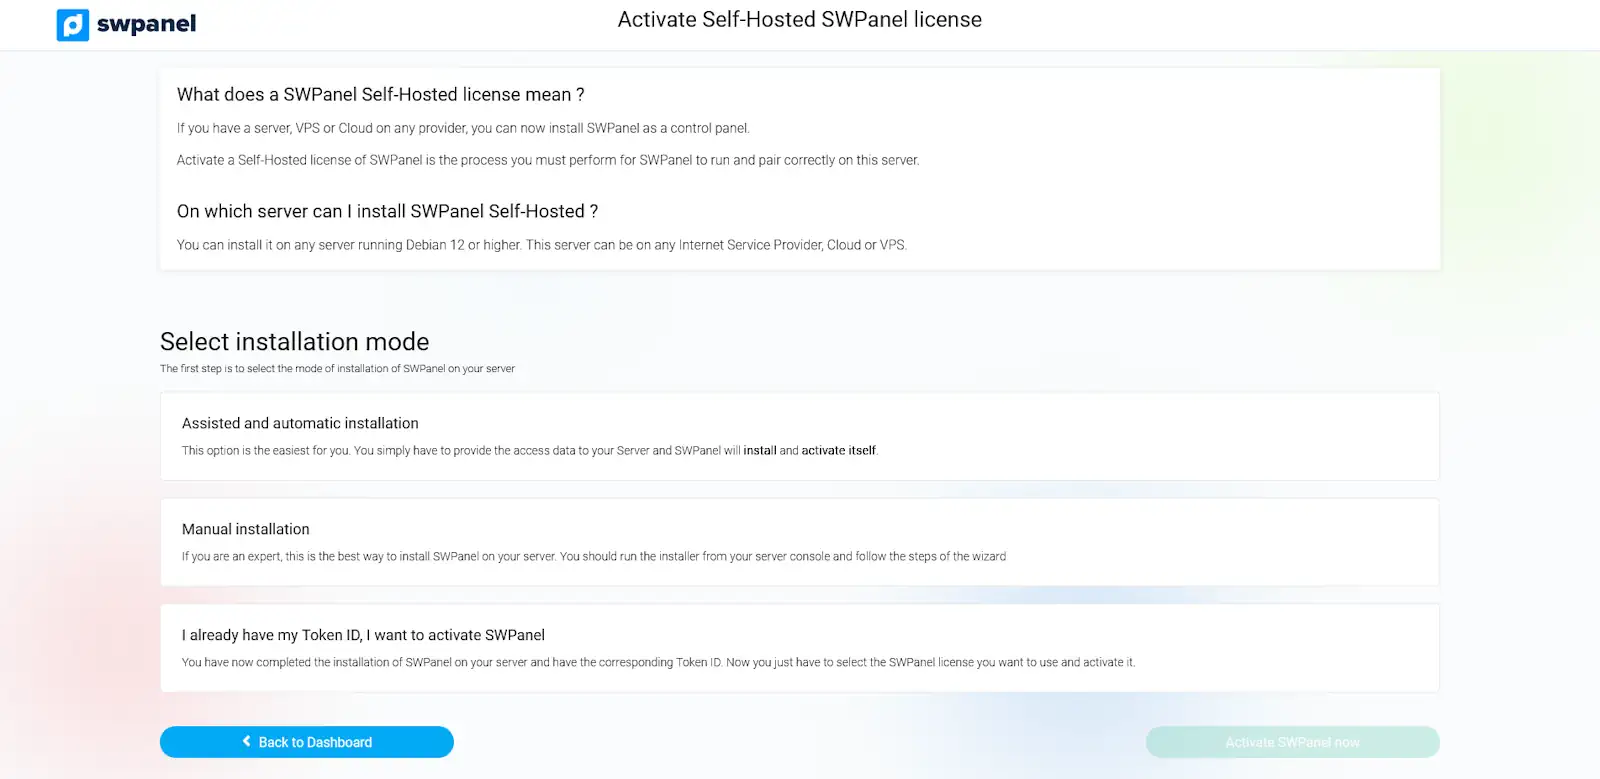
You will need to identify yourself with your SWPanel user account, once you have done so you will access the SWPanel Self-Hosted licence activation section
Select the SWPanel Self-Hosted installation mode
SWPanel allows you to select from 3 possible options. In this case you must select I already have my Token ID, I want to activate SWPanel
info_capture The screenshot is for guidance purposes only. It was taken on version 2025.03.0003 dated 26/03/2025. It may differ from what the current version of SWPanel shows
- Enter your installation token or Token ID in the corresponding field.
- Click on ‘Verify Token ID’ to confirm the validity.
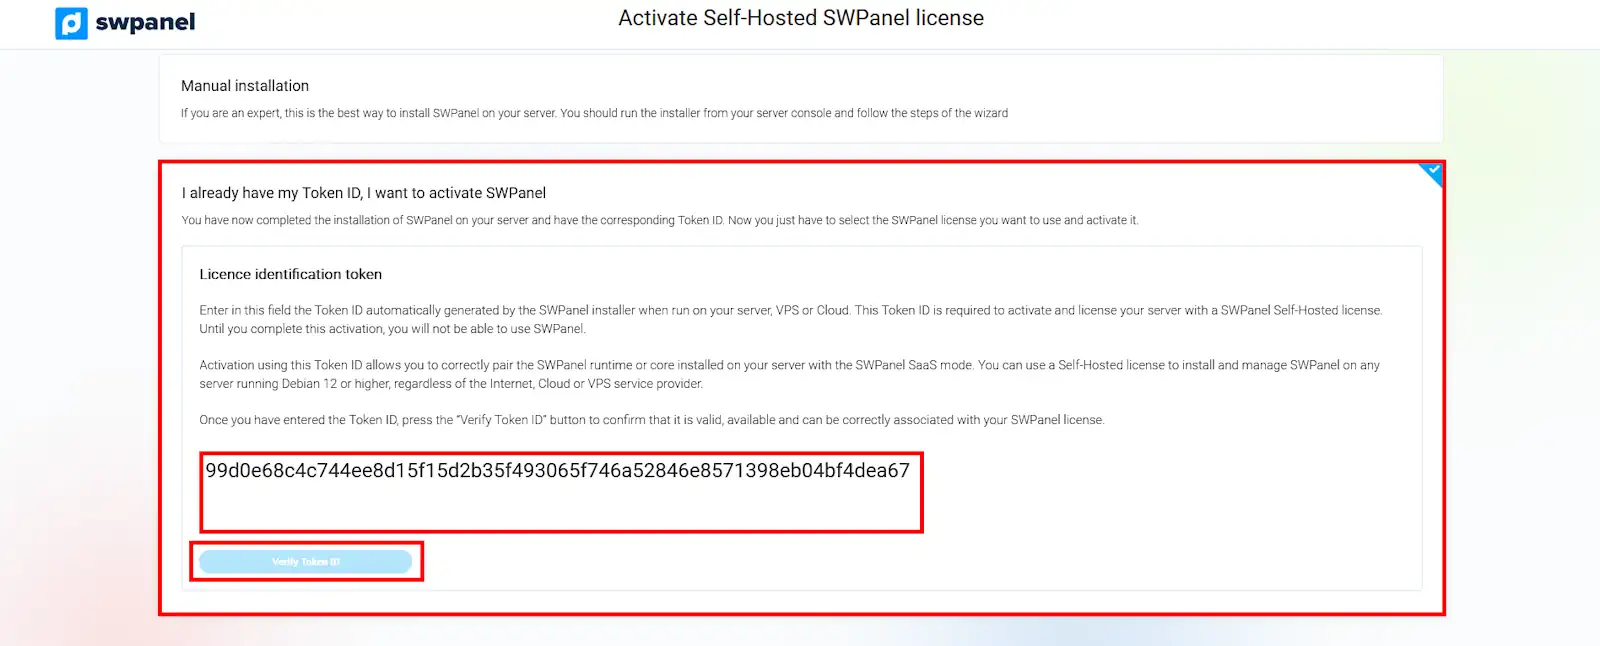
info_capture The screenshot is for guidance purposes only. It was taken on version 2025.03.0003 dated 26/03/2025. It may differ from what the current version of SWPanel shows
Step 3: Licence your server with SWPanel
This is the simplest step. You must select the type of licence you want to use on your server. You have two options
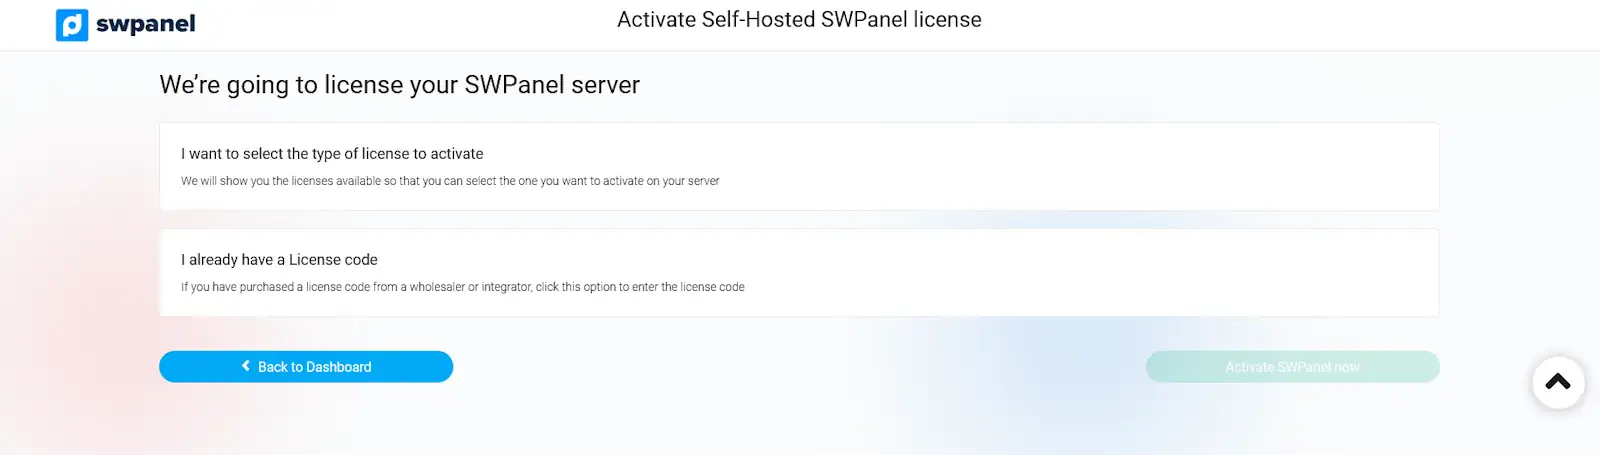
info_capture The screenshot is for guidance purposes only. It was taken on version 2025.03.0003 dated 26/03/2025. It may differ from what the current version of SWPanel shows
1. Select the type of licence to activate The system will allow you to select the licence type that best suits your needs.
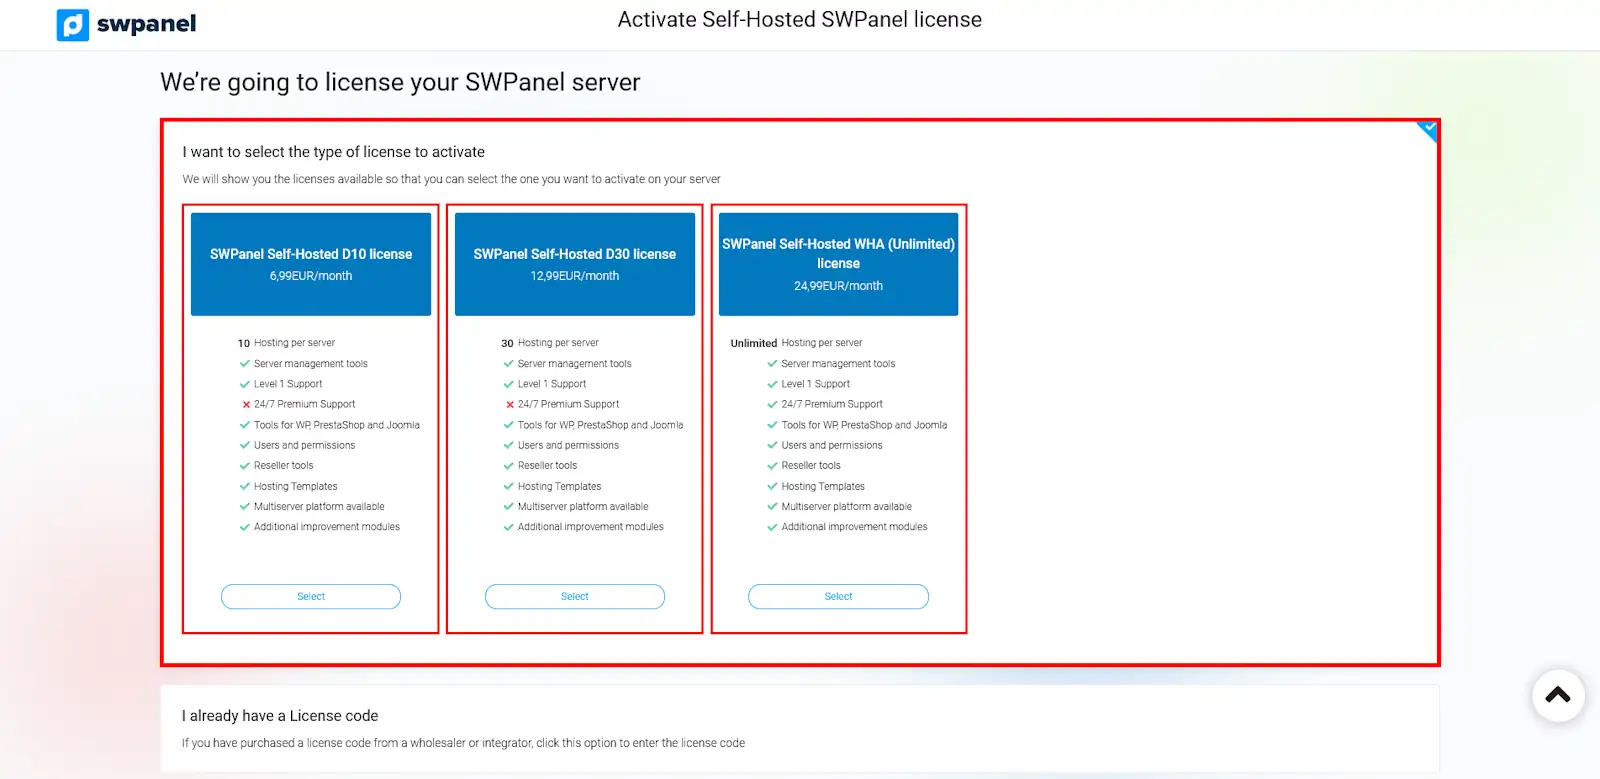
info_capture The screenshot is for guidance purposes only. It was taken on version 2025.03.0003 dated 26/03/2025. It may differ from what the current version of SWPanel shows
2. I already have a licence code
If you have purchased a SWPanel licence from a wholesaler or integrator, you must select this option and enter the licence code. Once you have entered it, click on the Verify licence code button to proceed with verification and activation.
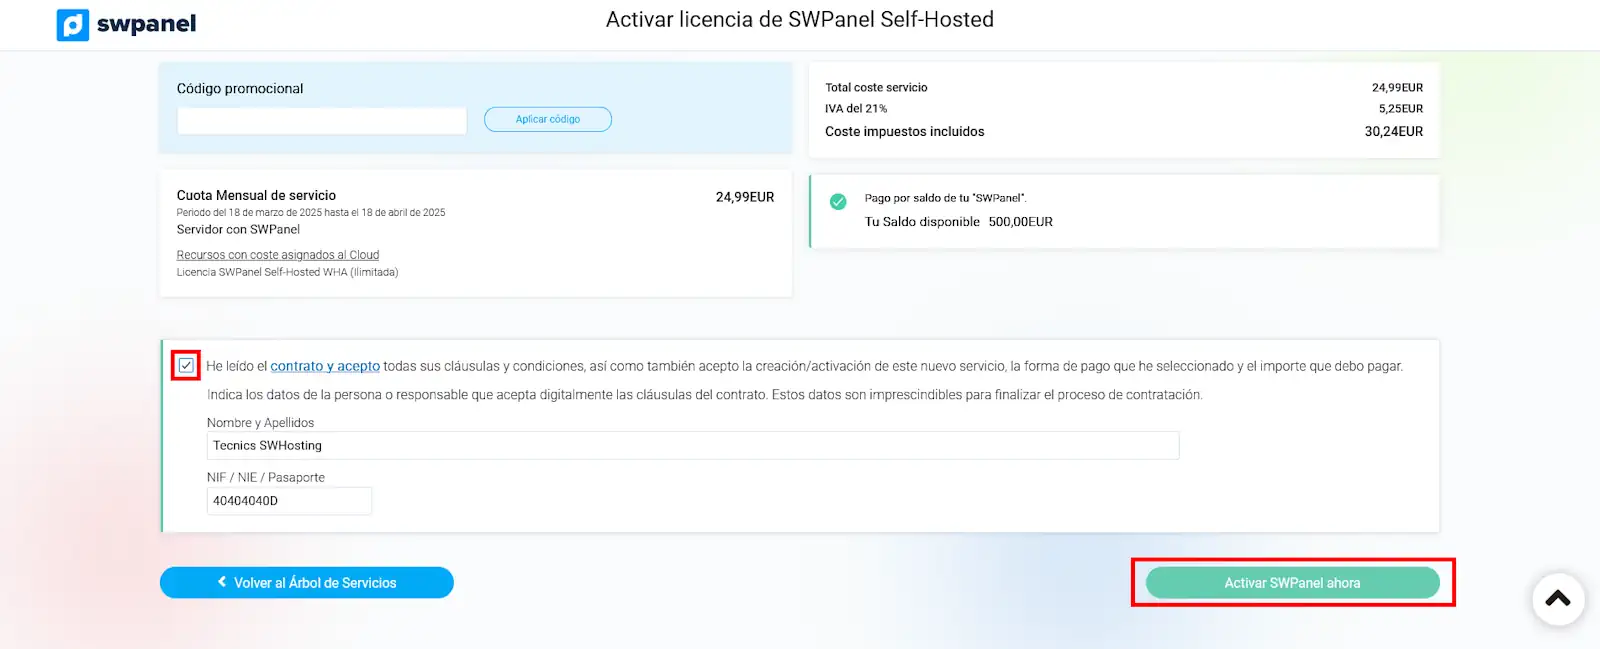
Step 4: Activation and payment of the licence
You are now at the last step. Simply pay the amount for the licence you have selected and accept the SWPanel contract and/or user agreement.
Finish the process and start the activation by clicking on the "Activate SWPanel now" button.
Installing SWPanel in an assisted or automatic way
This is the simplest process for installing SWPanel on your server. Before starting you must have an active SWPanel user account.
Consult the following manual to find out how to create an SWPanel user account 📃 Manual: How to register in SWPanel.
Once you have created and activated your SWPanel user account, you can start the installation process automatically and remotely on your Server.
Step 1: Access SWPanel
https://go.swpanel.com/activate/
Once inside the main panel (Dashboard), go to the blue side menu and click on Activate SWPanel Self-Hosted:
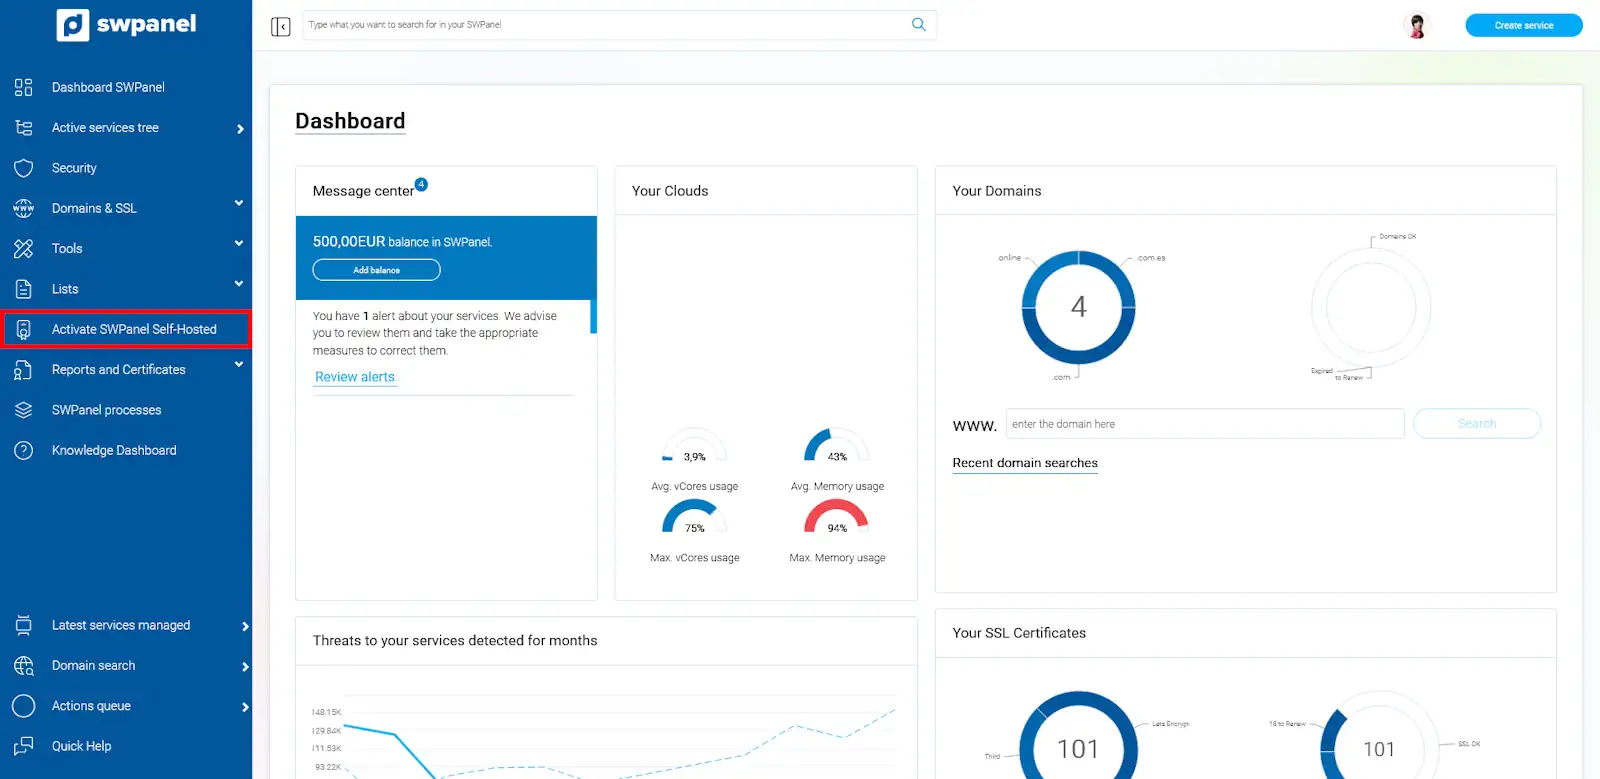
info_capture The screenshot is for guidance purposes only. It was taken on version 2025.03.0003 dated 26/03/2025. It may differ from what the current version of SWPanel shows
Step 2: Selecting the SWPanel Self-Hosted installation mode
After accessing the activation section, three methods for installing SWPanel will be presented:
info_capture The screenshot is for guidance purposes only. It was taken on version 2025.03.0003 dated 26/03/2025. It may differ from what the current version of SWPanel shows
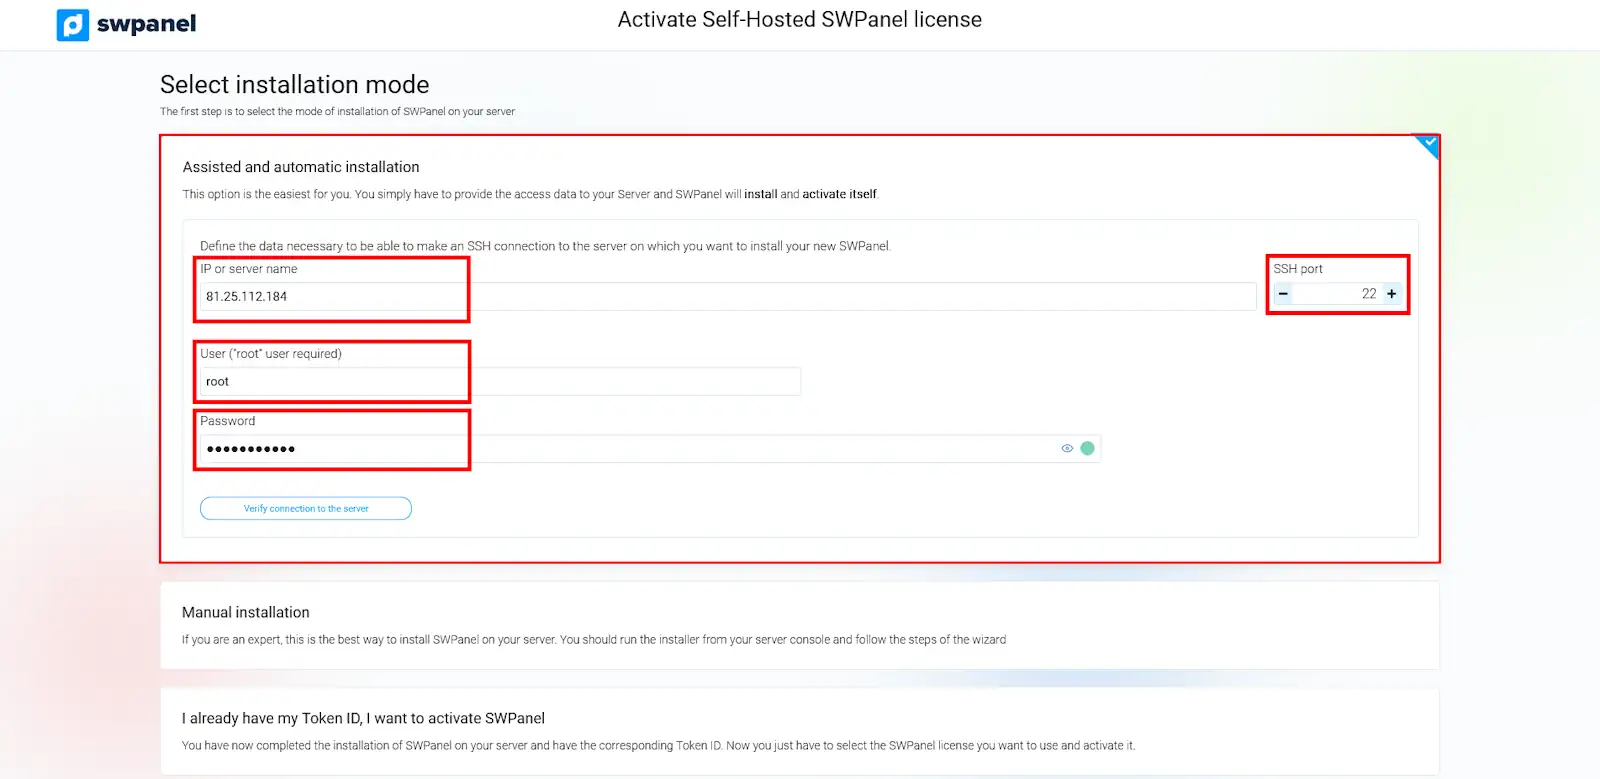
Step 3: Assisted and automatic installation
Recommended method for users without advanced technical knowledge.
Prerequisites:
- Public IP address of the server.
- SSH port (by default it is usually 22).
- Password of the root user.
info_capture The screenshot is for guidance purposes only. It was taken on version 2025.03.0003 dated 26/03/2025. It may differ from what the current version of SWPanel shows
Steps:
- Enter the server's IP address, the SSH port and the root password.
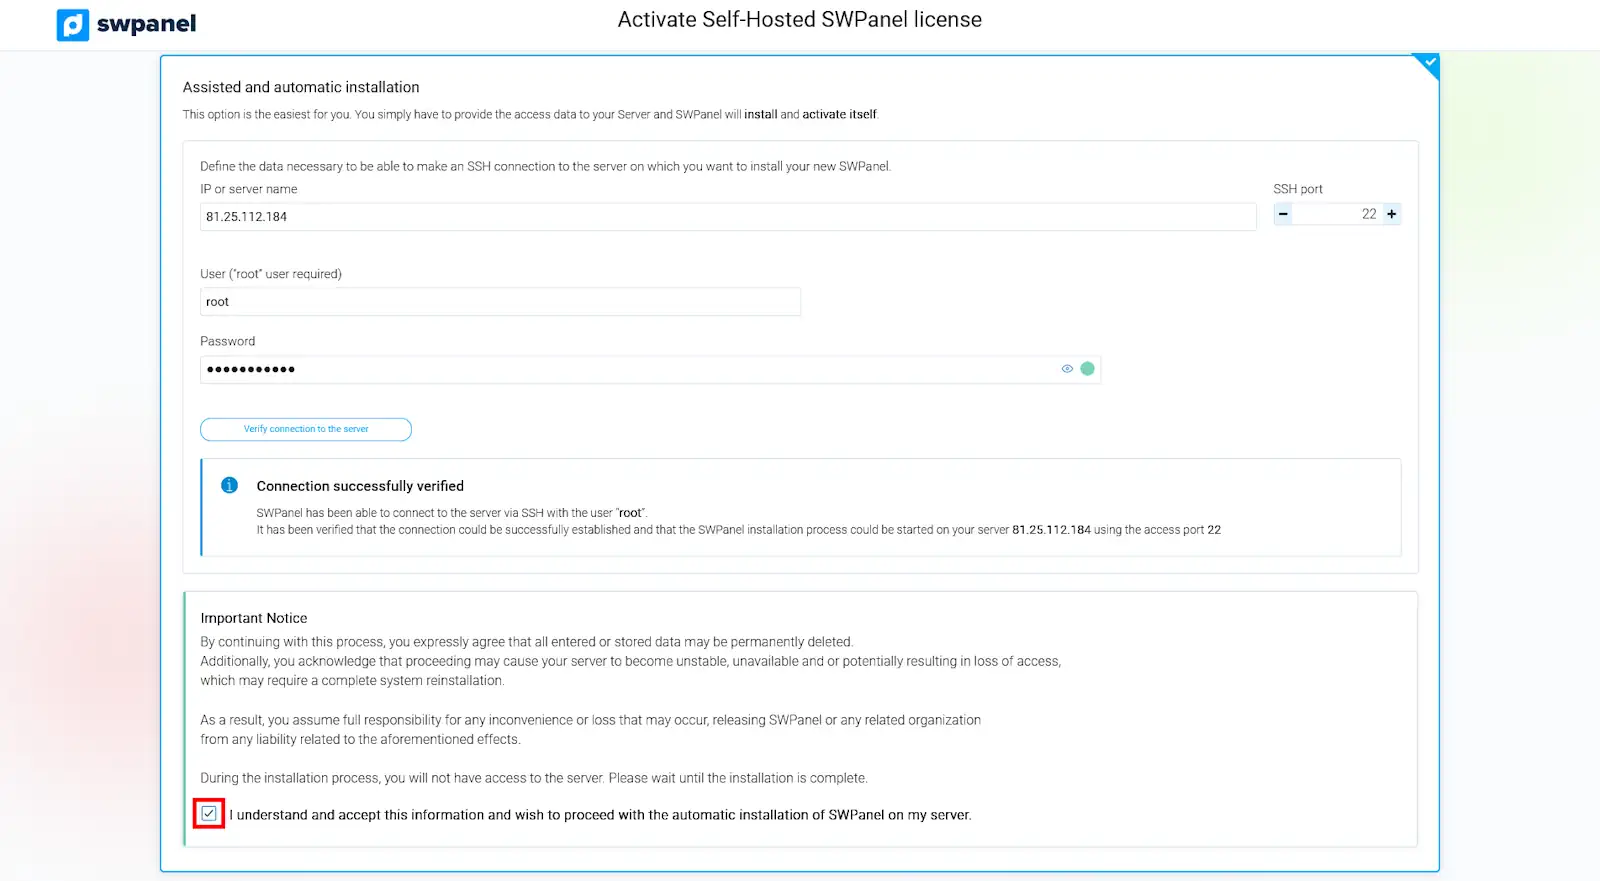
- Click on "Verify connection to the server".
- Accept the disclaimer by ticking the corresponding box:
info_capture The screenshot is for guidance purposes only. It was taken on version 2025.03.0003 dated 26/03/2025. It may differ from what the current version of SWPanel shows
- Once the connection has been verified and the disclaimer accepted, SWPanel will start the installation automatically, without any further user intervention.
Step 4: Selecting the type of licence
This is the simplest step. You must select the type of licence you want to use on your server. You have two options
info_capture The screenshot is for guidance purposes only. It was taken on version 2025.03.0003 dated 26/03/2025. It may differ from what the current version of SWPanel shows
1. Select the type of licence to activate The system will allow you to select the licence type that best suits your needs.
info_capture The screenshot is for guidance purposes only. It was taken on version 2025.03.0003 dated 26/03/2025. It may differ from what the current version of SWPanel shows
2. I already have a licence code
If you have purchased a SWPanel licence from a wholesaler or integrator, you must select this option and enter the licence code. Once you have entered it, click on the Verify licence code button to proceed with verification and activation.
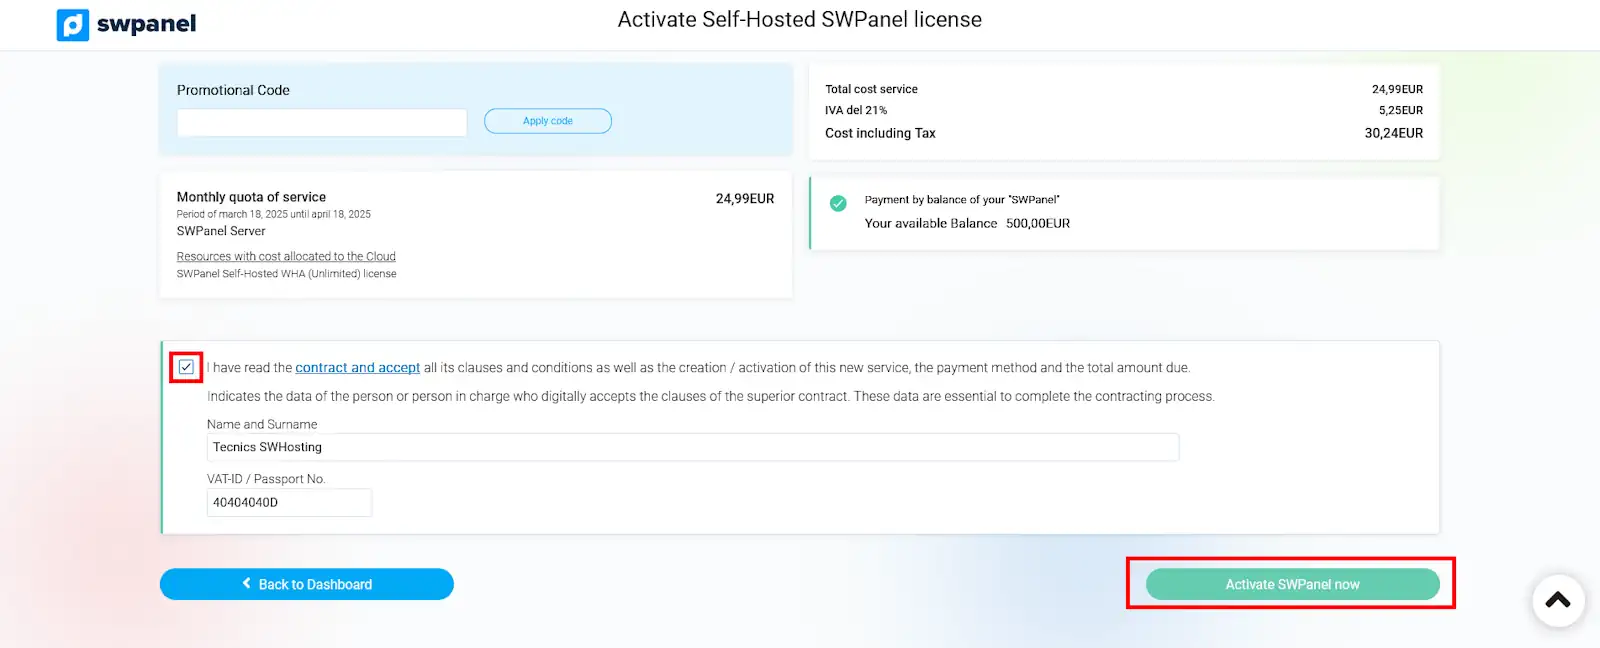
Step 5: Activation and payment of the licence
You are now at the last step, now you simply have to pay the amount for the licence you have selected and accept the contract and/or agreement to use SWPanel.
Finish the process and start the activation by clicking on the button "Activate SWPanel now"
info_capture The screenshot is for guidance purposes only. It was taken on version 2025.03.0003 dated 26/03/2025. It may differ from what the current version of SWPanel shows
Do you know how to install SWPanel on your server automatically?
With SWPanel’s automatic installation, the process is fast and simple. Just enter your server details and the system will handle all the configuration for you. In just a few minutes, your Cloud with SWPanel will be active and ready to manage. Enter your server details, follow the payment steps, and start using it all with just one click.
Configure and adapt the features to your needs:
With SWPanel you can deploy and manage your Cloud services immediately, securely and in a scalable way. Our panel allows you to manage your entire infrastructure from a single space, with intuitive tools that help you optimize resources, control costs and ensure maximum performance. In addition, you can configure and adapt all the features of your Cloud to your needs, enjoying the flexibility and confidence necessary to grow without limits.
Request a demostration
Are you a business or self-employed and want to see how SWPanel works before purchasing?
Request a demo and we'll show you all the features you need.
Advantages over the competition
| Data updated in October 2024 |

€3.49 /month |

€12.99 /month |

€26.99 /month |
|---|---|---|---|
| Hosting Services Management | |||
| DNS Records Management for Domains | |||
| FTP Account Management | |||
| File Management via Web | |||
| Email Account Management | |||
| Email Alias Management | |||
| Distribution List Management | |||
| Directory Permissions Management | |||
| Error Page Management | |||
| Cron Job Management | |||
| Database Management | |||
| MySQL | |||
| MariaDB | |||
| Automatic Installation of WordPress and Prestashop | |||
| Automatic Installation of SSL Certificates | |||
| Let's Encrypt Free Certificates | |||
| Paid Certificates Comodo, Rapid SSL | |||
| Domain Registration | |||
| Automatic Domain Renewal | |||
| Hosting + Domain + Certificate Registration | |||
| Web Hosting Deployment | |||
| Moving Hosting plans between servers | |||
| Move Hosting plans between locations | |||
| Migrate services from Plesk | |||
| Migrate services from any provider | |||
| Deployment and management of Wordpress | |||
| Deployment and management of PrestaShop | |||
| Deployment and management of Moodle | |||
| Integration of MemCache and IA Web acceleration systems | |||
| CloudFlare Free CDN integration | |||
| Limitation of resource use by Hosting | |||
| Hosting Plan Templates | |||
| DNS templates | |||
| Resource control templates | |||
| Web export | |||
| Web export planning according to calendar | |||
| Web Snapshot | |||
| Scheduling Web SnapShots according to calendar | |||
| Infrastructure Management | |||
| Hosting Service Deployment | |||
| Cloud Server Deployment* | |||
| Planned vCores and RAM Scaling for Cloud Servers* | |||
| Multicloud Infrastructure Deployment | |||
| Vertical Scaling Intelligence for Cloud Resources* | |||
| vCores, RAM, and HD Management for Cloud Servers* | |||
| Snapshot Management for Cloud Servers* | |||
| Template Management for Cloud Deployment* | |||
| Local Backup Management | |||
| External Multi-CPD Backups* | |||
| Operating System Updates | |||
| SWPanel Migration Tool | |||
| Server Services Monitoring | |||
| Real-Time Server Status Viewer (netdata) | |||
| Blocking access to websites by country | |||
| Blocking access to websites by continent | |||
| CloudFlare WAF Integration | |||
| AntiSpam Services | |||
| Antivirus Services | |||
| Security, Firewalls, and Networking | |||
| Creation of Private VLANs Between Cloud Servers* | |||
| Creation of SSL VPN* | |||
| Creation of IPSec VPN* | |||
| Community, Newsletter, and Mailing Tools | |||
| Creation of Cloud Storage Service* | |||
| Fail2Ban Management | |||
| Local IP Tables FW Management* | |||
| Perimeter FW Management, Outside Server/Cloud* | |||
| Layer 4 Perimeter FW or IPS* | |||
| Layer 7 or Application Perimeter FW* | |||
| Real-Time Attack Analysis* | |||
| Real-Time Attack Charts and Maps* | |||
| Reports and Administrative Tasks | |||
| Cloud server level security reports (openvas) | |||
| Server Logs Custody | |||
| Domain Registration, Management, and Monitoring | |||
| Integrated Management of Balances, Billing, and Payments | |||
| Administrative Tasks | |||
| Support and Ticket Management | |||
| Reseller Management | |||
| White Label | |||
| Image/Color Customization | |||
| Login Integration with Reseller Website | |||
| User Management | |||
| User Depth Levels | |||
| Domain Management APIs | |||
| User Permission Management | |||
| Access Profile Management | |||
| Access by Email Accounts | |||
| Access by Hosting Service | |||
| Access by User | |||
| A Single Control Panel for All Services | |||
| A Single Main User for All Services | |||
| RHA Module** | |||
| Customer management | |||
| User management | |||
| Domain registration management | |||
| Hosting plan management | |||
| Sales item management | |||
| Contract management | |||
| Tax management | |||
| Billing of services to clients | |||
| Integred white label SWPanel module for customer service management | |||
| Management of collections and customer blances integrating | |||
| Stripe charging module | |||
| Paypal payment module | |||
| Redsys payment module | |||
| SEPA 19 Bank Debit collection module | |||
| Customer support | |||
| Activation/contracting of Hosting Plans | |||
| Control and management of contracting, analysis and BI | |||
| Statistics and metrics of CRM customer acquisition | |||
| Integration with Reseller management services | |||
| Service Connections | |||
| List of IPs connecting to the Web | |||
| List of IPs connecting to the Server | |||
| List of countries connecting to the Web | |||
| List of countries connecting to URLS on the Web | |||
| List of countries connecting to the Server | |||
| List of connection to URLS on the Web | |||
| List of connection to Server URLS | |||
| List of connection to VHosts to the Server |
Do you have any questions?
We’ll answer them for you
You can use SWPanel in two ways:
Self-Hosted: Install SWPanel on your own server and enjoy a free 15-day trial, with full control of your infrastructure.
Cloud: Access the cloud panel with integrated SW Hosting services without complex configurations, quickly and securely.
They are specialized partners that help you deploy SWPanel Cloud quickly, with automatic installation, optimized configuration, and ongoing support.
Yes, you can integrate your provider with SWPanel using custom configurations.
In a few minutes, once all the data has been entered and payment completed, your Cloud with SWPanel will be active and ready to manage from the panel.
After entering the details, you just need to follow the payment steps. Once completed, you can start using SWPanel with a single click.
Do you have any questions?
We’ll answer them for you
The licenses vary by the maximum number of hostings you can manage with SWPanel.
D5 → up to 5 hostings.
D25 → up to 25 hostings.
WHA → unlimited hostings.
This way you can choose the one that best suits your project or business.
Yes. You can start with a small license and upgrade to a larger one at any time, without interruption or data loss.
Exactly. You can configure and adapt your Cloud resources according to your needs. If your project grows, you just need to increase resources and they will be available immediately.
The price includes the chosen license and configured resources (vCores, RAM, disk). There are no hidden costs and you can see the price per hour and more before you hire.
No. SWPanel is designed so that anyone can easily manage hosting and Cloud services. However, if you are a technician you will find advanced management and automation tools.
In this case, the WHA license is the most suitable, as it allows you unlimited hosting and manages everything from a single panel.