SWPanel migration tool
1. Introducción
En esta guía aprenderás a migrar tus servicios desde otro proveedor de hosting hacia tu SWPanel.
La última versión de SWPanel incorpora herramientas que facilitan el traslado de contenido desde proveedores externos. Gracias a estas funciones, podrás transferir de manera más sencilla tu sitio web, bases de datos y cuentas de correo electrónico, reduciendo tiempos y errores durante la migración.
¿Qué aprenderás en este manual?
Al finalizar este manual, sabrás cómo:
- Acceder a la herramienta de migraciones dentro de SWPanel.
- Elegir el tipo de migración que mejor se adapte a tus necesidades.
- Sincronizar tus archivos web, bases de datos y cuentas de correo electrónico de forma segura.
- Verificar que la migración se haya completado correctamente y sin errores.
2. Acceder a la Herramienta de Migraciones
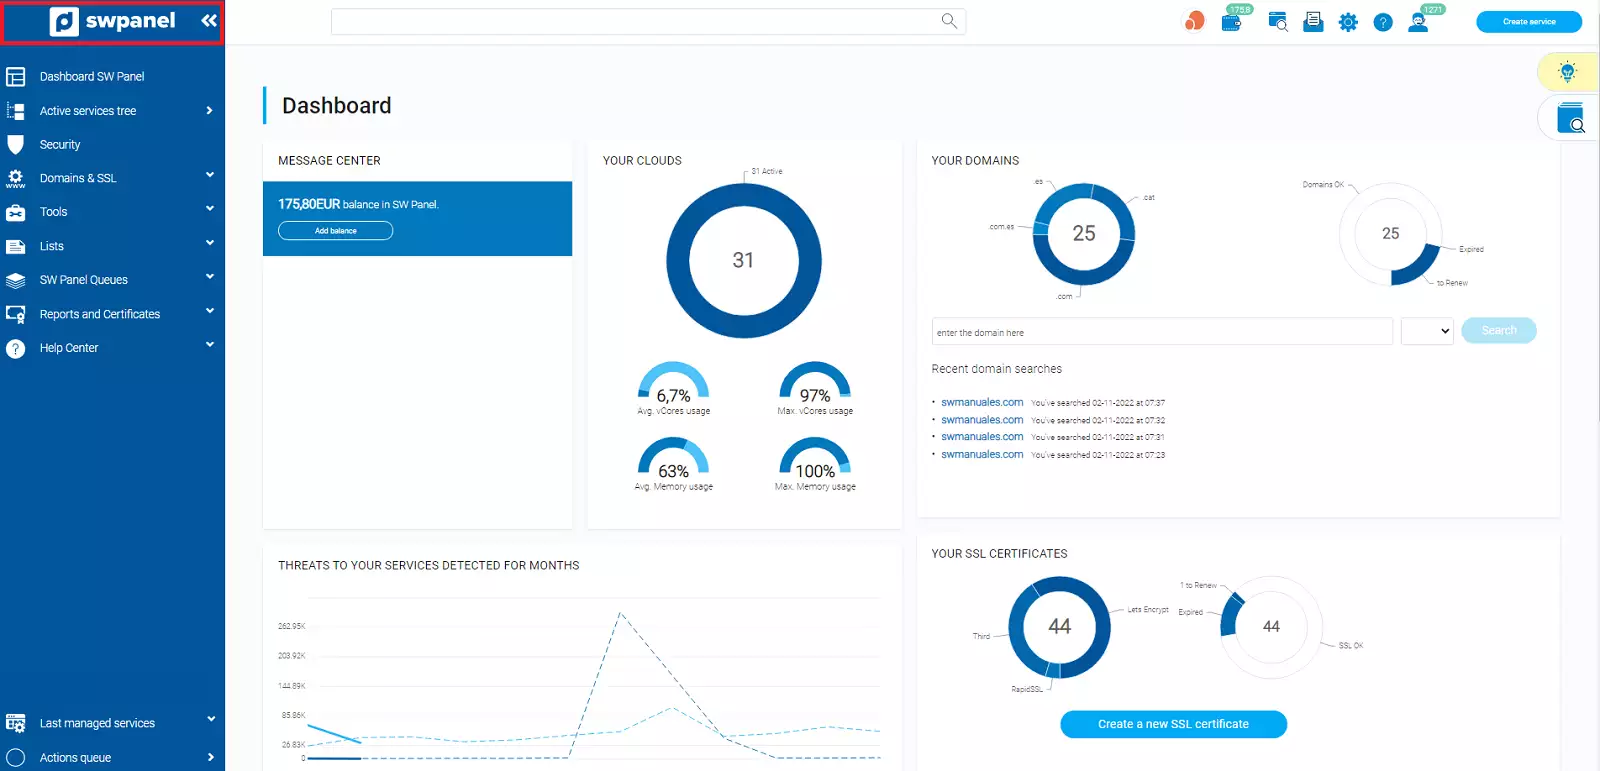
Para iniciar el proceso de migración, primero debes acceder al Dashboard principal de SWPanel. Sigue estos pasos:
- Haz clic en el logotipo de SWPanel (o en tu logo personalizado) situado en la esquina superior izquierda de la pantalla.
info_capture ℹ️ Nota: La captura es orientativa, tomada sobre la versión 2026.000.0030 con fecha 14/03/2026. Puede diferir de la versión actual de SWPanel.
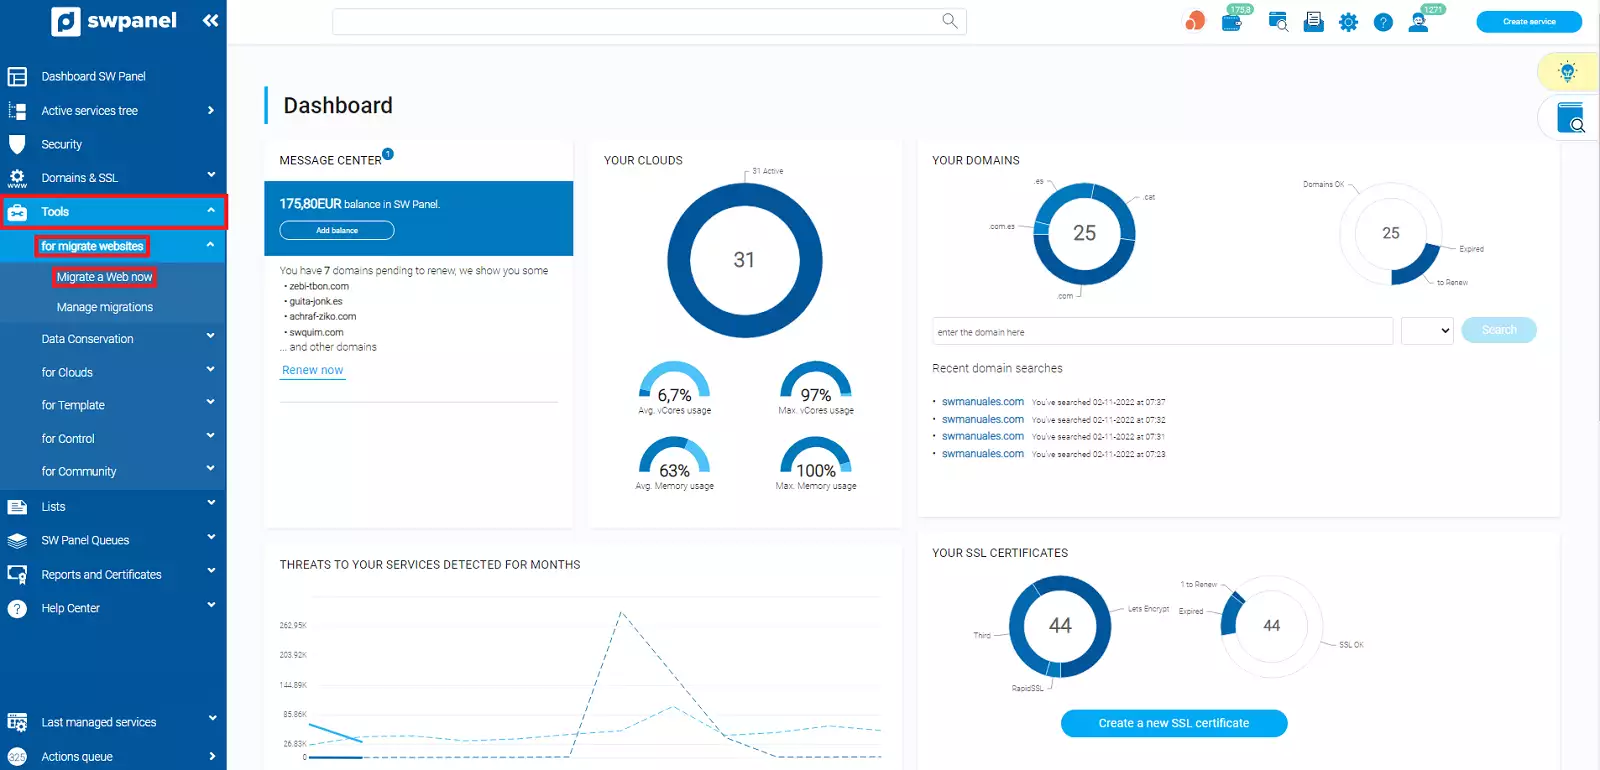
- En el menú lateral izquierdo, navega hasta:
- Herramientas
- Para migrar Webs
- Migrar una Web ahora
info_capture ℹ️ Nota: La captura es orientativa, tomada sobre la versión 2026.000.0030 con fecha 14/03/2026. Puede diferir de la versión actual de SWPanel.
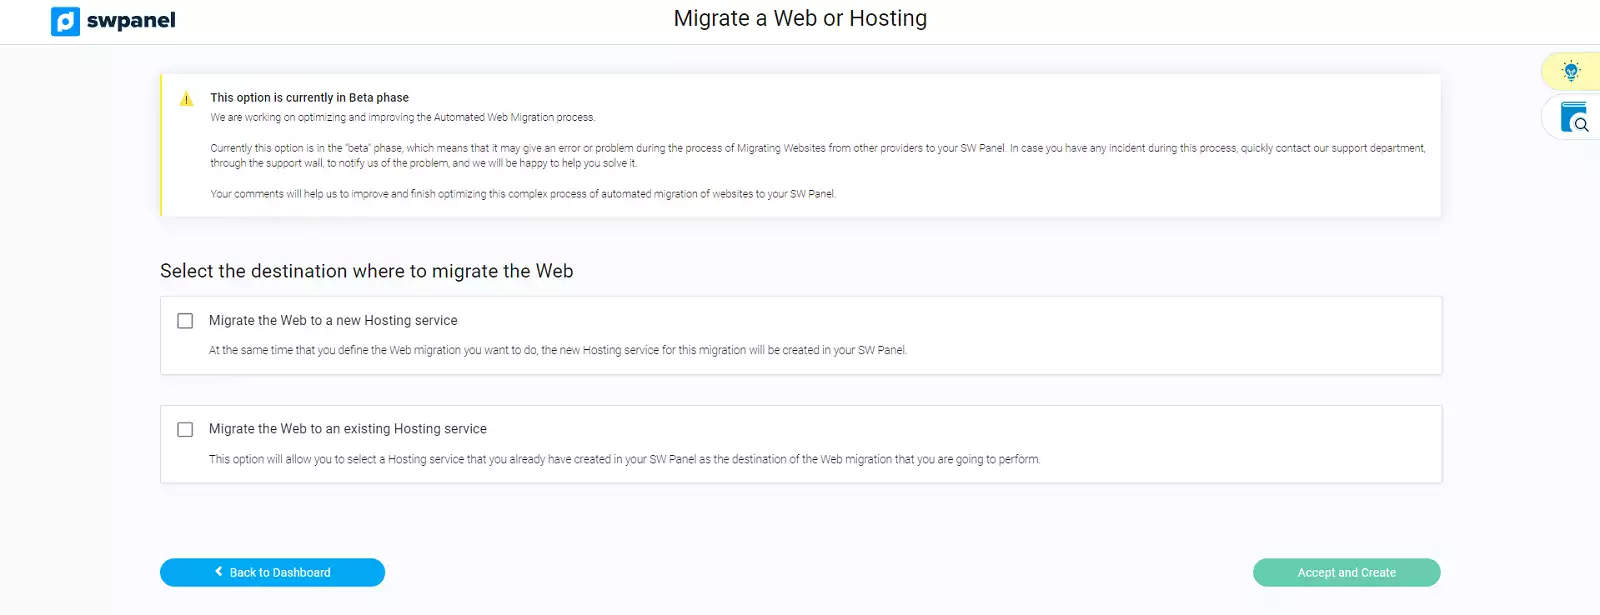
3. Iniciar el Asistente de Migraciones
El asistente de migraciones te acompañará paso a paso durante todo el proceso.
- El primer paso consiste en seleccionar el origen de la migración, es decir, desde dónde deseas trasladar tu sitio web.
- Para este ejemplo, elegiremos la opción Cualquier panel de control.
info_capture ℹ️ Nota: La captura es orientativa, tomada sobre la versión 2026.000.0030 con fecha 14/03/2026. Puede diferir de la versión actual de SWPanel.
A continuación, selecciona el destino de la migración:
- Un nuevo servicio de Hosting
- Un servicio de Hosting ya existente (opción utilizada en este manual)
info_capture ℹ️ Nota: La captura es orientativa, tomada sobre la versión 2026.000.0030 con fecha 14/03/2026. Puede diferir de la versión actual de SWPanel.
Para aprender a crear un servicio de Hosting, consulta los siguientes manuales:
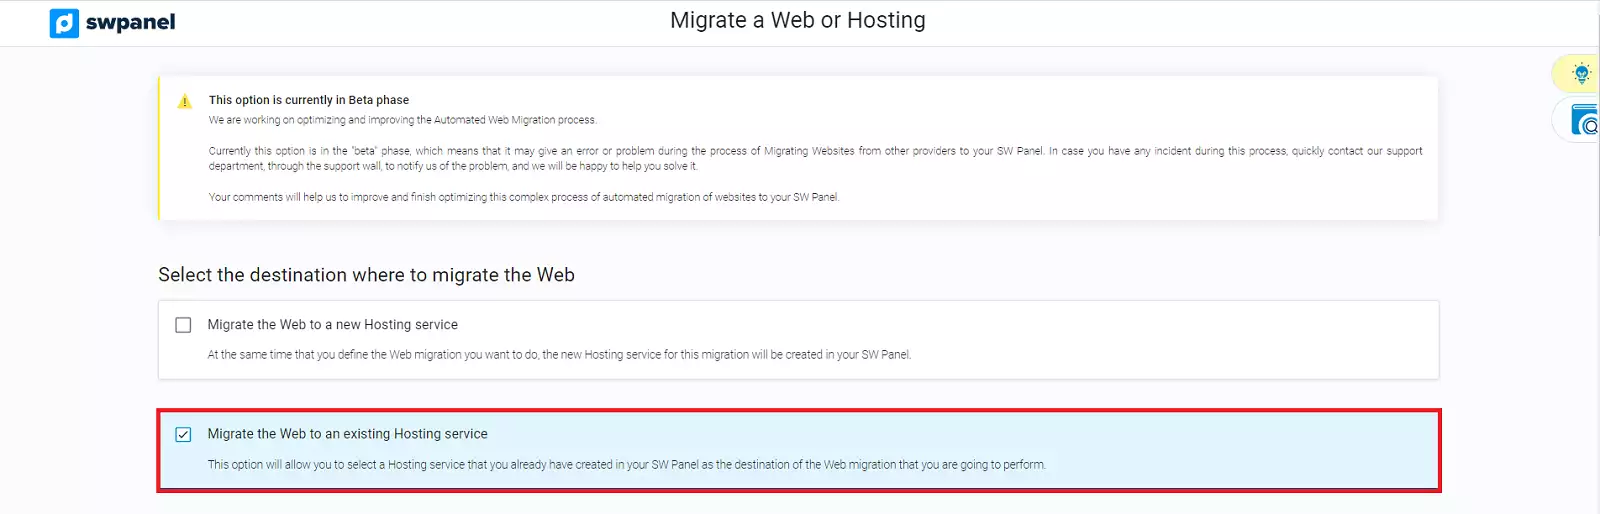
4. Migrar a un Servicio de Hosting Existente.
- Selecciona la opción Migrar la Web a un servicio de Hosting ya existente.
- En el menú desplegable, elige el servicio de hosting donde deseas realizar la migración.
⚠ Importante: Para que la migración se complete correctamente, el servicio de hosting debe estar vacío. Esto significa que no debe contener WordPress, Prestashop, Moodle, bases de datos, cuentas FTP ni cuentas de correo creadas.

info_capture ℹ️ Nota: La captura es orientativa, tomada sobre la versión 2026.000.0030 con fecha 14/03/2026. Puede diferir de la versión actual de SWPanel.
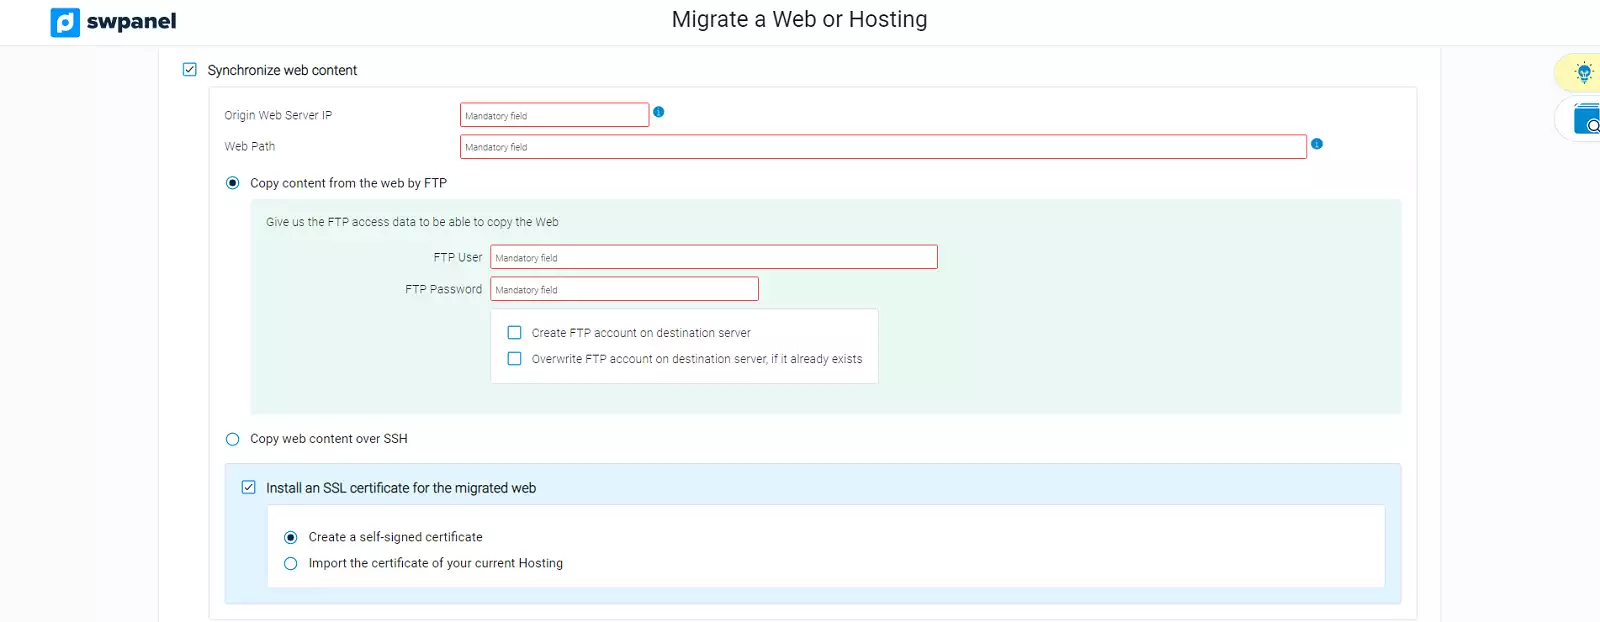
5. Sincronizar Contenido de la Web
- Selecciona qué contenido deseas migrar y el método de transferencia.
- Se recomienda utilizar FTP o SSH para una sincronización más rápida y segura.
info_capture ℹ️ Nota: La captura es orientativa, tomada sobre la versión 2026.000.0030 con fecha 14/03/2026. Puede diferir de la versión actual de SWPanel.
- Activa la opción Sincronizar contenido de la Web.
-
- Ingresa los datos de conexión y selecciona el método de transferencia: FTP o SSH.
- Si no hay un sitio web que migrar, deja esta opción desmarcada.
info_capture ℹ️ Nota: La captura es orientativa, tomada sobre la versión 2026.000.0030 con fecha 14/03/2026. Puede diferir de la versión actual de SWPanel.
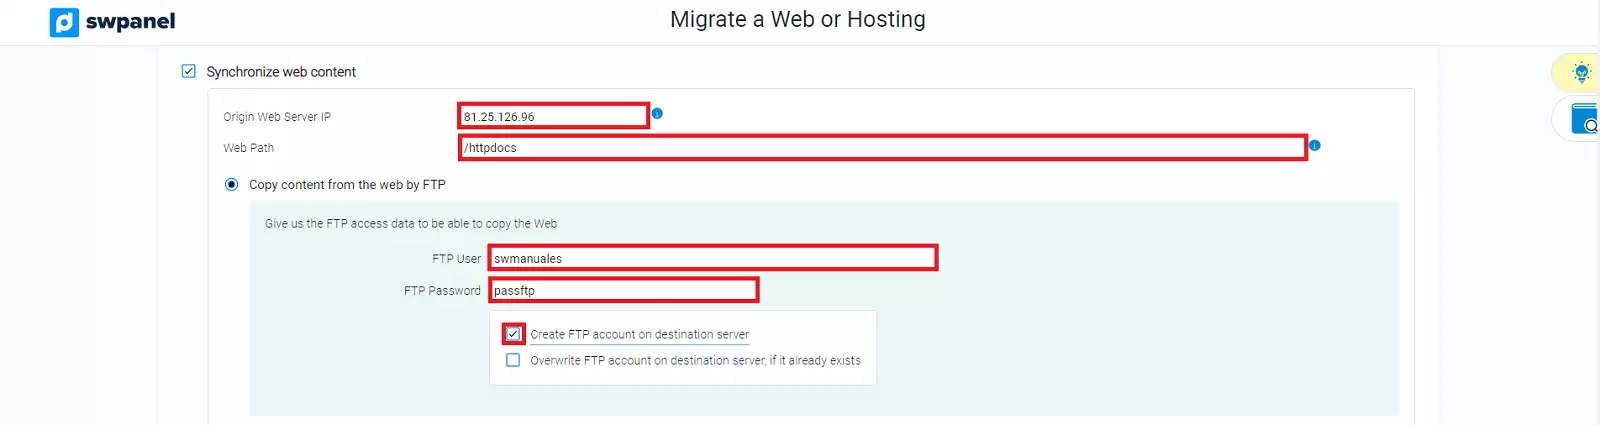
Datos de conexión necesarios
Para sincronizar correctamente tu sitio web, necesitarás proporcionar la siguiente información:
- IP del servidor de origen: La dirección IP donde se encuentra tu sitio en el proveedor actual.
- Path de la Web: El directorio exacto donde está alojada la web en el servidor de origen.
⚠ Importante: La ruta del directorio puede variar según el panel de control del proveedor:
- cPanel →
/public_html- Plesk →
/httpdocs- Si tu conexión FTP ya apunta directamente al directorio de la web, simplemente introduce el path
/
Migración vía FTP o SSH
Migración vía FTP
Para migrar tu sitio utilizando FTP, necesitarás:
- Usuario FTP
- Contraseña FTP
- Activar la opción Crear cuenta FTP en el servidor destino (o sobrescribirla si ya existe).
Migración vía SSH
Para migrar tu sitio utilizando SSH, necesitarás:
- Usuario SSH
- Contraseña SSH
- Puerto de conexión SSH
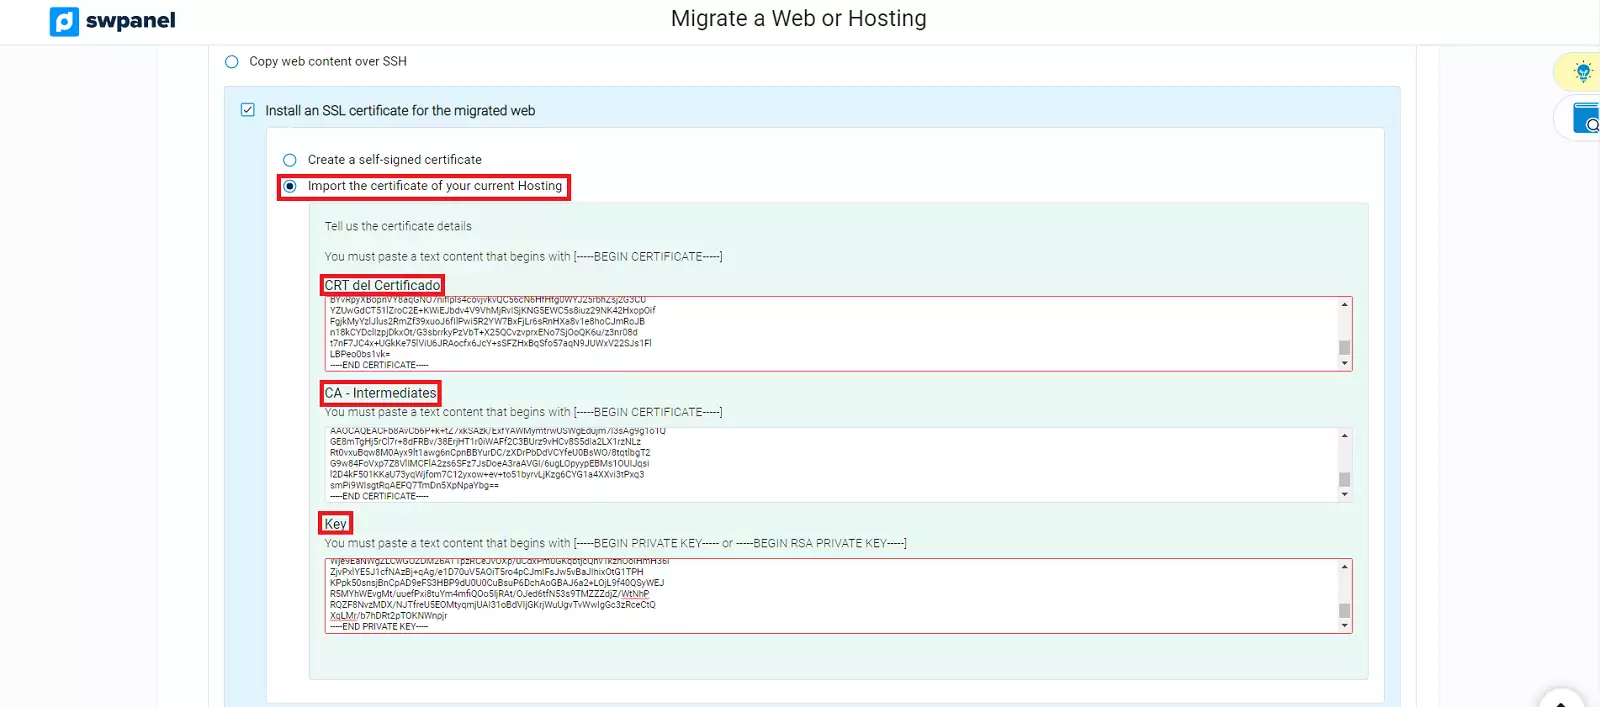
6. Instalar un Certificado SSL
Existen dos formas de instalar un certificado SSL en tu servicio de hosting:
- Autofirmado: Generado automáticamente por SWPanel.
- Importado desde otro proveedor: Requiere los archivos CRT, CA y KEY del certificado.
En este ejemplo, hemos configurado la migración vía FTP y optado por importar el certificado desde otro proveedor de hosting. La configuración final quedaría de la siguiente manera:
info_capture ℹ️ Nota: La captura es orientativa, tomada sobre la versión 2026.000.0030 con fecha 14/03/2026. Puede diferir de la versión actual de SWPanel.
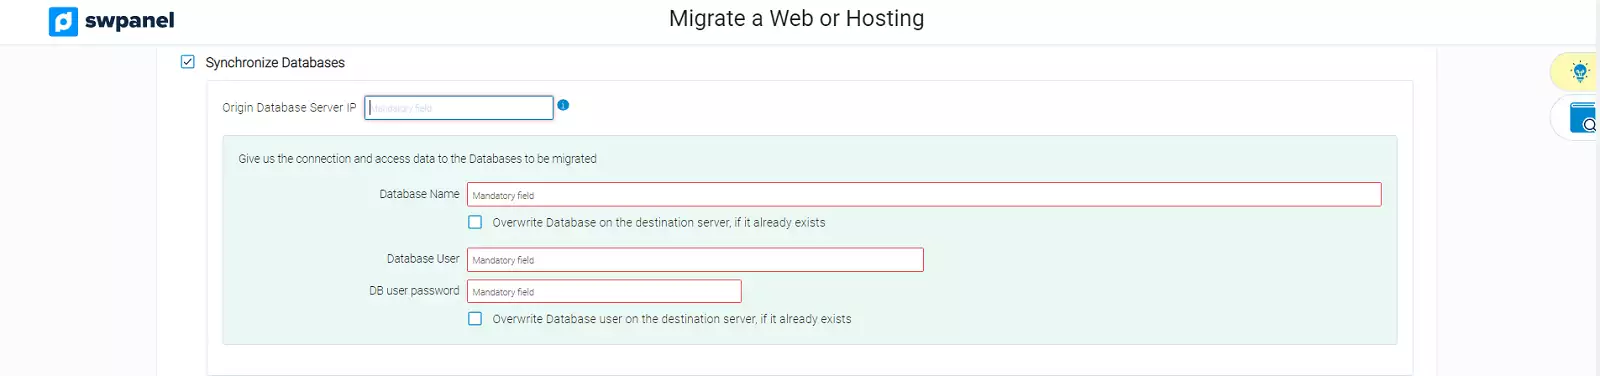
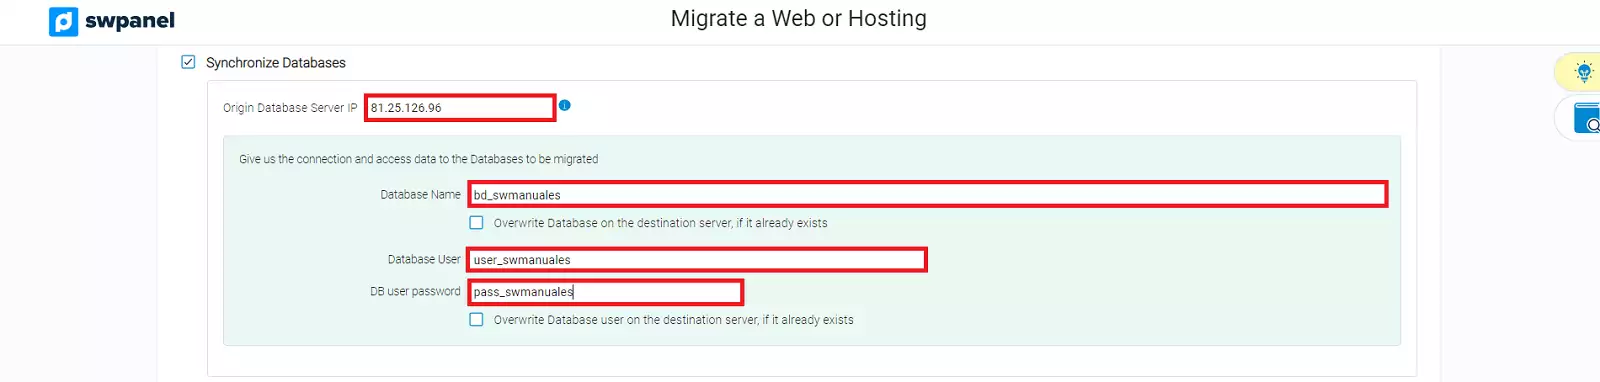
7. Sincronizar Bases de Datos
- Activa la opción Sincronizar Bases de Datos.
- Ingresa los datos necesarios para la conexión:
- IP del servidor de base de datos origen: La dirección IP asignada a tu servidor de base de datos en el proveedor actual. Puedes verificarla desde el panel de administración de tu proveedor.
- Nombre de la base de datos.
- Usuario y contraseña de la base de datos.
⚠ Importante: Asegúrate de que todos estos datos coincidan exactamente con los de tu base de datos de origen. Cualquier error puede impedir que la migración se complete correctamente.
info_capture ℹ️ Nota: La captura es orientativa, tomada sobre la versión 2026.000.0030 con fecha 14/03/2026. Puede diferir de la versión actual de SWPanel.
⚠ Importante: Para sincronizar la base de datos, el acceso remoto debe estar habilitado.
- Asegúrate de abrir el puerto 3306 para la IP 81.25.112.90 (nuestro servidor encargado del proceso de migración).
- Si no es posible abrir este puerto, desmarca la opción de sincronización y realiza la migración de la base de datos mediante importación manual, utilizando herramientas como PHPMyAdmin, HeidiSQL, u otras similares.
Para verificar que el puerto está habilitado, consulta los siguientes manuales:
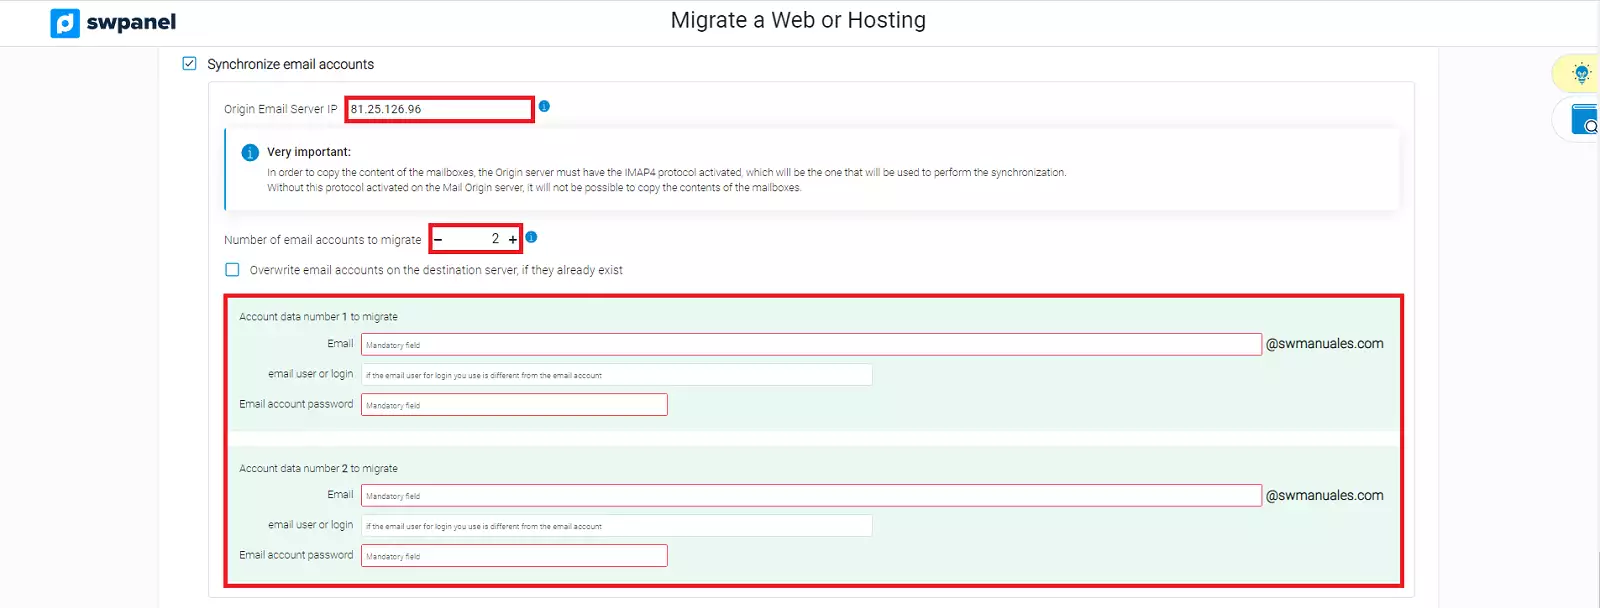
8. Sincronizar Cuentas de Correo Electrónico
Si quieres migrar tus cuentas de correo electrónico, activa la opción Aprovechar y mover también mis cuentas de correo electrónico e ingresa los datos correspondientes:
info_capture ℹ️ Nota: La captura es orientativa, tomada sobre la versión 2026.000.0030 con fecha 14/03/2026. Puede diferir de la versión actual de SWPanel.
Datos necesarios para migrar cuentas de correo
Para sincronizar correctamente tus cuentas de correo electrónico, deberás proporcionar:
- IP del servidor de correo origen
- Puerto IMAP (por defecto: 993)
- Número de cuentas a migrar

info_capture ℹ️ Nota: La captura es orientativa, tomada sobre la versión 2026.000.0030 con fecha 14/03/2026. Puede diferir de la versión actual de SWPanel.
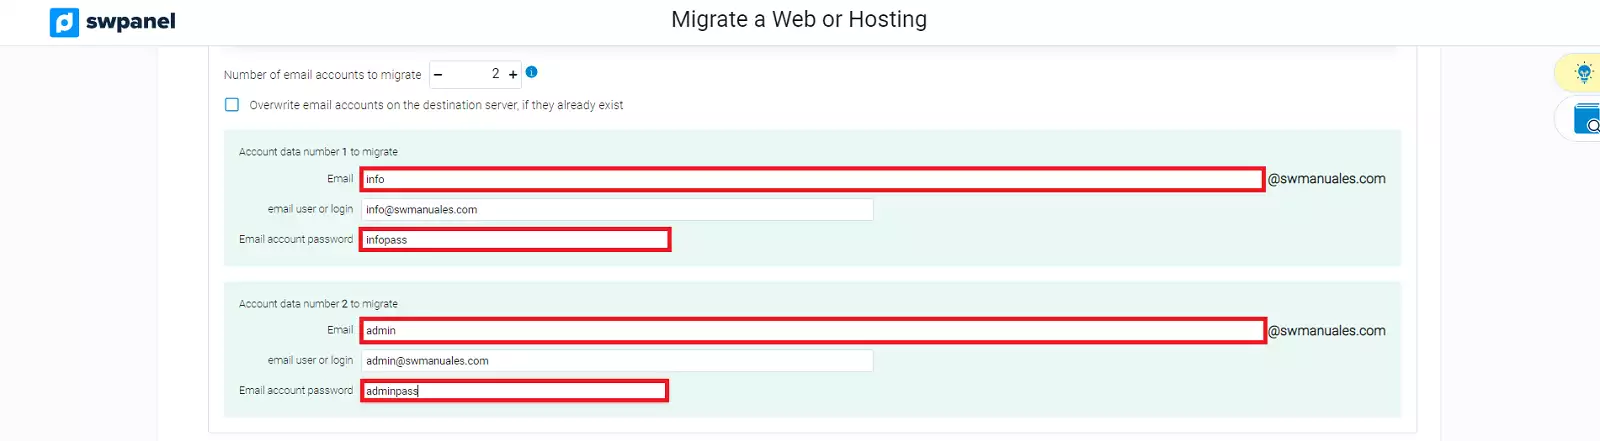
Configuración de cada cuenta de correo
Para cada cuenta que desees migrar, proporciona la siguiente información:
- Nombre de la cuenta: Solo indica el nombre de la cuenta; no es necesario añadir
@dominio, ya que se completará automáticamente. - Usuario de correo (login): Este campo se rellenará de forma automática. Solo verifica que sea correcto.
- Contraseña: Introduce la contraseña correspondiente a la cuenta.
Si lo deseas, puedes indicar una cuenta de correo electrónico para que se te notifique la finalización de la migración:
info_capture ℹ️ Nota: La captura es orientativa, tomada sobre la versión 2026.000.0030 con fecha 14/03/2026. Puede diferir de la versión actual de SWPanel.
9. Finalizar la Migración
- Verifica que todos los datos ingresados sean correctos.
- Acepta el contrato y las condiciones del servicio.
- Haz clic en Aceptar y crear para iniciar la migración.
ℹ️ Importante: La migración no tiene ningún coste; el campo Total coste servicio aparecerá como 0€.
info_capture ℹ️ Nota: La captura es orientativa, tomada sobre la versión 2026.000.0030 con fecha 14/03/2026. Puede diferir de la versión actual de SWPanel.
⚠ Importante: No cierres la pantalla durante la preparación de la migración. Una vez iniciada, el proceso se ejecutará en segundo plano y serás redirigido automáticamente a SWPanel.
Al finalizar la migración, verifica que tu sitio web funciona correctamente modificando temporalmente tu archivo Hosts: 📃 Manual: Modify 'hosts' file on Windows, Mac and Linux
10. Glosario
| Término | Definición |
|---|---|
| SWPanel | Plataforma de gestión de hosting y dominios de SW Hosting. |
| FTP | Protocolo de transferencia de archivos utilizado para mover datos entre servidores. |
| SSH | Protocolo seguro que permite acceder y gestionar servidores de forma remota. |
| Certificado SSL | Permite cifrar la conexión entre el servidor y los visitantes del sitio web, garantizando seguridad. |
| IMAP | Protocolo que permite acceder y gestionar el correo electrónico directamente en el servidor remoto. |