Manage DNS records
1. Introduction and overview
This manual aims to explain in detail the process of managing DNS records using the SWPanel platform, the service and domain management tool offered by SW Hosting. Throughout the document, we describe all the types of DNS records that you can create, modify, or delete, as well as their functions and configurations.
What is a DNS record?
The DNS (Domain Name System) is a system that translates human-readable domain names (such as yourdomain.com) into machine-readable IP addresses (such as 192.0.2.1). DNS records are entries in a domain's ‘DNS zone’ that define how that domain should behave in response to specific requests, such as emails, connections to web servers, etc.
Types of DNS records explained in this manual
- A record: Associates a domain with an IP address.
- CNAME record: Creates an alias for a domain.
- NS record: Informs which DNS servers are authoritative for the domain.
- MX record: Associates a domain with mail servers.
- SPF Record: Defines which servers can send mail on behalf of your domain.
- DKIM Record: Authenticates the origin of emails using a digital signature.
- DMARC Record: Defines policies for dealing with unauthorised emails.
- TXT Record: Allows you to add any type of informational text.
- SRV record: Defines services available under a domain.
Each section of the manual includes examples and screenshots to aid understanding, as well as warnings and recommendations on the use of each type of record.
2. Accessing DNS management in SWPanel
To start managing DNS records:
-
Access your Dashboard in SWPanel.
-
Use the search field at the top to locate the service you want to work on. Type in the name of the service and click on it.
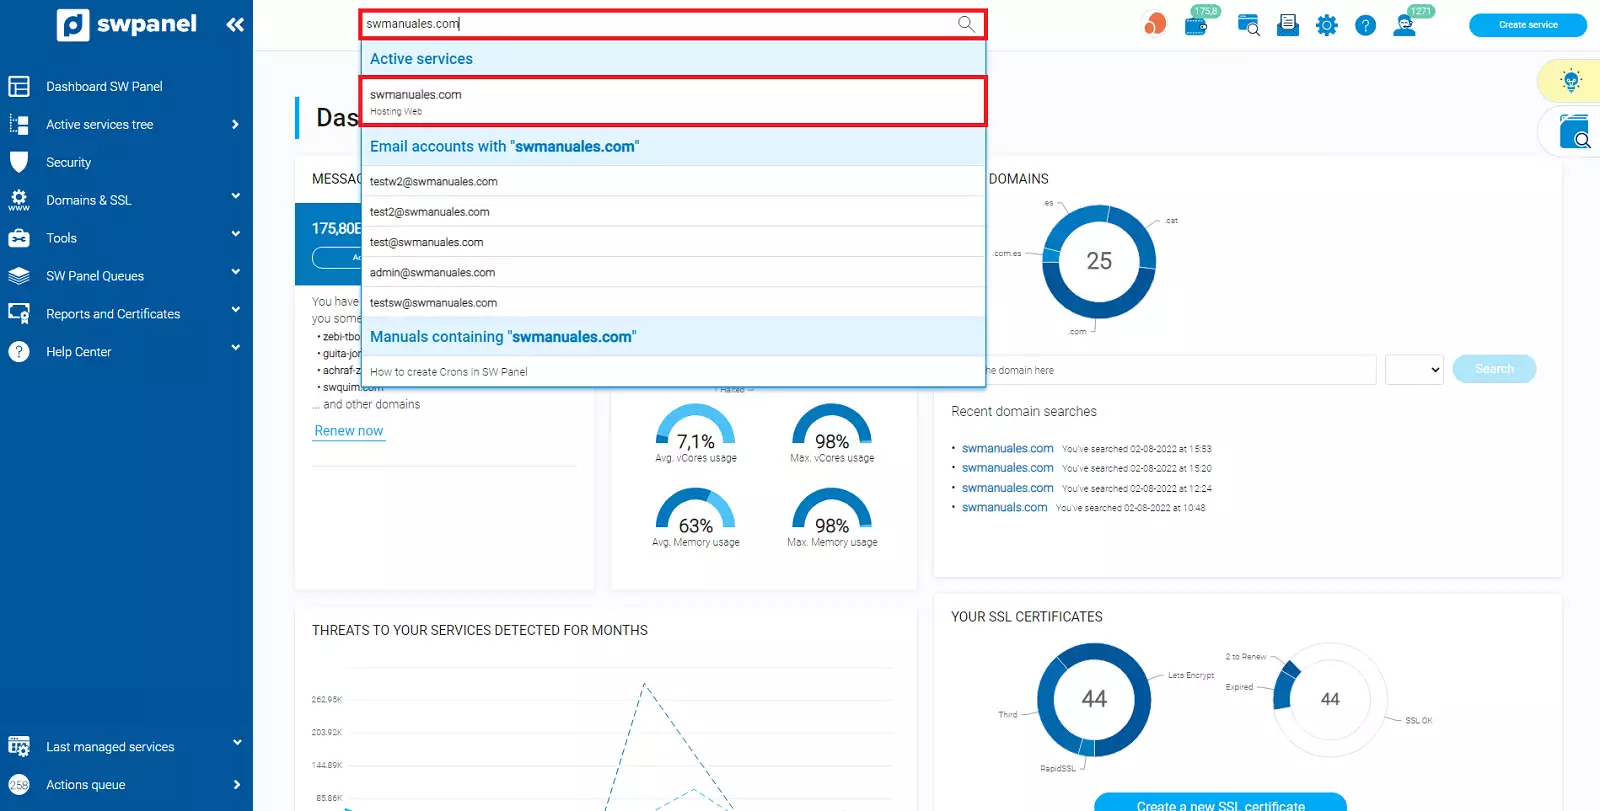
-
In the left-hand side menu, navigate to Service Management > DNS Management.
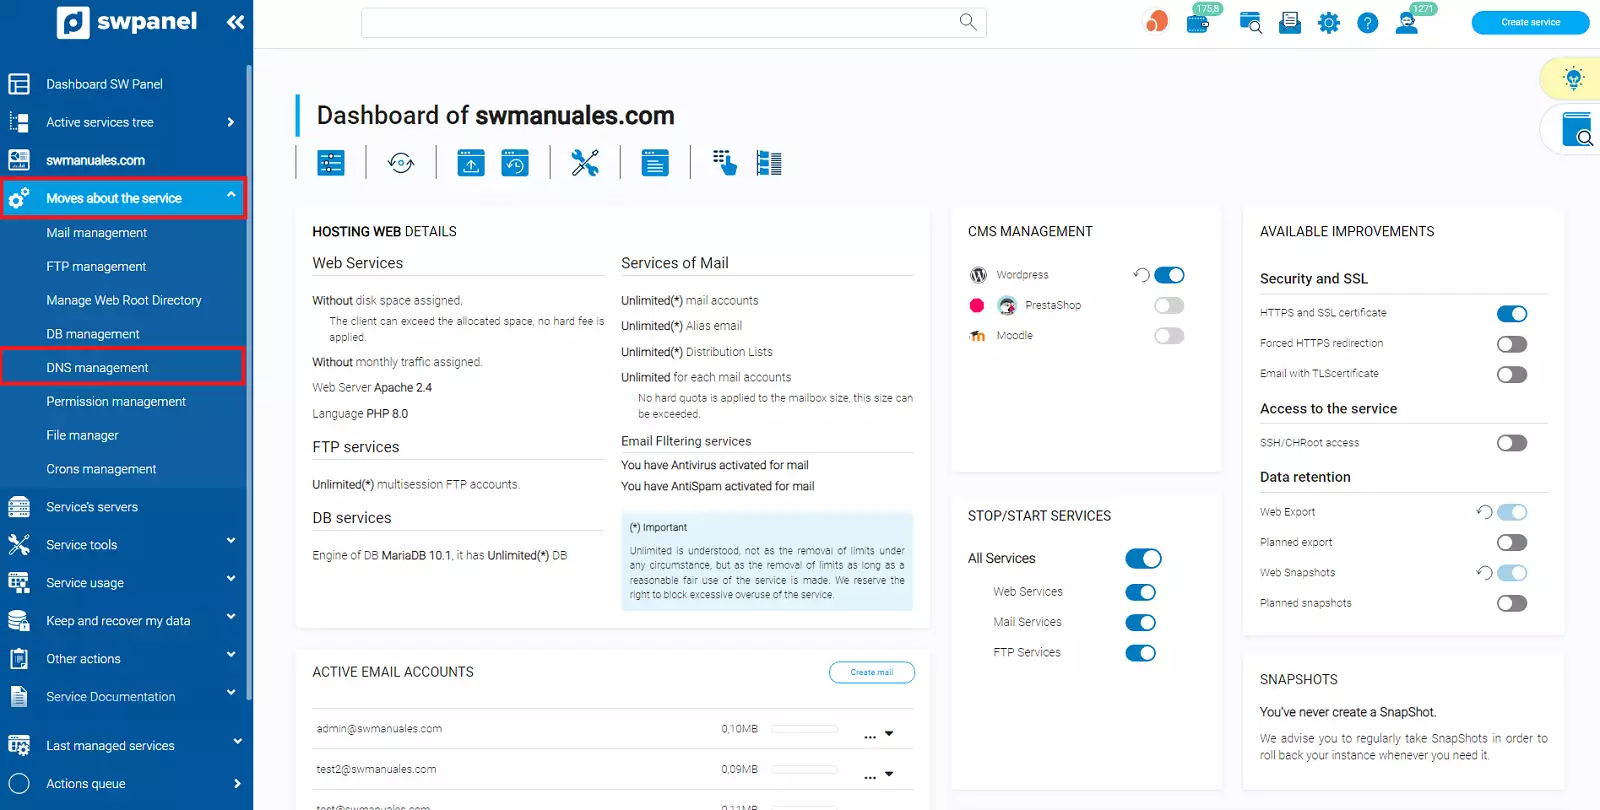
In this section, you will see all the DNS records currently configured for the selected service.
From here you can:
-
Create new DNS records.
-
Modify or delete existing records.
-
Automatically create advanced security records such as SPF, DKIM, and DMARC.
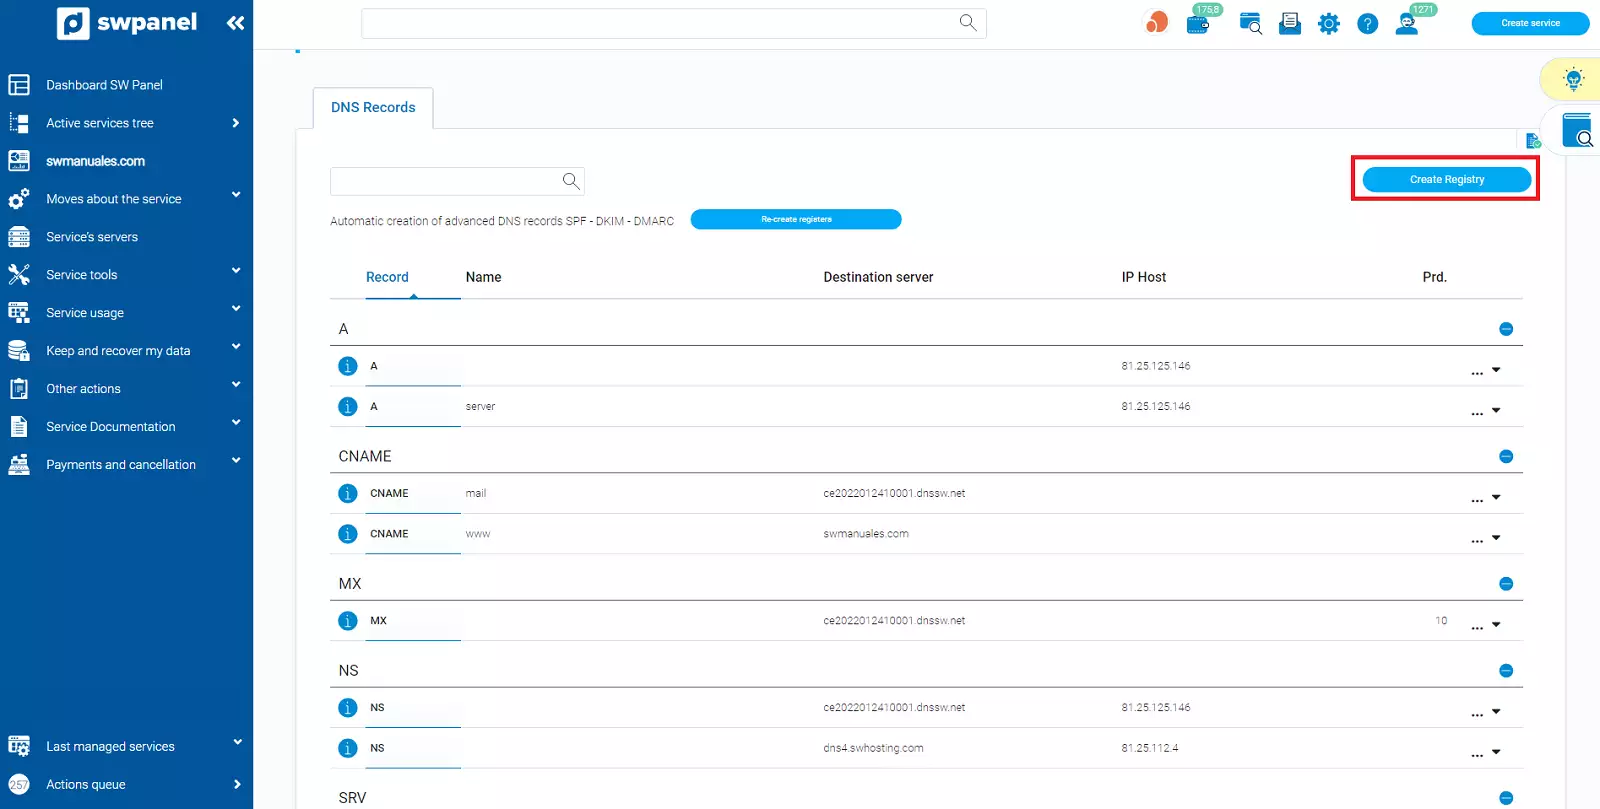
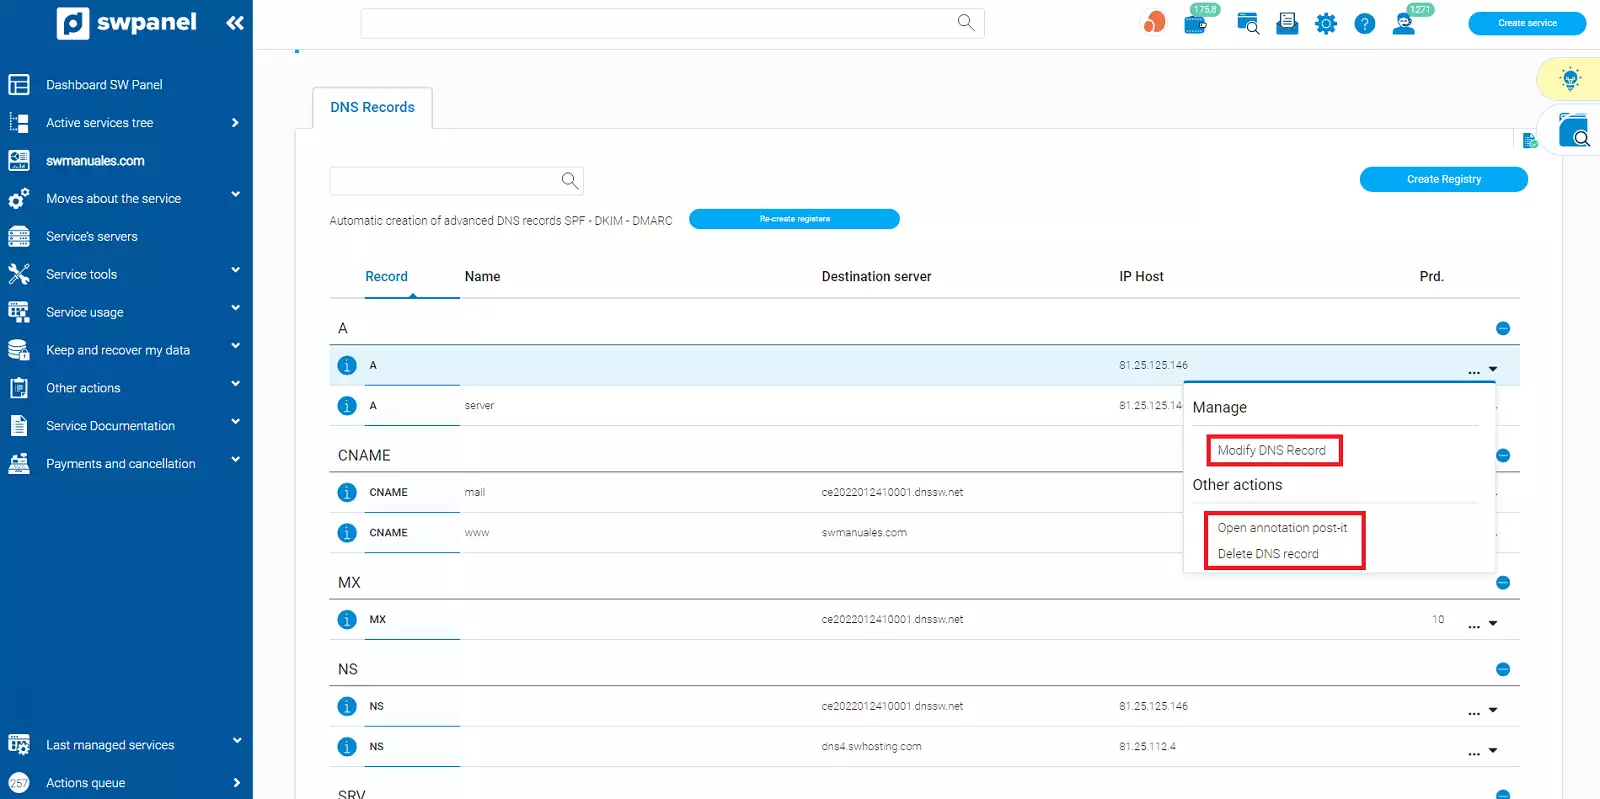
To modify or delete a record, click on the Manage button to the right of each entry:
Automatic creation of security records
SWPanel offers the option to automatically create SPF, DKIM, and DMARC records. These records improve email security and help ensure that your messages do not end up in the SPAM folder.
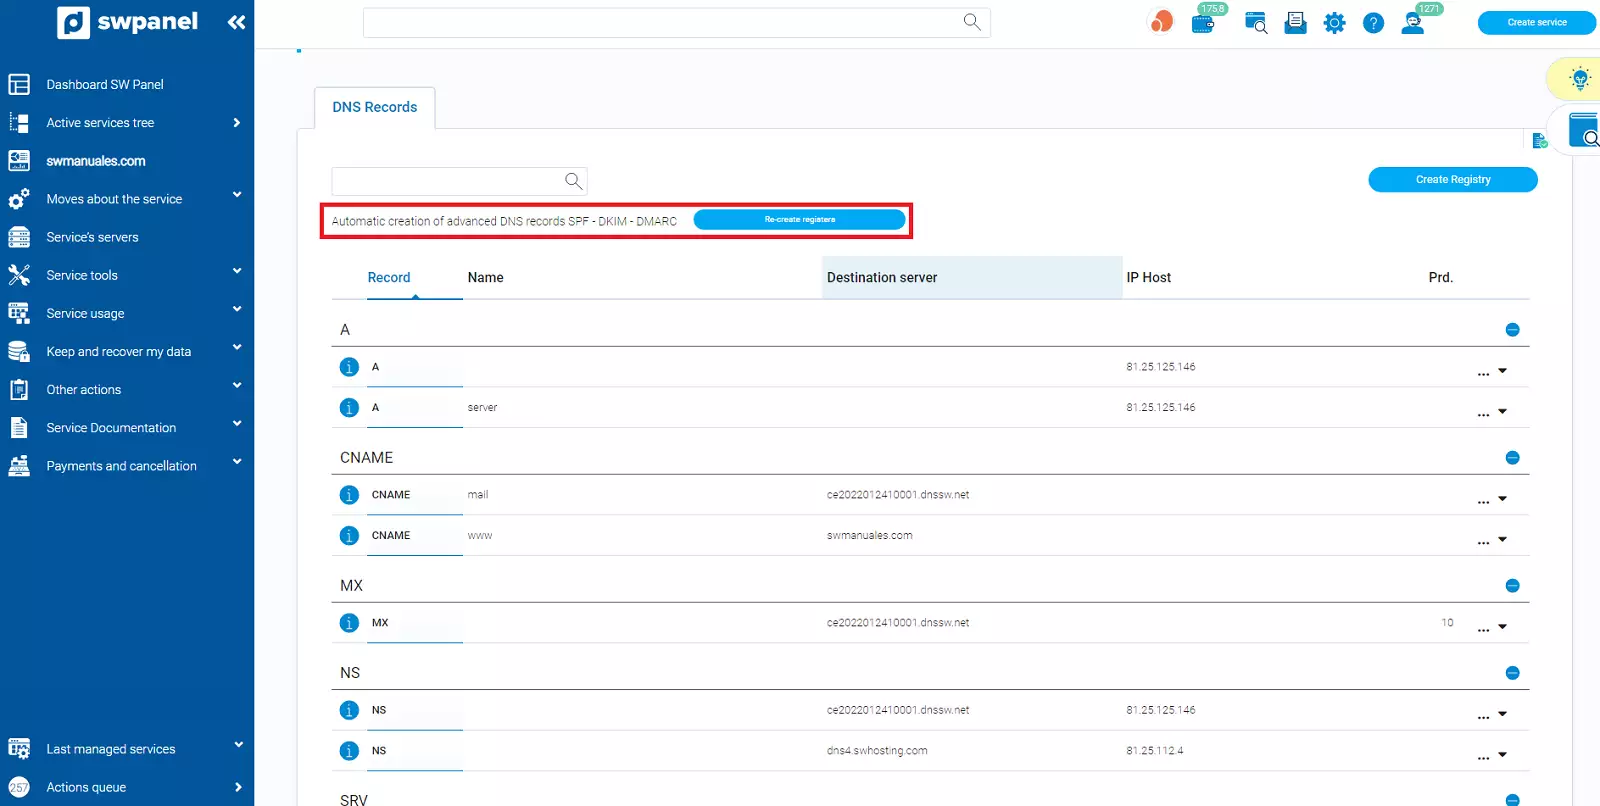
The interface lets you know whether the records have already been created by the colour of the button: green if they have not been created, blue if they already exist.
info Note: Changes made to the DNS zone may take up to 48 hours to propagate globally.
We explain how to create each of the records. In the following examples, we will create them in the DNS zone of "swmanuales.com".
3. Create an A record
An A record (Address) is used to associate a domain or subdomain with an IPv4 address. It is essential for your domain to be accessible from web browsers or other services.
Steps to create an A record:
-
Click on the Create Record button (located on the right side of the interface).
-
In the Record Type drop-down menu, select A Record (Host).
-
Complete the following fields:
- Host Name: Enter the name of the subdomain. Example:
shop - Host IP: The IP address to which you want to point the subdomain. Example:
1.2.3.4
- Host Name: Enter the name of the subdomain. Example:
-
Click Create Record.
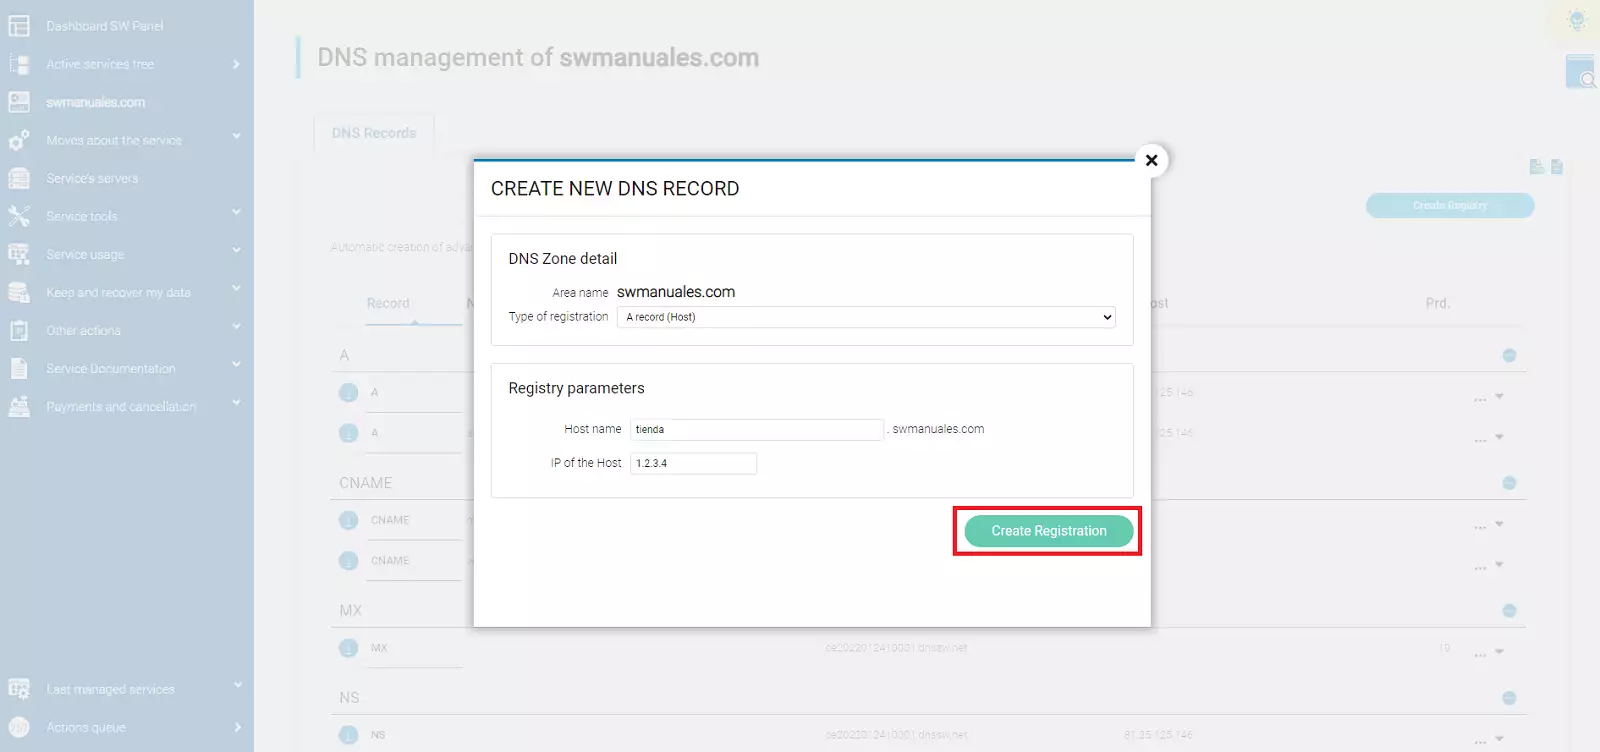
Expected result: The subdomain shop.dominiosw.com will point to the IP address 1.2.3.4.
You can find detailed technical information about this type of record in the Information tab.
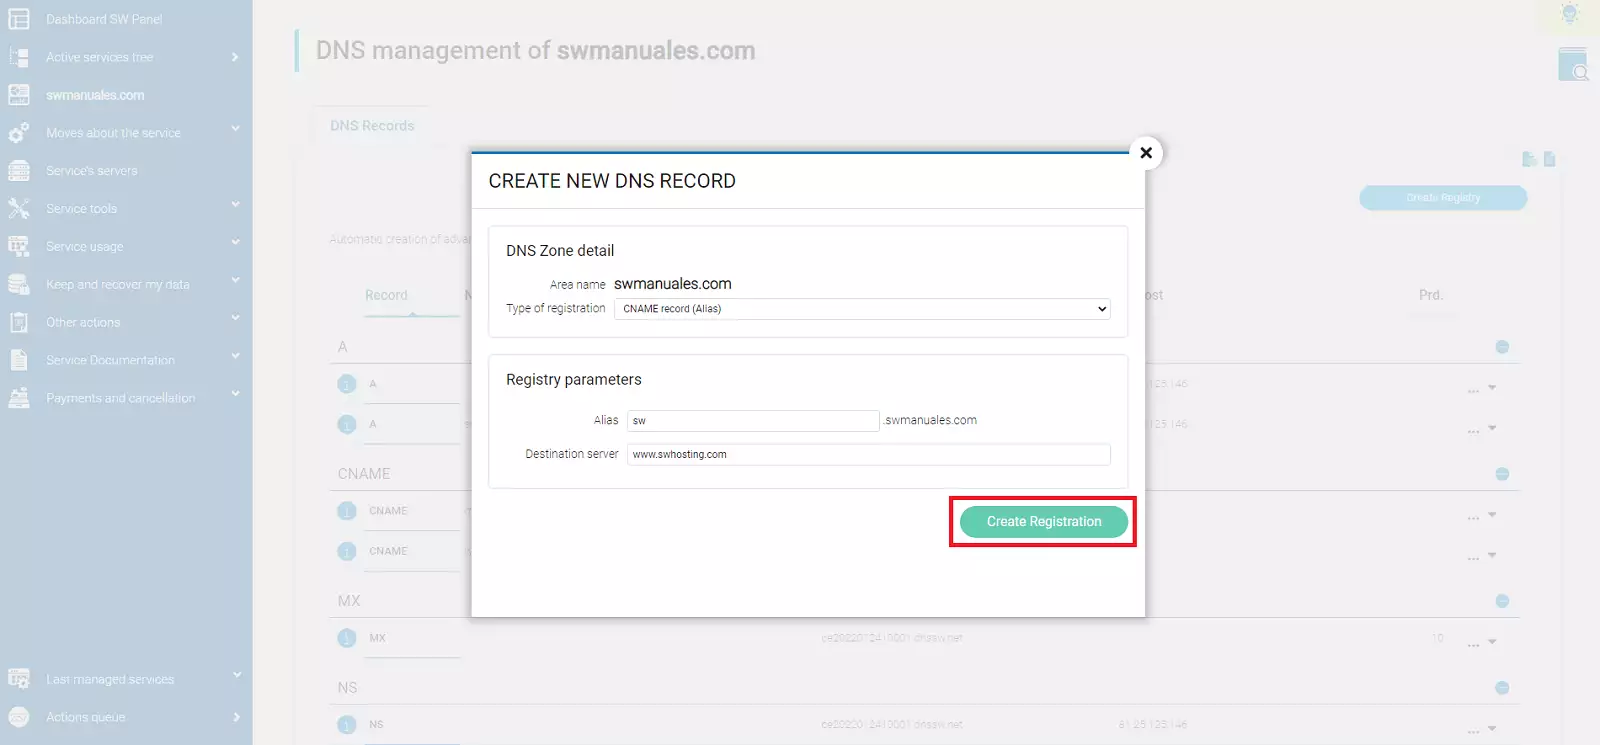
4. Create CNAME record
The CNAME (Canonical Name) record allows a subdomain to act as an alias for another domain. This means that the subdomain redirects to the same destination as another existing domain, avoiding duplication of IP records.
Steps to create a CNAME record:
-
Click on Create Record.
-
Select CNAME Record (Alias) from the type drop-down menu.
-
Fill in the following fields:
- Alias: The subdomain that will function as an alias. Example:
sw - Destination server: The domain to which it will redirect. Example:
www.swhosting.com
- Alias: The subdomain that will function as an alias. Example:
-
Click Create Record.
Expected result: sw.dominiosw.com will point to the same IP as www.swhosting.com.
See more technical details in the Information tab.
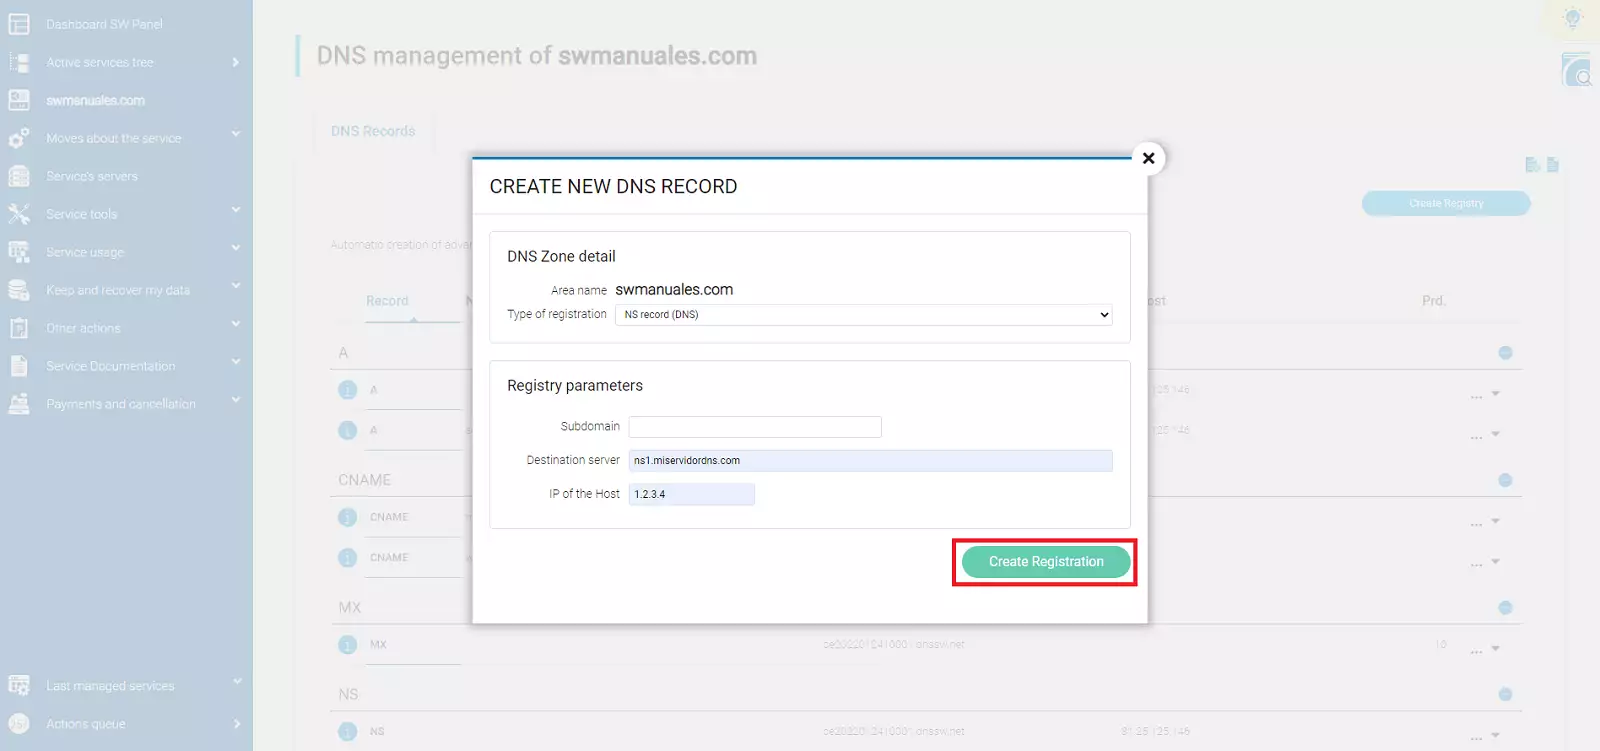
5. Create NS record
NS (Name Server) records indicate which DNS servers are authoritative for the domain or subdomain.
info These records are generated automatically. You should only modify them if you know what you are doing and have a specific configuration.
Steps to create an NS record:
-
Click on Create Record.
-
Select NS Record (DNS).
-
Complete the required fields:
- Subdomain: The subdomain to which these DNS servers apply.
- Destination Server: Name of the DNS server. Example:
ns1.miservidordns.com - Host IP: IP of the DNS server. Example:
1.2.3.4
-
Click Create Record.
Form to indicate which authoritative DNS servers will be used for a specific subdomain.
Expected result: Declare that ns1.mysdns.com (IP 1.2.3.4) manages the DNS for the specified subdomain.
See additional information in the Information tab.
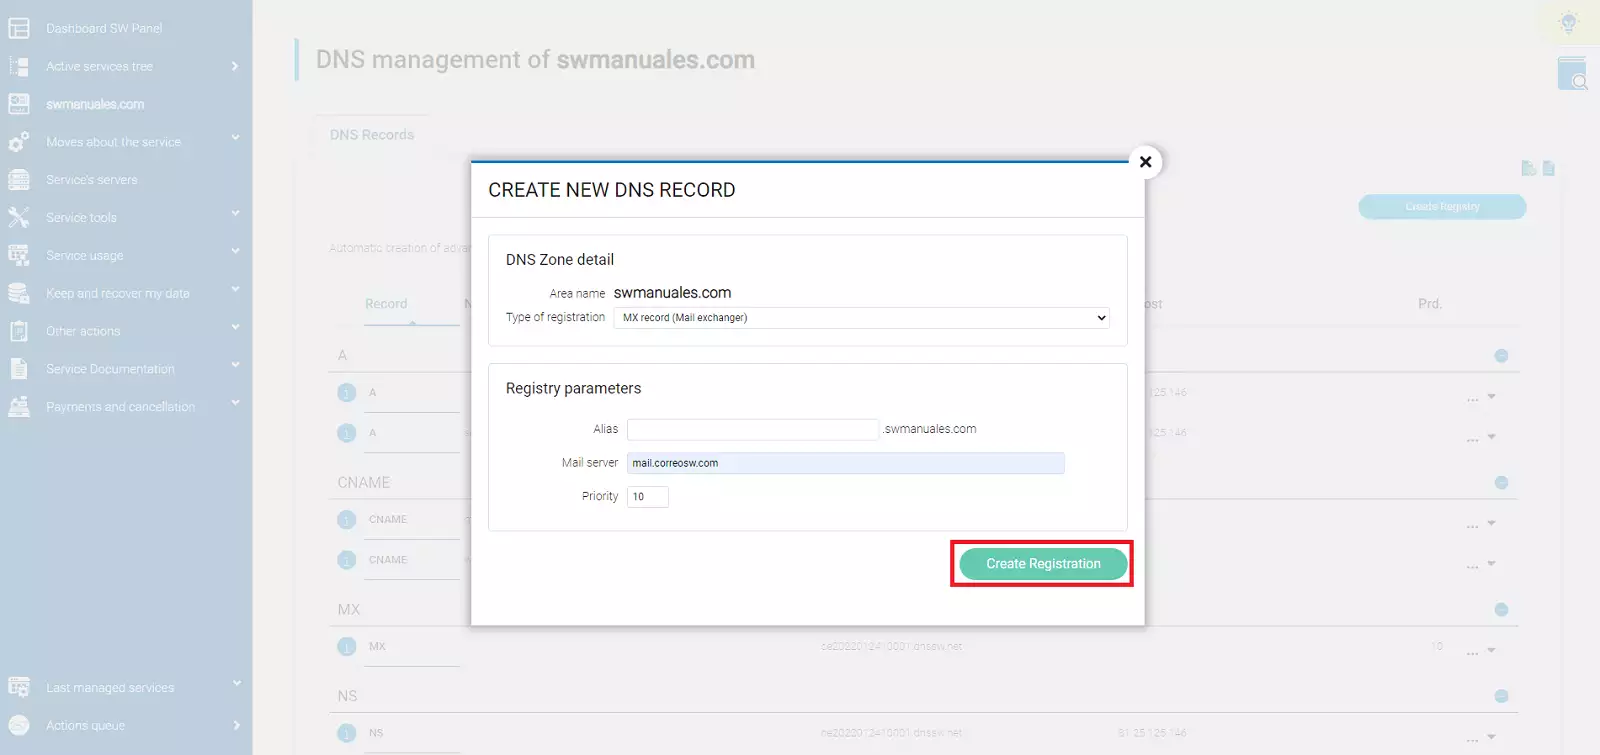
6. Create MX record
MX (Mail Exchange) records allow you to specify which mail servers should handle emails addressed to your domain or subdomain.
Steps to create an MX record:
- Click on Create Record.
- In the Record Type drop-down menu, select MX Record (Mail Exchanger).
- Complete the fields:
- Alias: Subdomain (can be left blank if it is for the main domain).
- Mail Server: Example:
mail.correosw.com. - Priority: A number indicating the order of preference. The lower the value, the higher the priority. Example:
10.
- Click Create Record.
info Important: The “Mail server” field must be a domain name (not an IP address), and this domain must have an A record; it cannot be a CNAME. This is because mail servers will perform two DNS lookups to send an email to a domain on another server: the first to find the MX record and the second to find its IP address.
Expected result: All emails sent to dominiosw.com will be managed by mail.correosw.com.
See more details in the Information tab:
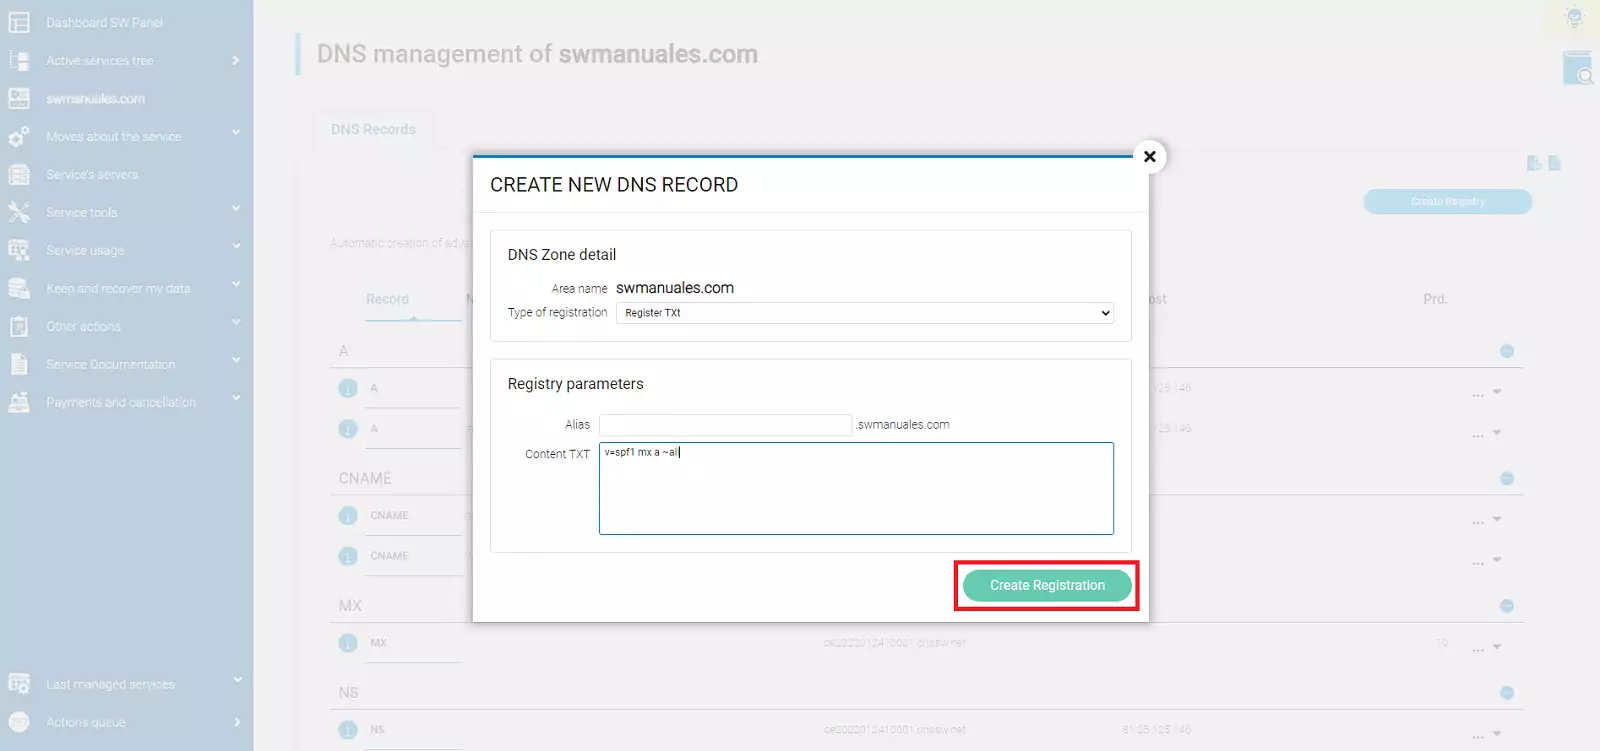
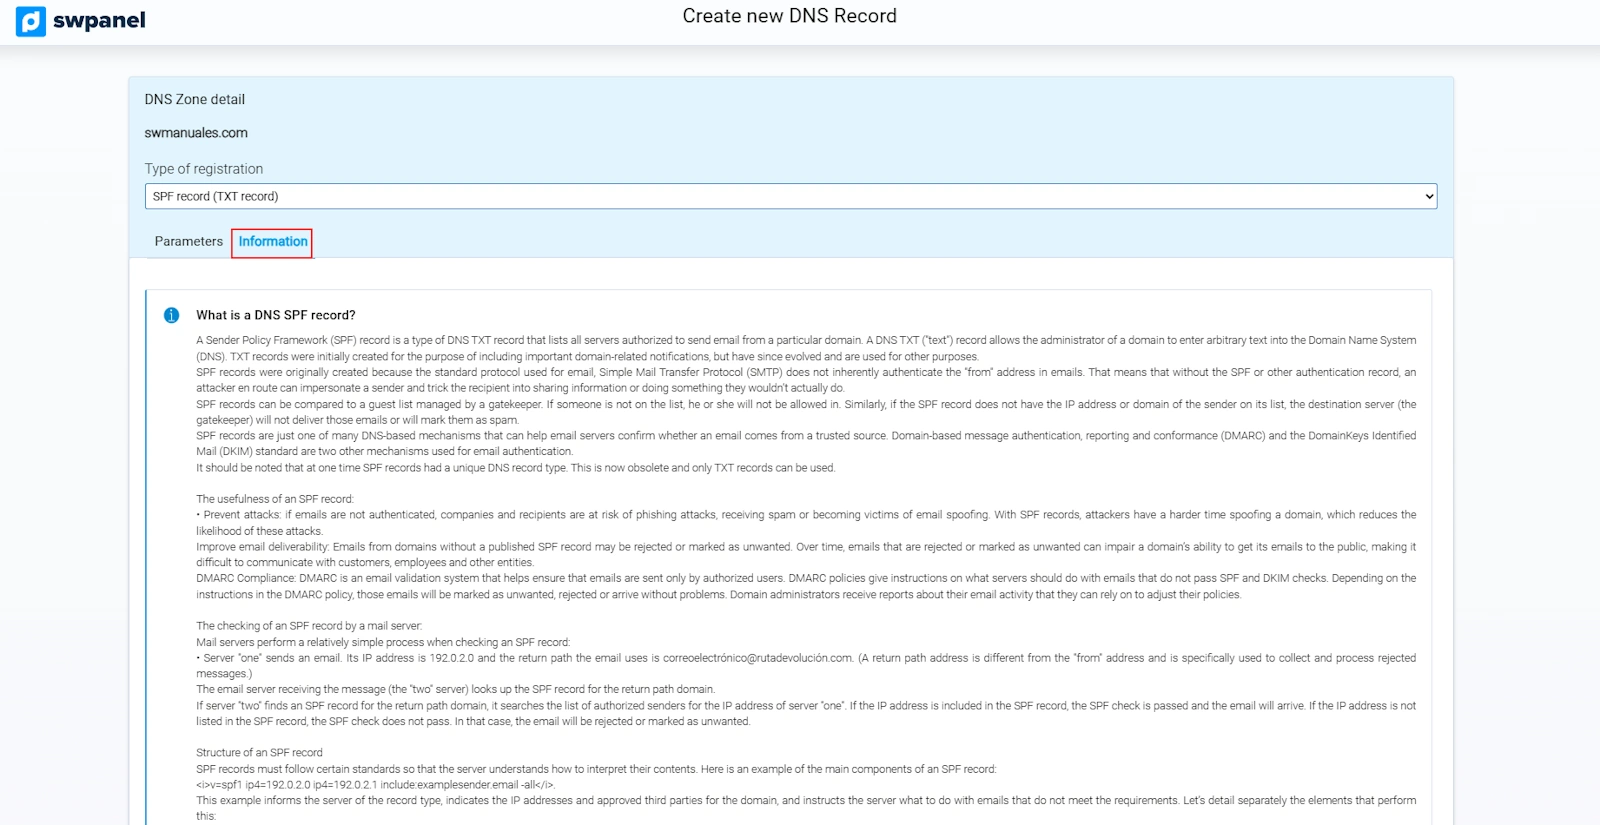
7. Create SPF record
The SPF (Sender Policy Framework) record allows you to specify which servers are authorised to send emails on behalf of your domain. It helps prevent spoofing. In order to prevent fraud and spam, large email service providers (such as Google) often require this record to be in place. Otherwise, emails sent to them may be rejected or classified as SPAM
info You can generate SPF rules with tools such as:
https://www.spfwizard.net
https://mxtoolbox.com/spf.aspx
Steps to create an SPF record:
-
Click Create Record.
-
Select SPF Record (TXT Record).
-
Complete:
- Alias: Subdomain, if applicable. Leave blank for the main domain.
- TXT Content: SPF rule. Example:
v=spf1 mx a ~all
-
Click Create Record.
View detailed technical information from the Information tab:
Common parameters in SPF rules
- v=spf1 Indicates the start of the rule and which version of SPF will be used.
- mx Allows MX servers to send mail.
- a Allows the IP in the A record to send mail.
- ip4:x.x.x.x IP authorised to send mail.
- ptr Authorises any host ending in ‘dominiosw.com’ to send mail.
- all Closes the rule, indicating behaviour for undefined items. Included at the end of the SPF rule
Possible prefixes:
- + Accepted (default if no prefix is specified).
- - Rejected.
- ~ Conditionally accepted, marked but not rejected.
- ? Neutral.
Examples:
-
v=spf1 mx a ~all
-
mx: MX record servers are authorised (as no prefix is included, + is assumed).
-
a: The IP address of the A record is authorised.
-
~all: Those that do not match the above rules are not authorised, but will not be rejected; they will be marked with a special header.
-
v=spf1 mx -all
-
mx: MX record servers are authorised (as no prefix is included, + is assumed).
-
-all: Those that do not match the above rules are not authorised and will be rejected.
-
v=spf1 -mx a ?ip4:1.2.3.4 ~all
-
-mx: MX record servers are not authorised and will be rejected.
-
a: The IP of the A record is authorised.
-
?ip4:1.2.3.4: The IP ‘1.2.3.4’ will be marked as neutral.
-
~all: Those that do not match the above rules are not authorised, but will not be rejected; they will be marked with a special header.
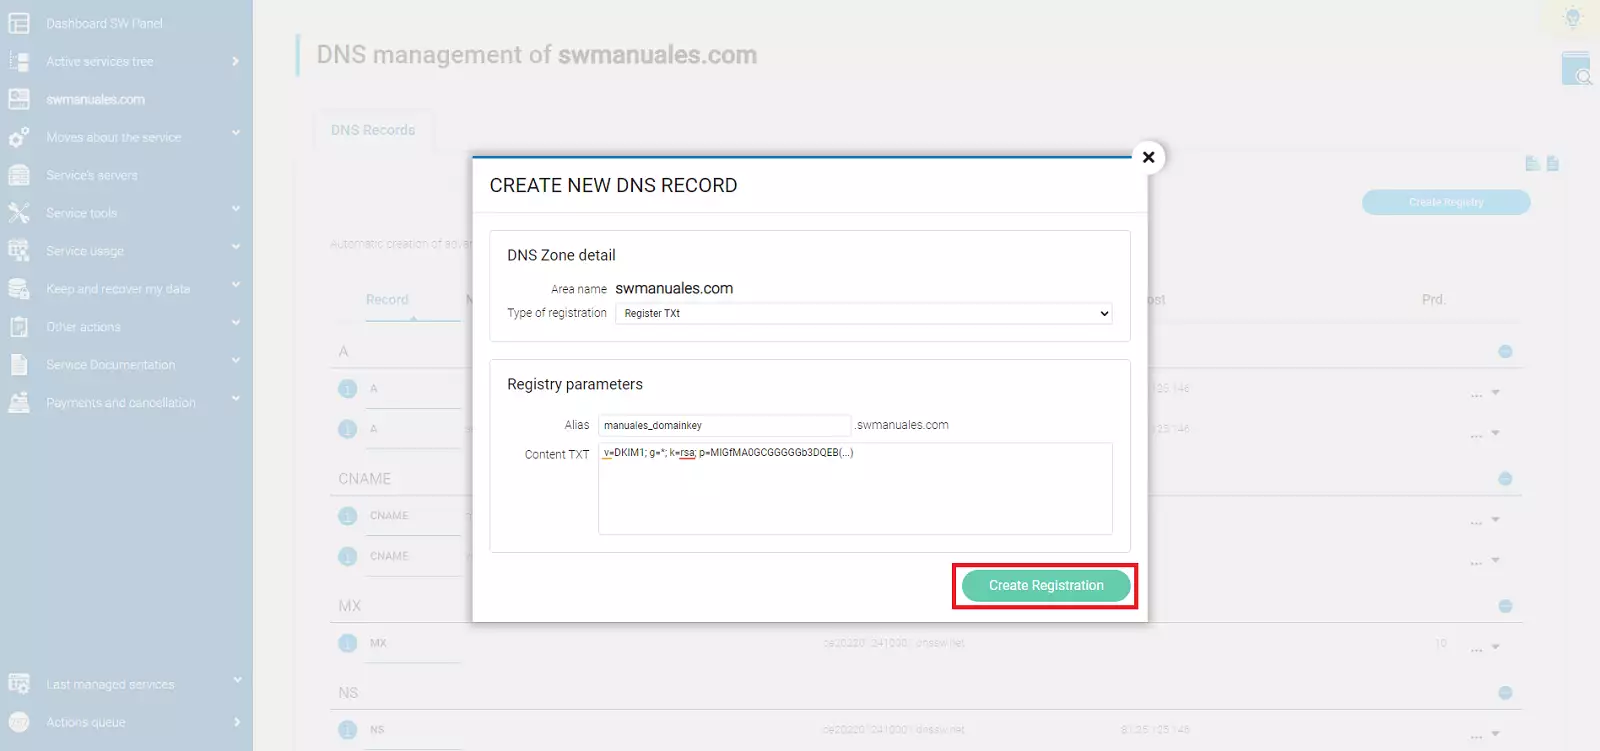
8. Create DKIM record
The DKIM (DomainKeys Identified Mail) record allows you to authenticate the content of emails using a digital signature. Like SPF and DMARC records, its purpose is to prevent fraud and spam.
Example:
DKIM selector: dominiosw
Key  DKIM: v=DKIM1; g=*; k=rsa; p=MIGfMA0GCGGGGGb3DQEBAQUAA4G000BiQKBgQD0000VKvGjmSb4FkI70000e1KqV01eQ70n0000D5bpRfo8ZGcab0000+3+O0mPI7wYblklU0000T0A3LVJk+QTwX00007VA7EiL0utBMW0000iZLJ8Exyzoajql0000RRJmyhngY/0000t0yq21pdlYLrJa0000CfaniL/8gKQGQID0000
Steps to create a DKIM record:
-
Click on Create Record.
-
Select TXT Record.
-
Complete:
- Alias: Format
selector._domainkey. Example:dominiosw._domainkey - TXT Content: The generated DKIM key. - Example: v=DKIM1; g=*; k=rsa; p=MIGfMA0GCGGGGGb3DQEB(...)
- Alias: Format
-
Press Create Record.

View technical information from the Information tab:
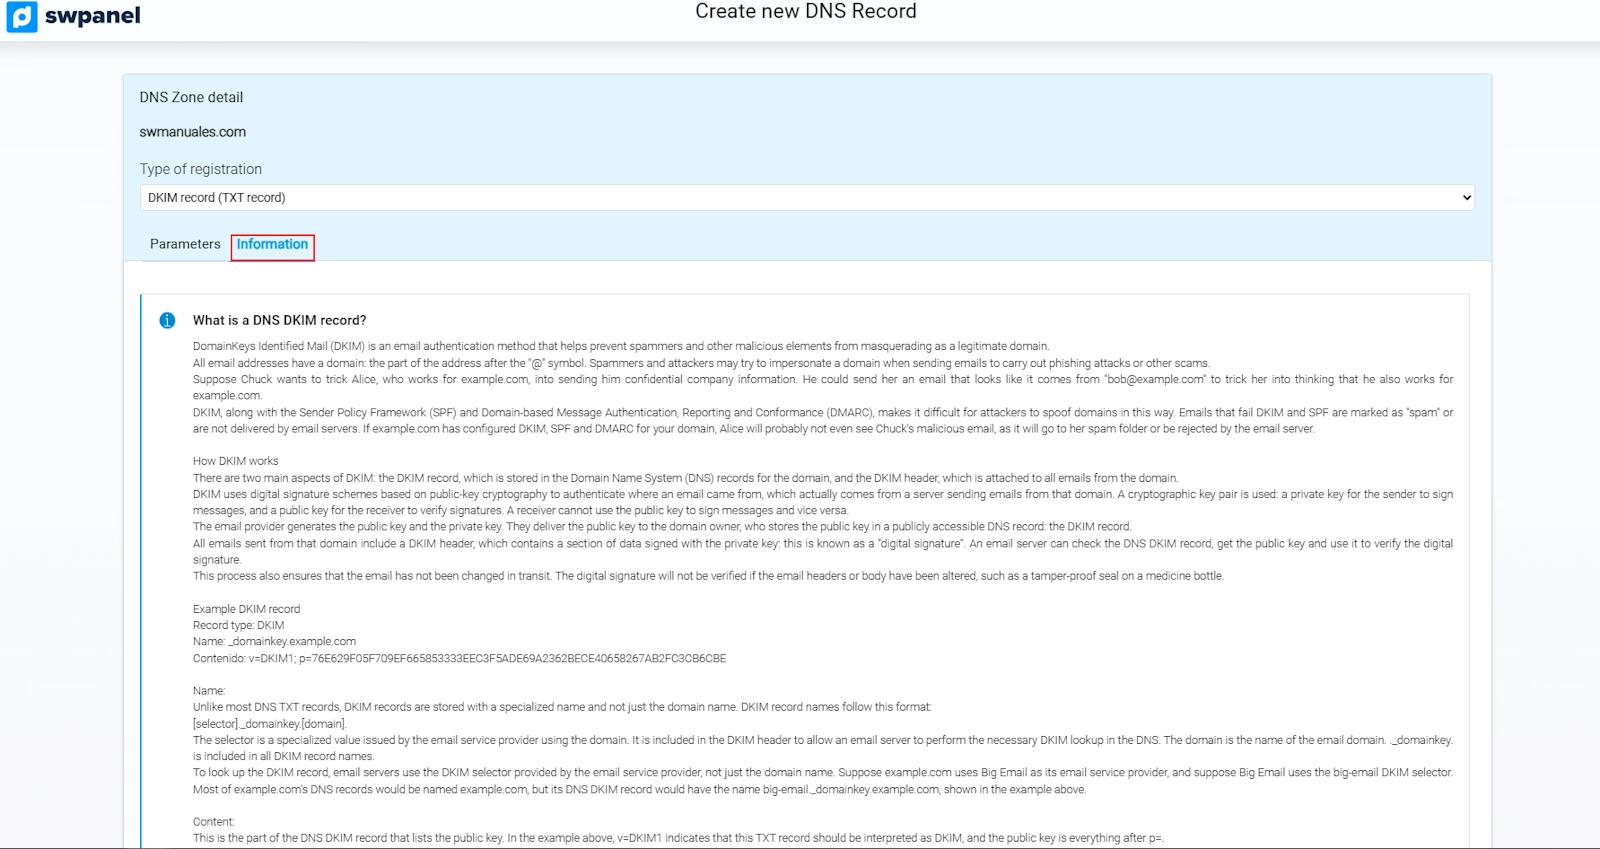
Result: An appropriate TXT record query will respond with the entered content. The recipient of an email will obtain this key to verify, unequivocally, that the sender is who they claim to be.
info The DKIM system requires additional configuration on your server or Cloud.
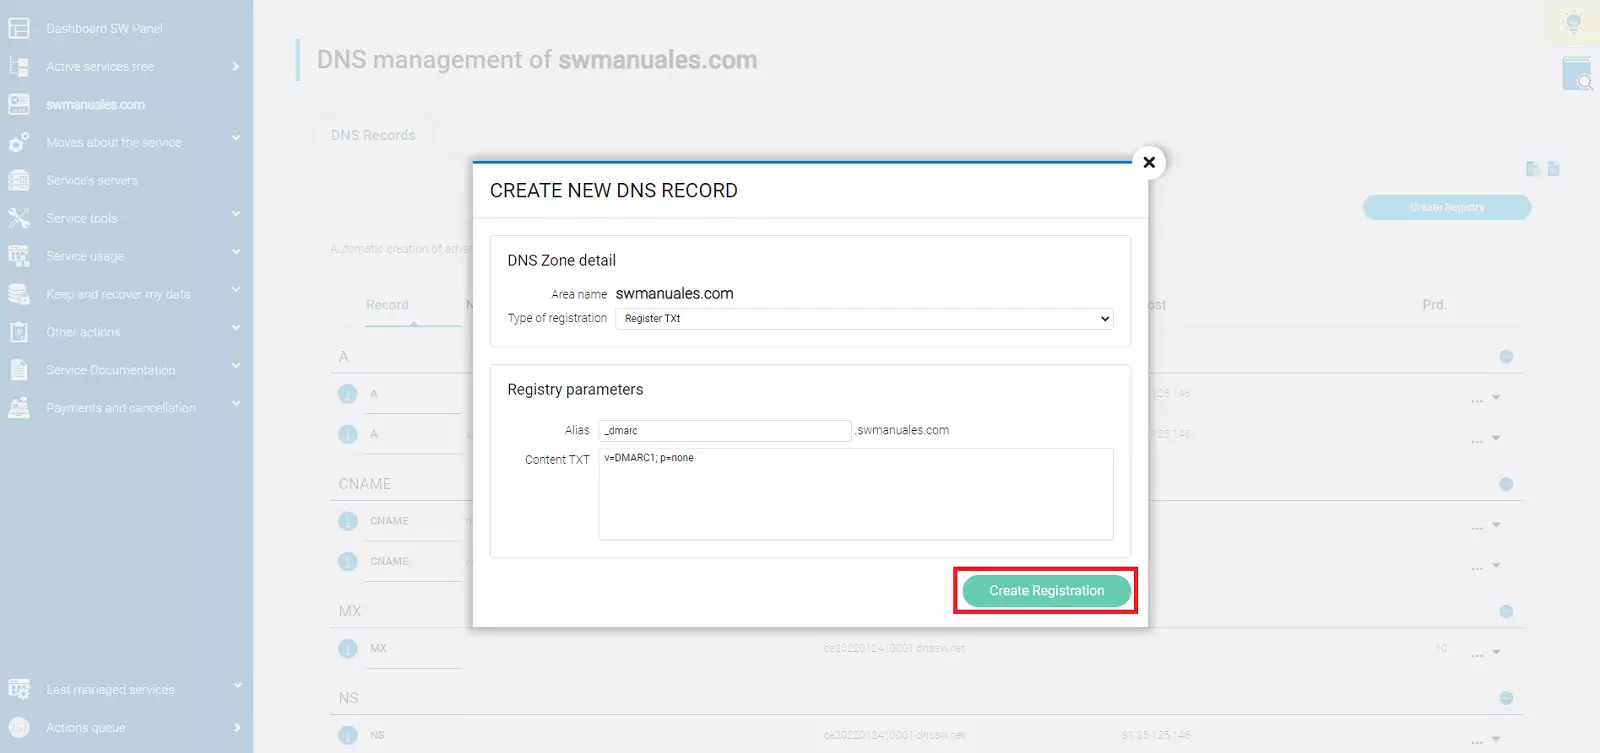
9. Create DMARC record
The DMARC (Domain-based Message Authentication, Reporting & Conformance) record complements SPF and DKIM. It defines policies for action in the event of validation failures and allows reports to be sent:
- Policy for action on suspicious emails that have not passed the two SPF and DKIM validation systems.
- Generation of aggregate reports with statistics on SPF and DKIM validation failures, among others.
- Generation of forensic reports with details on emails that fail the validation processes.
info Tools for generating DMARC rules:
https://dmarcian.com/dmarc-record-wizard/
https://mxtoolbox.com/DMARCRecordGenerator.aspx
info Important: Before creating DMARC, you must have SPF and DKIM operational.
Steps to create a DMARC record:
-
Click on Create Record.
-
Select TXT Record.
-
Complete:
- Alias:
_dmarc - TXT Content: Rule. Example:
v=DMARC1; p=none;
- Alias:
-
Click Create Record.
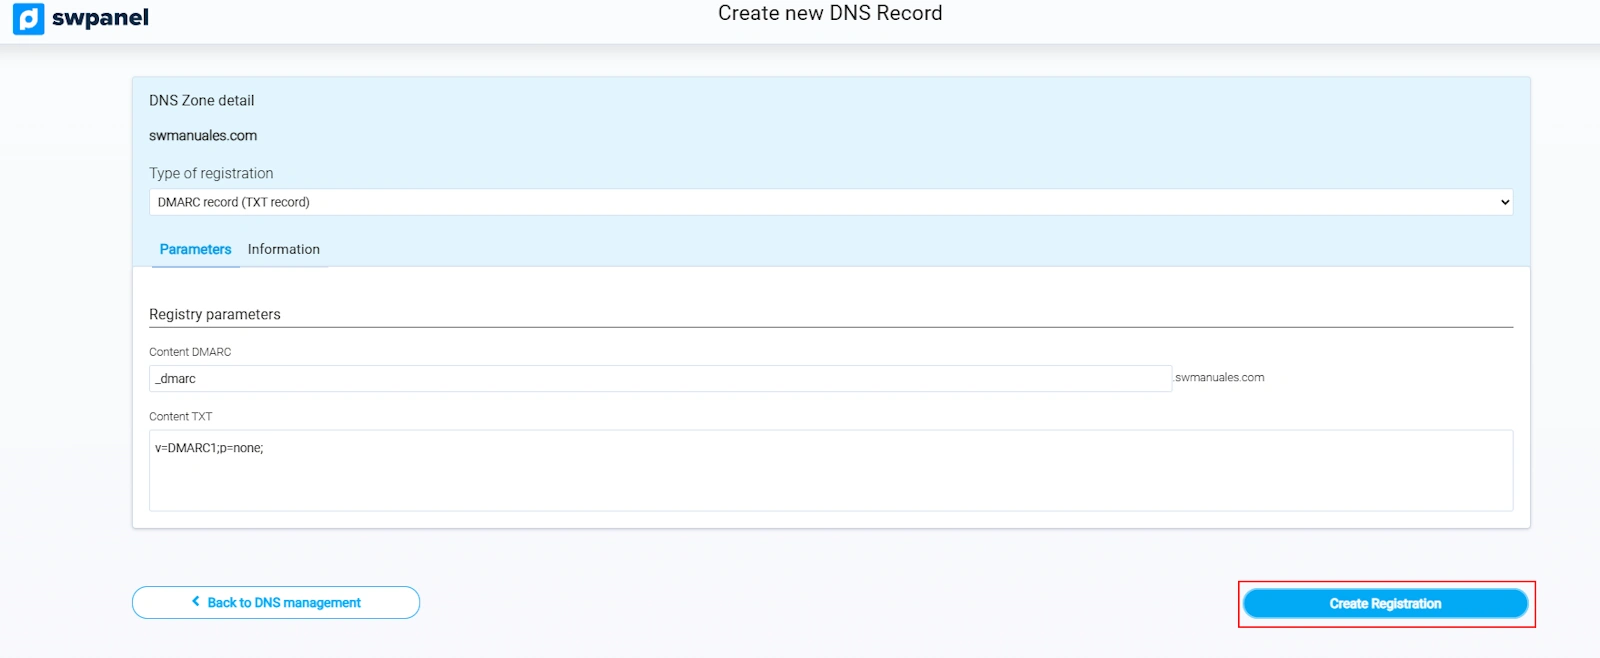
View details from the Information tab:
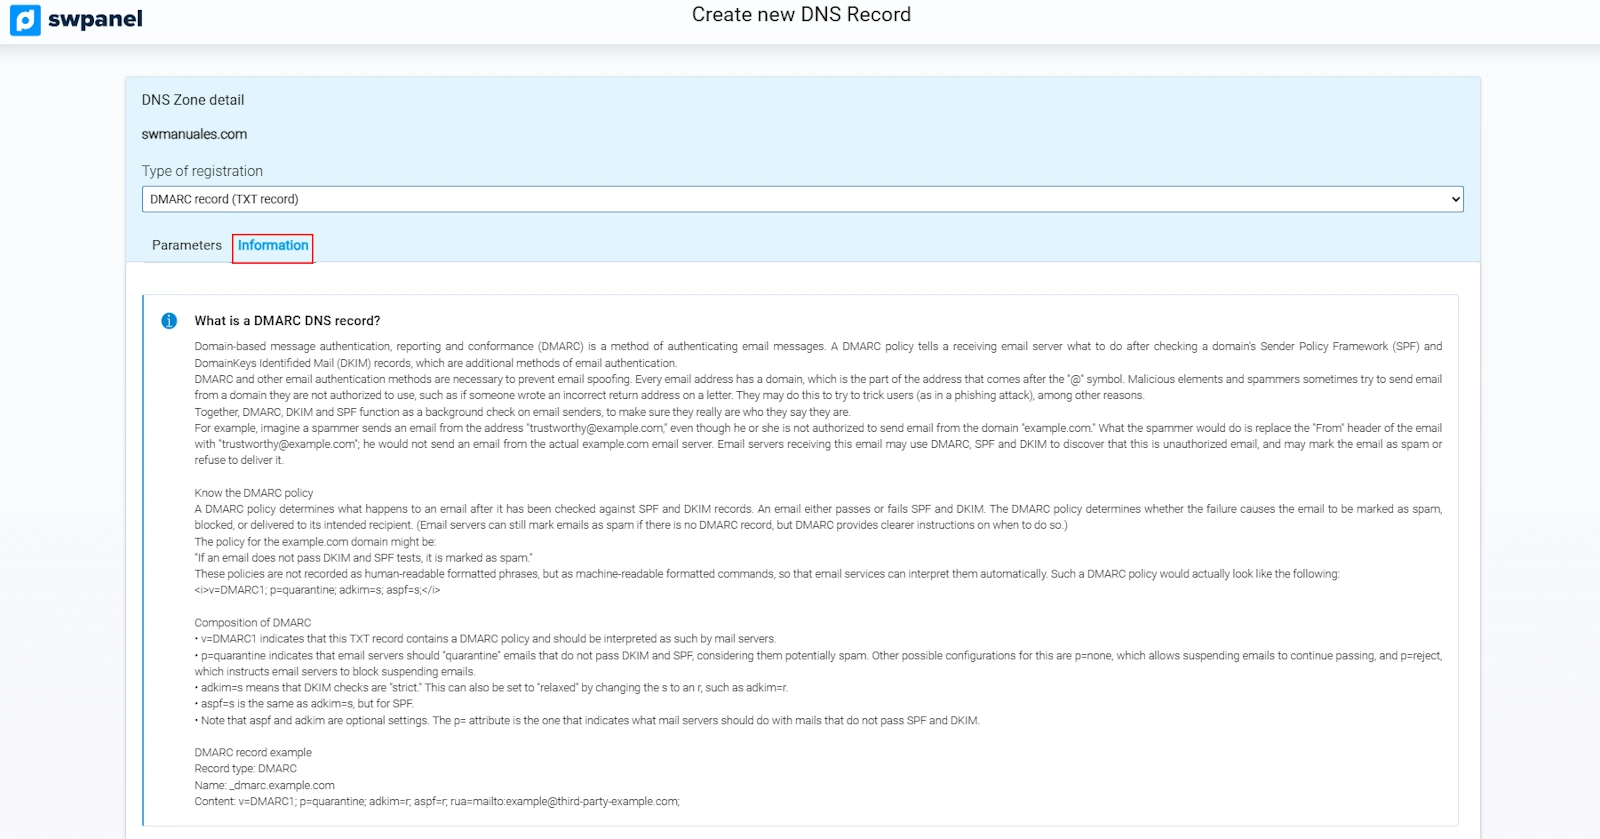
Common parameters in DMARC rules:
- v=DMARC1; - Indicates the start of the rule.
- p=none; - Monitoring and reporting policy. The email will be delivered normally, but the receiving servers will monitor behaviour and generate reports. This is used to verify functionality and check whether someone is attempting to impersonate your domain as the email sender.
- p=quarantine; - The recipient will mark emails that do not pass both validation systems (DKIM/SPF) as SPAM or place them in quarantine.
- p=reject; - The recipient will reject emails that do not pass both validation systems (DKIM/SPF).
- sp=none;/sp=quarantine;/sp=reject; - [Optional] Different policy for subdomains. If this parameter is not present, the previous parameter (‘p=none;/quarantine;/reject;’) will take effect on the domain and subdomains.
- rua=mailto:[email protected]; - [Optional] Email address to which aggregate reports should be sent.
- ruf=mailto:[email protected] - [Optional] Email address to which forensic reports should be sent.
- aspf=s - [Optional] Strict SPF validation. The domain must be identical to the one that appears in the SPF rule; subdomains of the same are not accepted.
- adkim=s; - [Optional] Strict DKIM validation. The domain must be identical to the one that appears in the SPF rule; subdomains of the same are not accepted.
Examples:
-
v=DMARC1; p=none;
-
p=none; - Monitoring and reporting policy. The rule does not include an email address for receiving reports, so no reports will be generated. The email will be delivered normally; no action will be taken on emails that do not pass the validation systems.
-
v=DMARC1; p=none; sp=reject; rua=mailto:[email protected];
-
p=none; - Monitoring and reporting policy. The email will be delivered normally; no action will be taken on emails that do not pass the validation systems.
-
sp=reject; - Emails originating from subdomains (e.g. ‘email.domainsw.com’) will be rejected if they do not pass both validation systems (DKIM/SPF).
-
rua=mailto:[email protected]; - Aggregate reports will be sent to the specified email address.
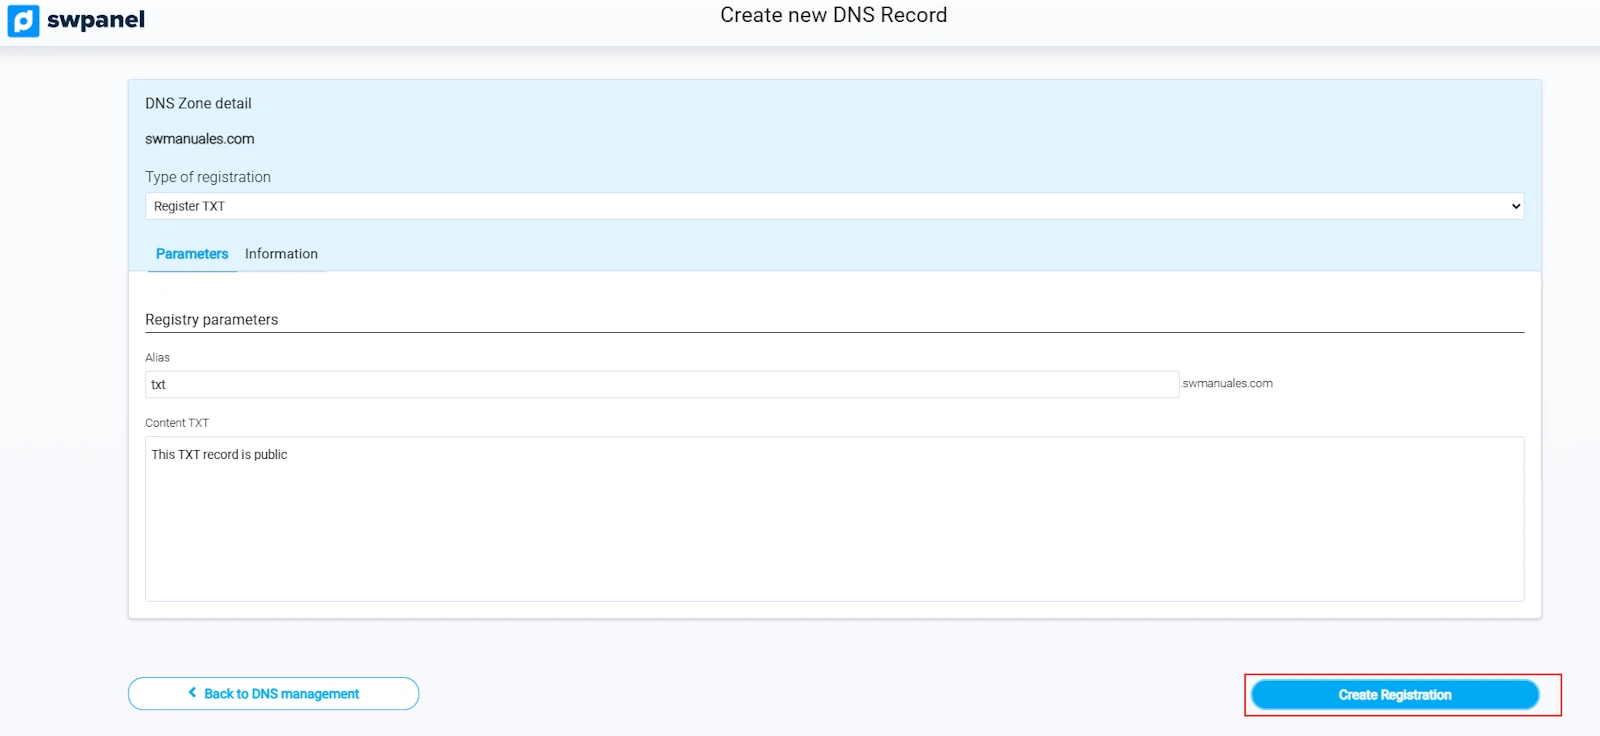
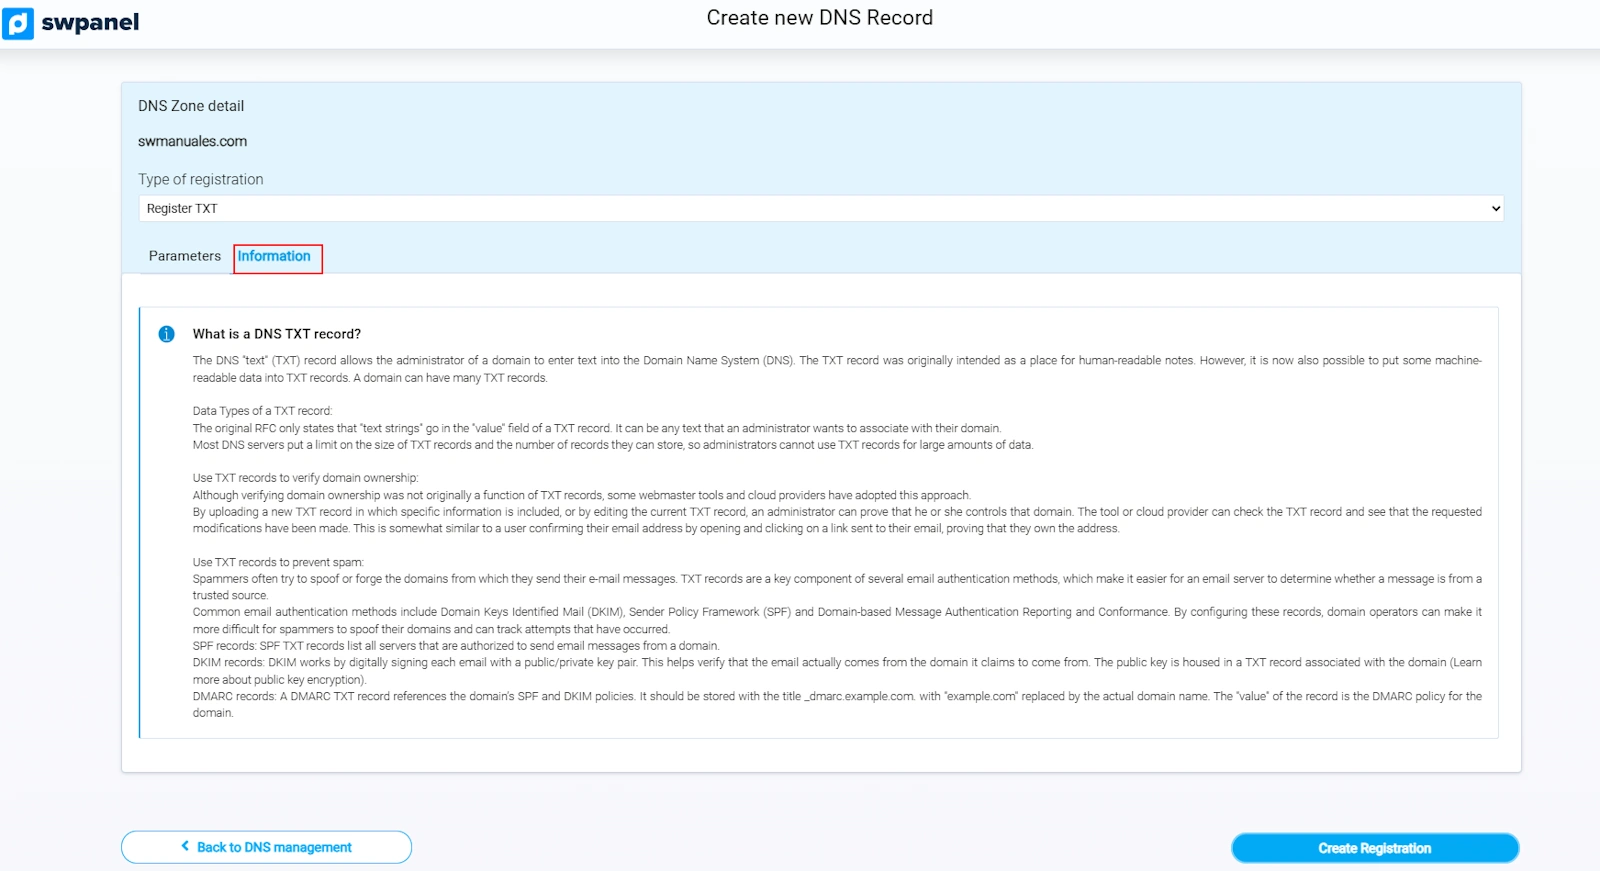
10. Create a TXT record
A TXT record allows you to include any type of text in the DNS zone. It is used for verification, configuration, or documentation purposes.
Steps to create a TXT record:
-
Click on Create Record.
-
Select TXT Record.
-
Complete:
- Alias: Identifier of the record.
- TXT Content: The text you want to include.
-
Click Create Record.
See additional information in the Information tab:
Result: An appropriate TXT record query will respond with the entered content.
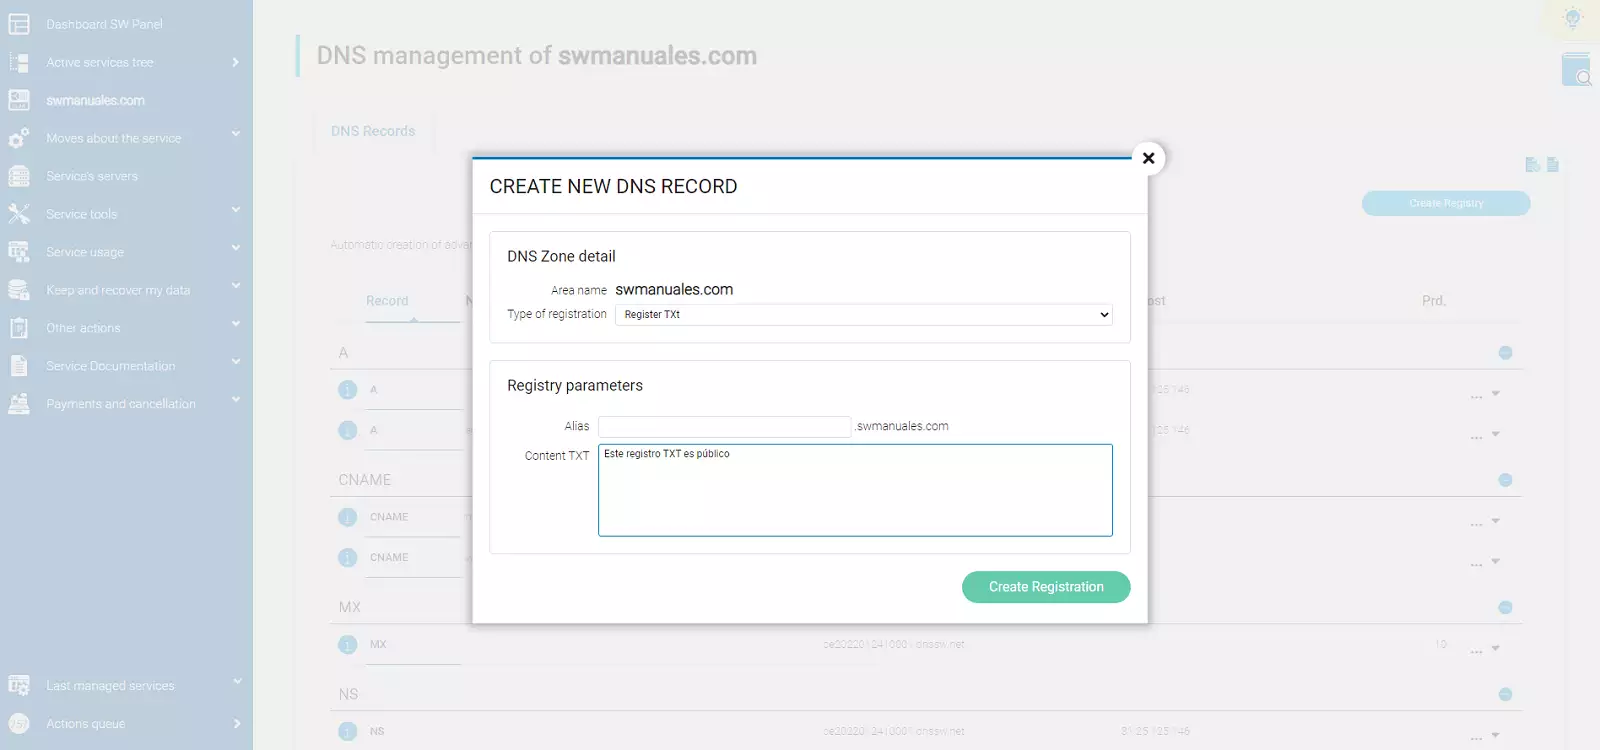
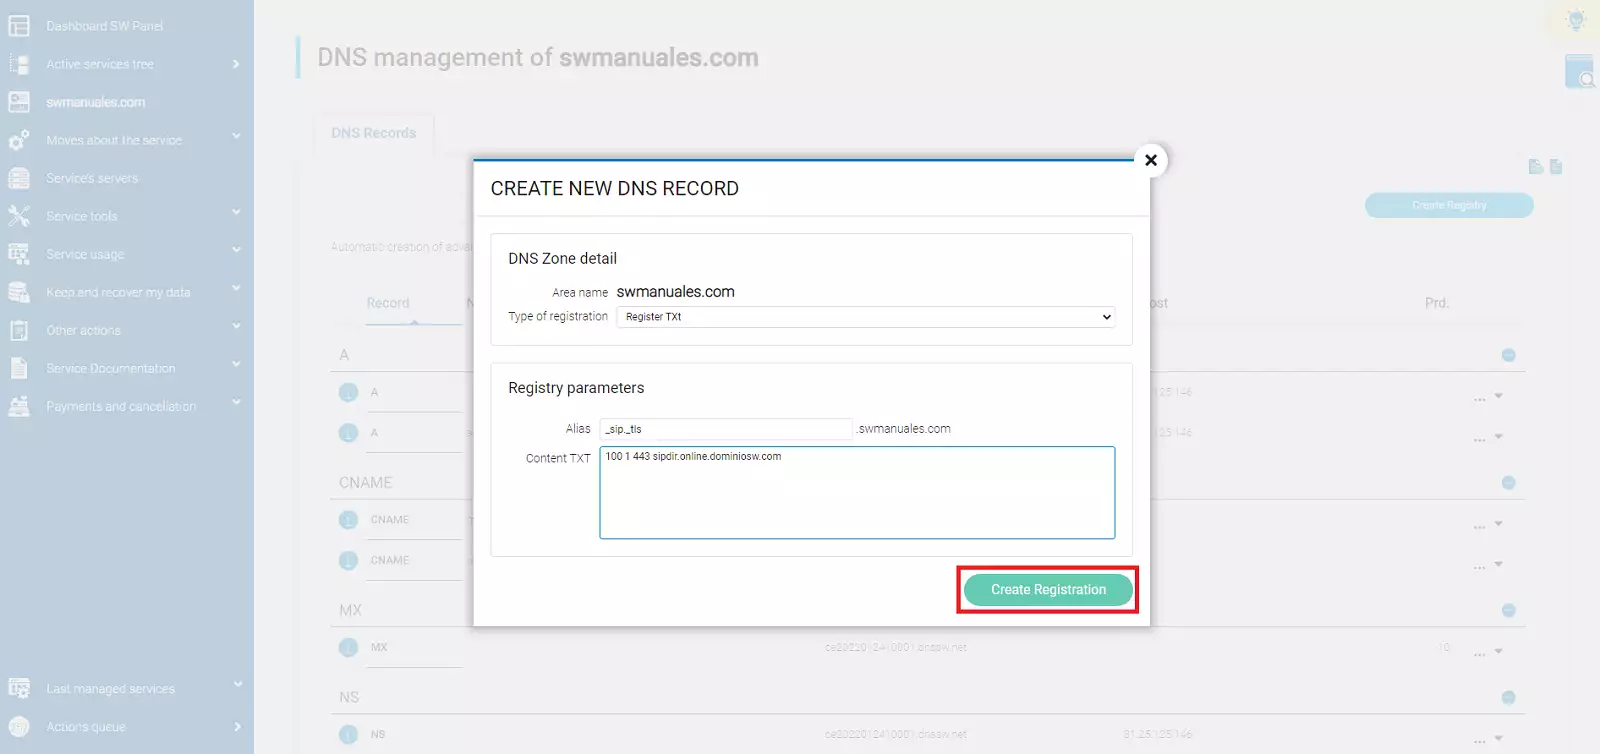
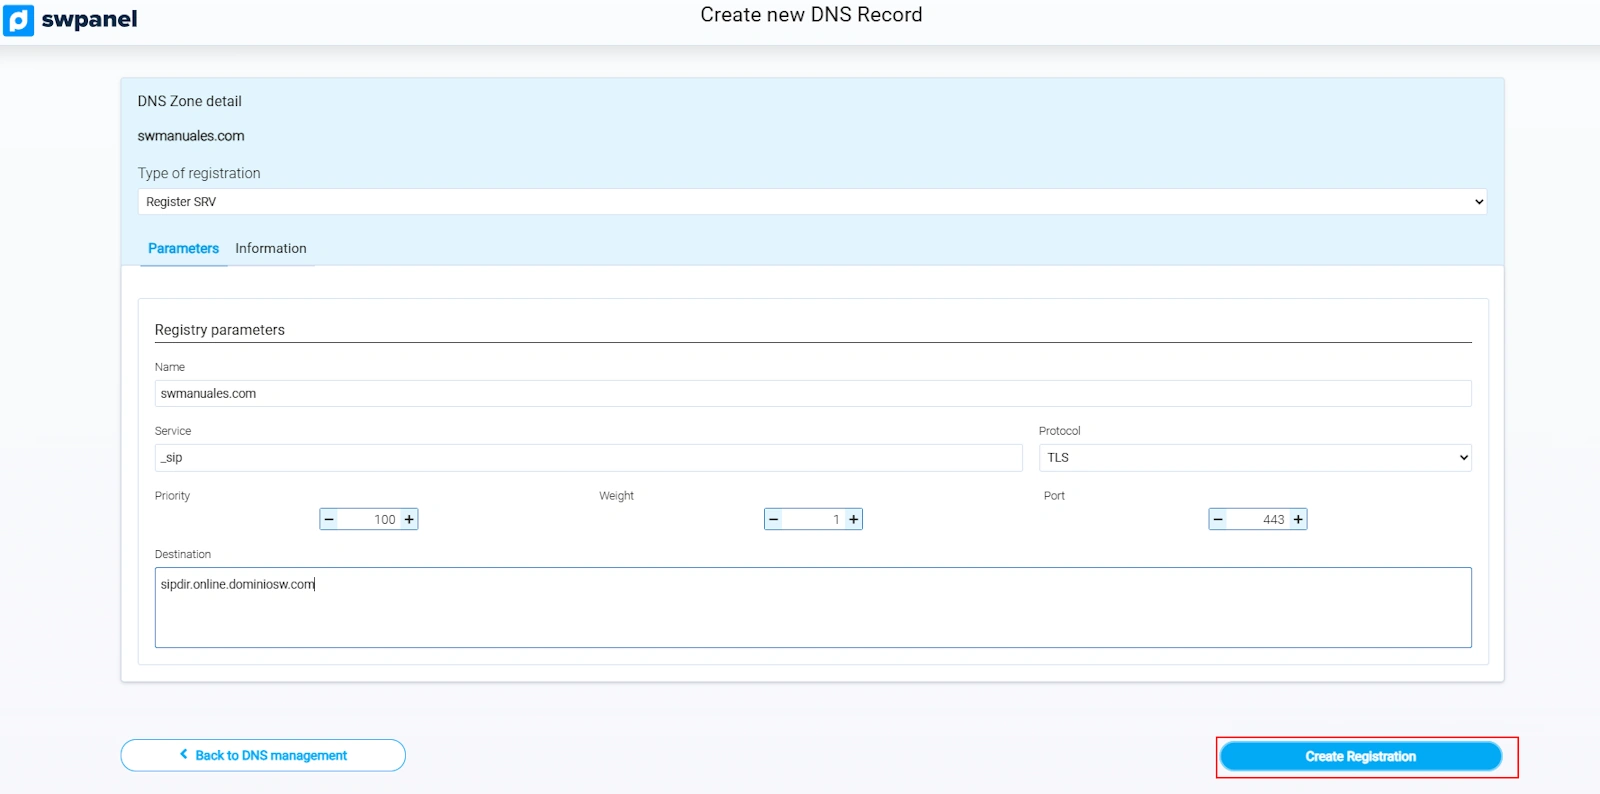
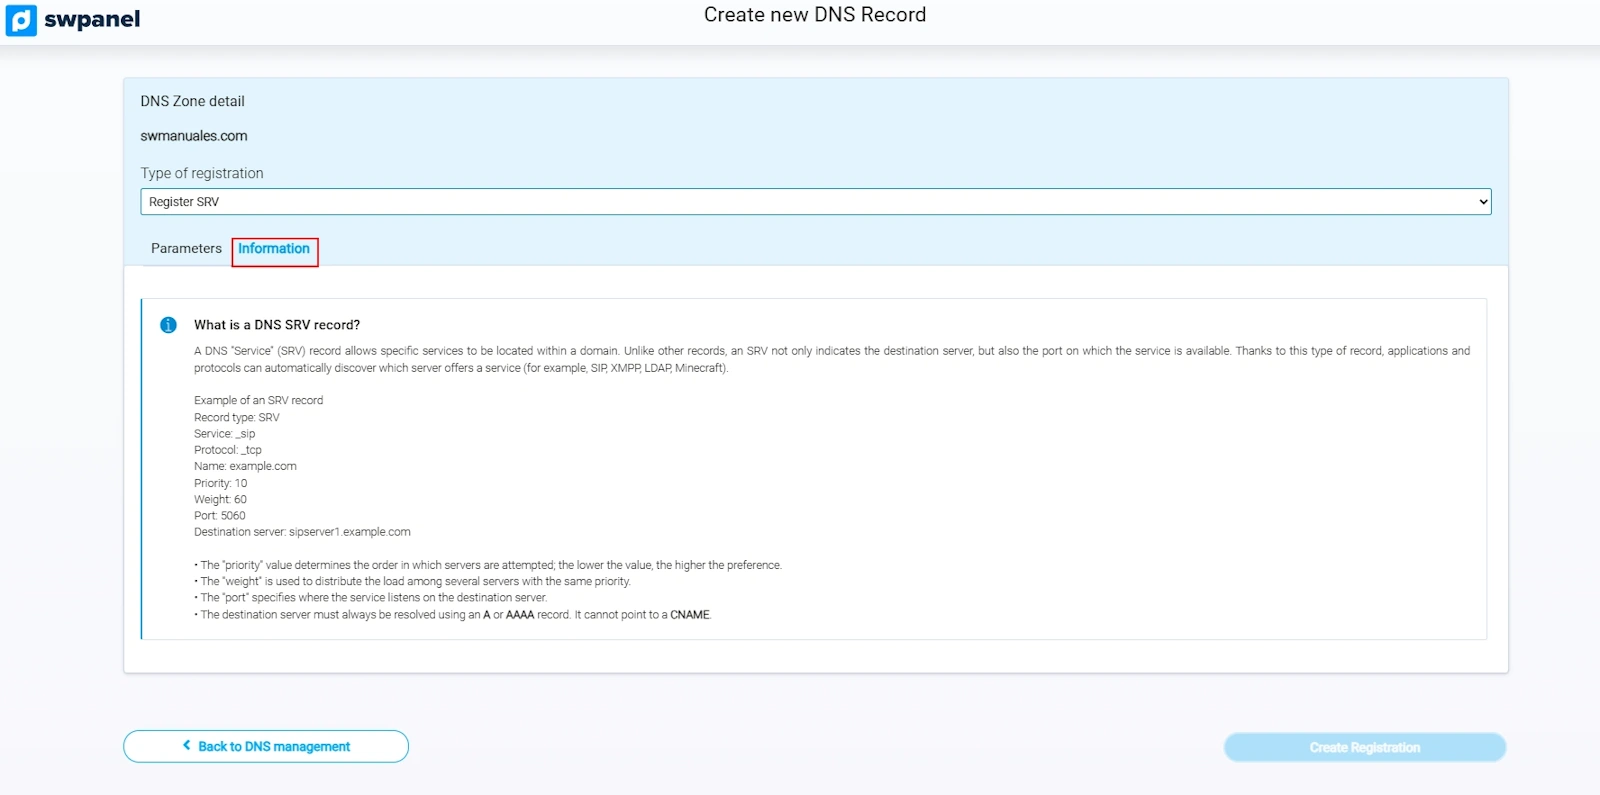
11. Create SRV record
The SRV record provides information about services available under your domain, such as telephony (SIP), messaging (XMPP) or Office365.
Example:
Service: _sip. Protocol: _tls Port: 443 Weight: 1 Priority: 100 Name: @ Destination: sipdir.online.dominiosw.com TTL: 3600
Steps to create an SRV record:
-
Click on Create Record.
-
Select SRV Record.
-
Complete:
- Alias: Service + Protocol. Example:
_sip._tls - TXT Content: Priority Weight Port Destination. Example:
100 1 443 sipdir.online.dominiosw.com.
- Alias: Service + Protocol. Example:
-
Click Create Record.
View technical information from the Information tab:
info Important: The destination domain must end with a full stop (
.), otherwise the domain name will be automatically added, causing errors.